

Thought I'd give my two cents on what I did to replace my '99 Camry XLE V6's spark plugs & spark plug wires (along with the PCV valve). It has the 1MZ-FE V6 engine with 3 coil packs on top of the front spark plugs and a secondary ignition wire connecting each coil pack to a rear spark plug.
I did NOT remove the upper manifold plenum. Would've been a total waste of time for me given how easy it was to do with it in place (to me anyways). I've worked on other FWD vehicles and accessing the rear plugs on certain other makes were more "difficult" (ie took more time, sometimes way more time) compared to this Gen 4 Camry.
All that chatter aside, let's get down to work!
TOOLS:
10mm socket or wrench
5mm Allen head socket, or an L, or a T handle allen wrench
Flat blade screwdriver assortment, both regular and very small ones
16mm or 5/8" spark plug socket with a rubber insert to hold the spark plug into the socket
3/8" drive socket driver wrench. NOTE: if you have a swivel handle socket driver wrench, this will make your life SO much easier. To make your life even easier yet is if it also has a socket/extension push button release on it.
3/8" drive assortment of 3" extensions, I used up to three 3" extensions.
In lb. and ft. lb torque wrenches (can get by with just an in lb. wrench since the needed torque setting isn't very high)
PARTS:
6 spark plugs: either Denso PK20TR11 or NGK BKR6EKPB11, I chose NGKs.
Set of spark plug wires: I chose NGK part # RC-TE65
Optional: PCV valve, I chose a Toyota OEM one because of bad experiences with aftermarket ones in the past in all kinds of makes and models of cars. Usually resulting in oil blowbying into the air box, onto the ground, or out the exhaust (ie oil burning). Toyota OEM part # 12204-20010, $8.25 retail.
STEPS to Changing the Spark Plugs & Wires:
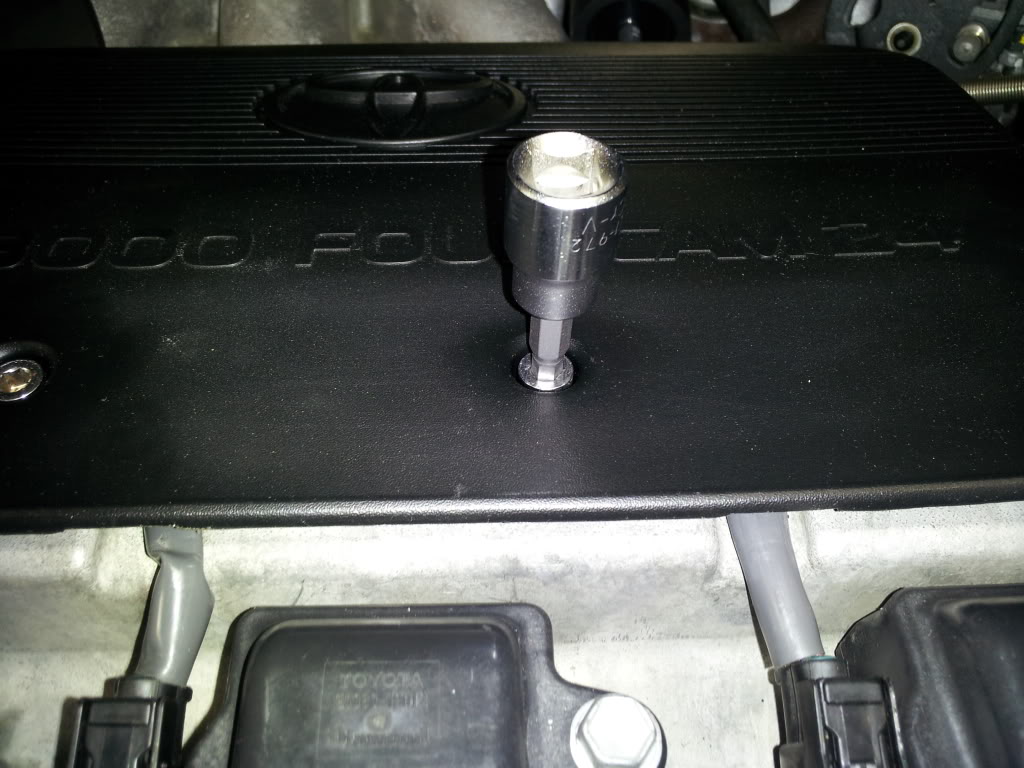
1) Remove the fuel rail cover by loosening the two 5mm allen head screws and then grasp the rearward sides of the cover and pull upward to release the hold down clips.
View of the 5mm Socket Bit on the allen screw:
![Image]()
View of the cover lifted up; note where it was attached:
![Image]()
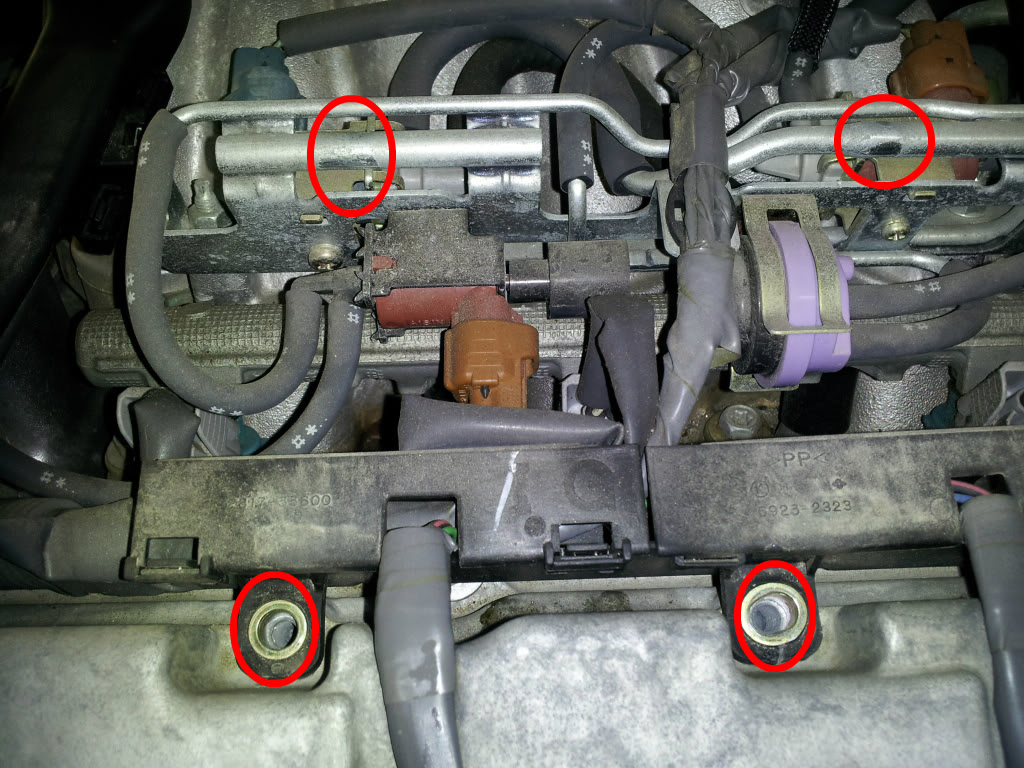
View of where the cover was attached:
![Image]()
2) Remove the spark plug wires by:
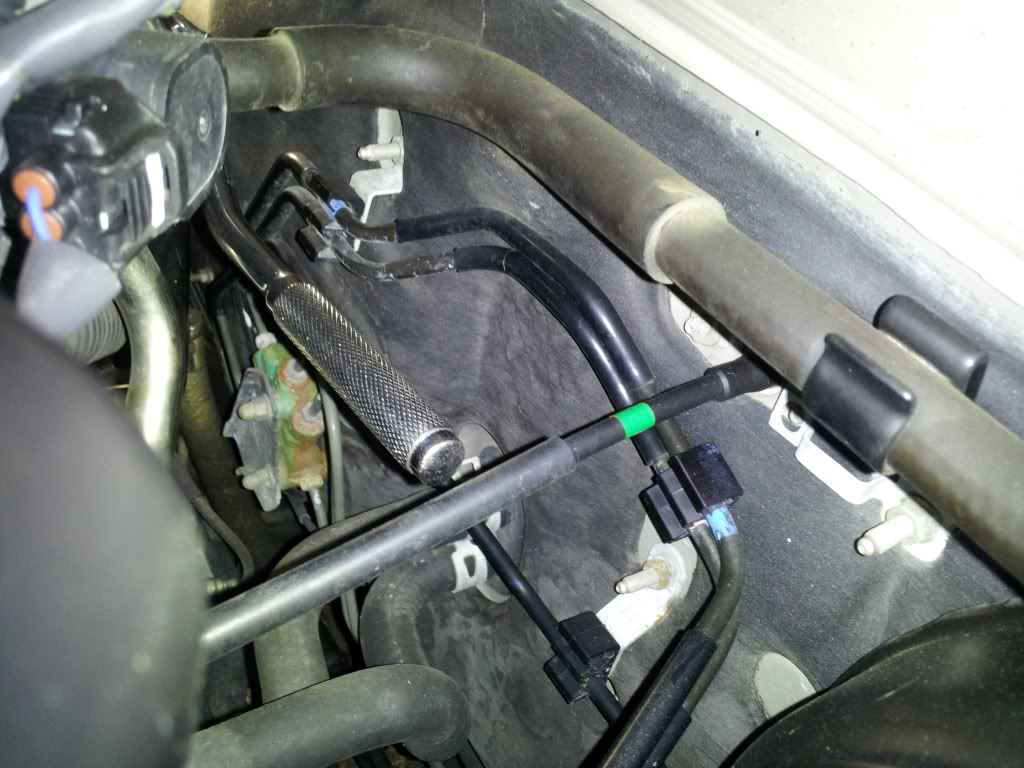
--a) first carefully studying the routing of the wires and how the loom is connected
View of the Wire Loom:
![Image]()
Another View:
![Image]()
--b) then unclip the coil wires by using a screwdriver and pulling out on the tab and then lifting up on the connector off each coil.
View of where the screwdriver is placed:
![Image]()
--c) then remove the 10mm screw located next to the left side ignition coil that holds the plastic wire loom, you'll need to push the wiring to the coil out of the way to reach it.
View of the wire pushed aside to show the screw:
![Image]()
--d) then remove the clip holding the loom at the top side by pulling out on the clip and pulling up
View of the Loom clip separated:
![Image]()
--e) then remove the vacuum line off the loom.
View of vacuum line separated off the loom:
![Image]()
--f) then remove the rearward hold-down clip by using a pair of needlenose pliers and pinching the tabs together and lifting up on the wire loom
View of the rearward loom clip with pliers in use pinching locking tabs together:
![Image]()
View of the rearward loom clip separated from its stay:
![Image]()
--g) then locate the PCV valve and depress the hose clamp and slide it back and then remove the hose off the PCV valve. On my car, the hose had been disturbed and wasn't properly installed onto the valve, so it simply came off super easy.
View of PCV hose separated off the PCV valve:
![Image]()
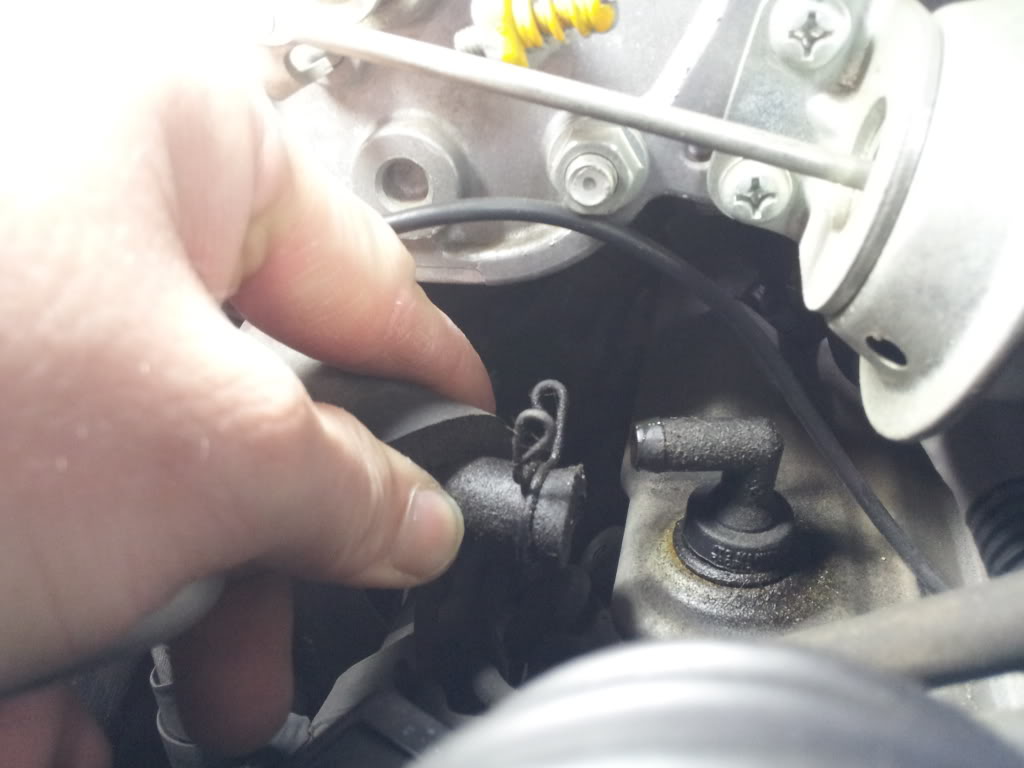
--h) then grasp the PCV hose firmly and see if it'll pull off of the intake manifold plenum as mine did. Otherwise you'll have to try and reach under there and grasp the clamp and try to slide it back so you can pull off the hose off the manifold plenum. You could then remove the PCV valve and tape over the hole, but IMO it wasn't really in the way so I left it there.
View of me grasping the PCV hose and removing it:
![Image]()
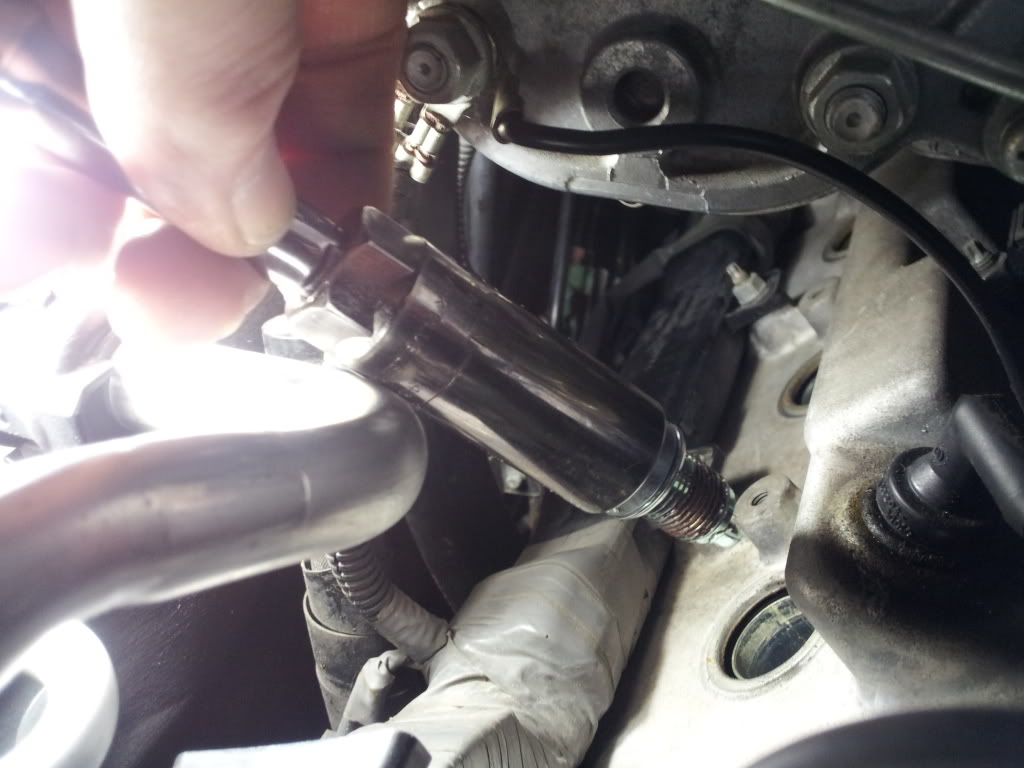
--i) then twist and pull up on each of the spark plug wire connectors off each of the rear cylinder spark plugs. I reached the two left side connectors from the passenger side and the right side connector from the driver side.
View of the spark plug wire connector to cylinder #1 from the passenger side:
![Image]()
View of the #3 & #5 Connectors from the passenger side:
![Image]()
View of me about to remove the #1 connector (BTW which very easy to get to):
![Image]()
View of me reaching in and breaking connector #3 loose from the passenger side:
![Image]()
Another view of me breaking #3 loose from the passenger side:
![Image]()
View of me reaching in from the driver's side to remove connector #5:
![Image]()
Another view looking thru the manifold plenum removing #5:
![Image]()
Removing #5:
![Image]()
#5 Removed:
![Image]()
--j) then remove the wires by carefully "snaking" them out through the passenger side. I also used compressed air to blow air into the tube wells to help clean them of debris that could drop into the engine when removing the spark plugs.
3) Remove the old and install new rear spark plugs:
--a) the two left most plugs were the easiest to remove and install. I used a 5/8" spark plug socket (which has a rubber insert that holds the spark plug firmly in place inside the socket) and attached 3" extensions to it and my socket driver.
--b) reaching in from the passenger side set the socket and one 3" extension down onto the #1 spark plug.
--c) then attach a second 3" extension to the first and make sure it's connected securely to the first extension and then make sure that the socket has dropped and locked down all the way onto the spark plug.
View of the second 3" extension installed:
![Image]()
I then attached my 3/8" drive socket driver (which has a swivel handle) and removed the #1 cylinder's spark plug.
--d) then remove the #3 spark plug in the same manner.
View of the socket swivel head driver removing #3 plug:
![Image]()
Both #1 & #3 spark plugs came out super easy, not tight at all. Just know that you'll have to separate one by one the socket driver off the top extension and then remove the top 3" extension in order to have enough clearance to remove the spark plug, socket, and first 3" extension. Installation simply was the reverse of removal. I like a dab of antiseize but some folks swear by not using it, so make your own judgement call.
View of the old Denso vs. new NGK plugs:
![Image]()
View of me getting ready to install the cylinder #1 spark plug with antiseize on the threads:
![Image]()
Just make sure to hand thread the spark plugs into the cylinder head first before using your socket driver, they should thread in super easy, any immediate resistance might mean you're "cross-threading" it. If you have a torque wrench and and an assortment of extension sizes and can get it all back behind there, tighten to 13 ft lbs (or 156 in lbs). I was barely able to get my 1/4" torque wrench back there to #3 plug, #1 was cake.
--e) the right side rear spark plug also wasn't too bad. I attached two 3" extensions to my socket and reaching in from the driver's side I set it onto the spark plug making sure the socket was all the way on.
View from above of socket and two 3" extensions installed onto #5 spark plug:
![Image]()
Then I attached a third 3" extension and then my swivel handle 3/8" socket driver and I removed the spark plug.
View of the socket wrench reaching #5:
![Image]()
Another view of socket wrench reaching #5:
![Image]()
Another view of socket wrench reaching #5:
![Image]()
Just like the other 2 plugs, you'll have to separate the socket driver & the top extension from the rest of the extentions in order to get enough clearance to get the socket and spark plug out.
4) And now for the easy ones, remove the old and install the new FRONT cylinder head spark plugs:
--a) Depress the release tab on the wire connector and pull firmly off each of the coils.
View of connector separated from the coil:
![Image]()
--b) then using a 10mm socket remove the screw holding the coil assembly to the engine.
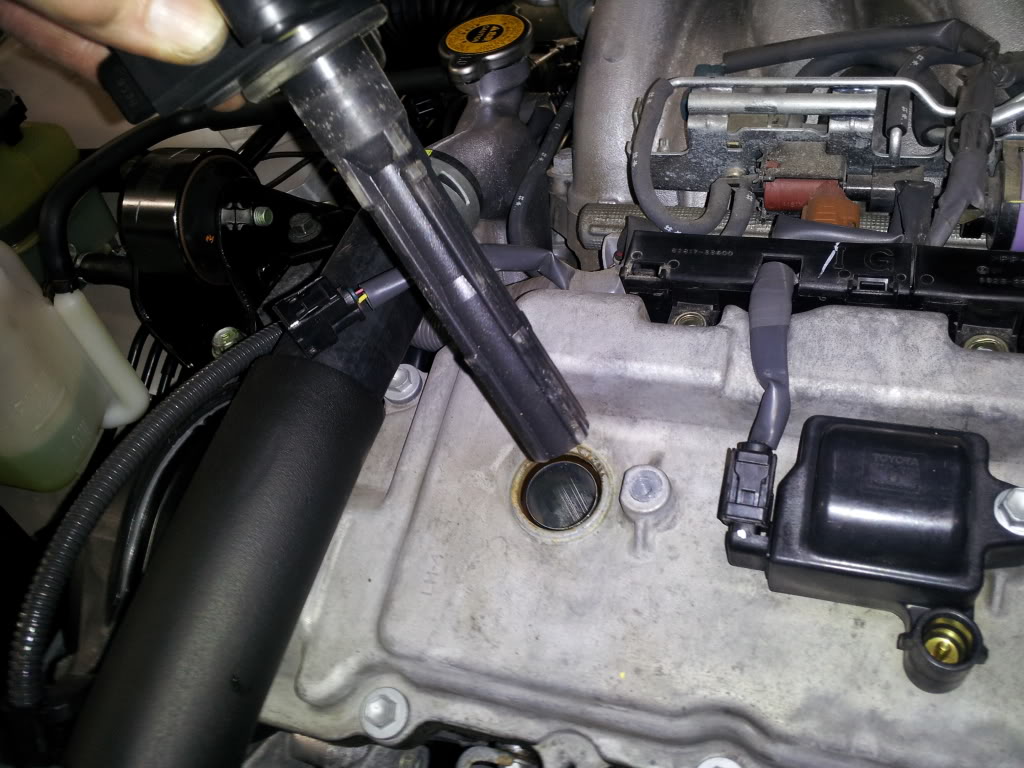
--c) then twist the coil to help it break free of the spark plug and then pull firmly and straight up.
View of coil pack separated from the spark plug:
![Image]()
--d) I used two 3" extensions along with my 5/8" socket and driver to remove the front spark plugs. Same torque setting at 13 ft lbs (or 156 in lbs) when tightening the new plugs.
--e) Install the coils onto the spark plugs and align them with their screw holes and push down firmly. Tighten the 10mm head screws to only 69 in lbs. Reconnect the coil wire connectors.
5) Install new spark plug wires:
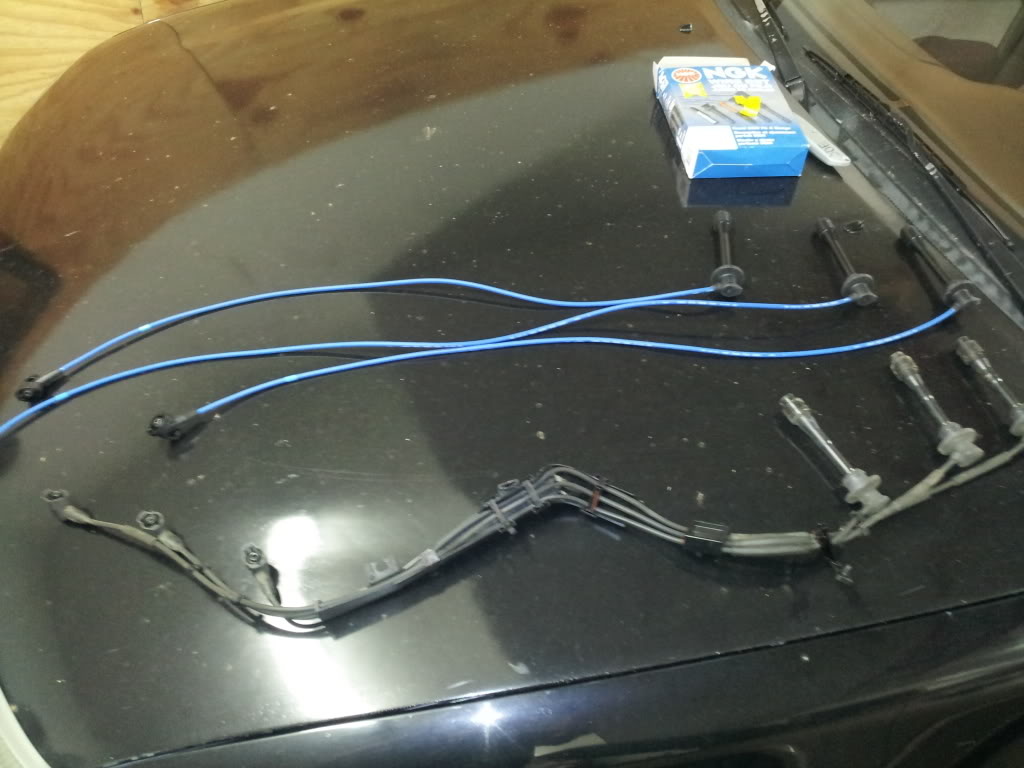
--a) I laid out the old spark plug wires/loom assembly as well as the new wires to get an idea of how things will go together. Thankfully NGK had taped a number on each wire let you know where it should go") .
.
View of the old wire loom next to the new NGK wires:
![Image]()
--b) I used one or two small screwdrivers in order to separate the plastic hold-down clips on the loom assembly. Just take your time and one by one each wire separator/holddown tab will need to be unclipped so you can take each one of them off to allow you to remove and install the wires into the loom. Everything came apart fine with my loom assembly. I will admit it did take quite a bit of fiddling before I finally got the idea of what I needed to do to get them to separate.
A view of the two screwdrivers I used to separate the wire loom pieces:
![Image]()
View of one of the separators detached:
![Image]()
--c) Once I got all the separator/holders off, I removed one wire at a time when exchanging it with a new wire in the loom. I used the "witness marks" on the old wires to get an idea exactly where each of the new wires were to be located in the loom. If you took pictures beforehand, you'll be glad you did if you did a slight screw-up as I did, I had one of the wires on the wrong side of one of the wire holders, but it really wasn't a huge deal as I believe it would've worked fine.
View on the new wires installed into the loom:
![Image]()
Another view:
![Image]()
Another view:
![Image]()
Completed wire loom assembly:
![Image]()
--d) Once you have everything together with the loom assembly, place it on the engine and then lay everything out and then start by getting the wires in their proper locations before connecting stuff.
--e) I started by dropping the rear wires into the tube wells and then fiddled a bit with the wires back there until they seemed to be in their "proper" positions so that the wires weren't touching anything they shouldn't be or in a bind. I then clipped the plastic loom assembly into place starting with the rearward clip and then the clip on top. Then I fiddled some more with the wires and then finally after I was happy I snapped each of the rear connectors into place onto the spark plugs. I was able to get to the two left wires from the passenger side, the right one from the driver's side.
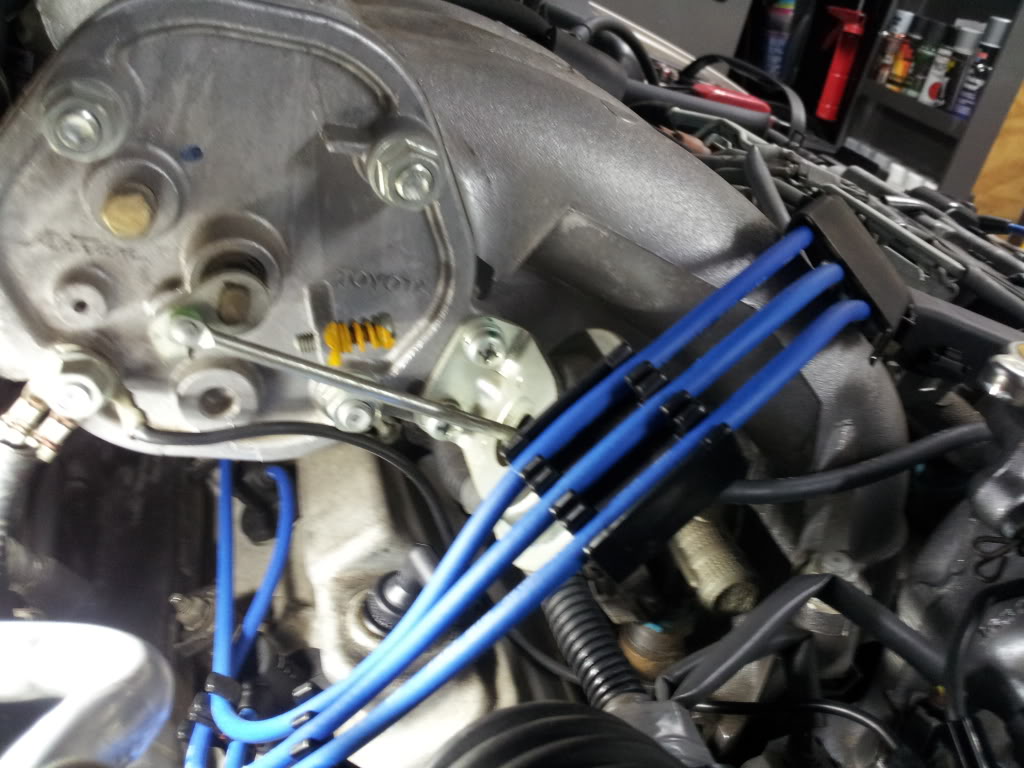
View of the wire loom installed:
![Image]()
Another view showing the connectors installed onto the spark plugs:
![Image]()
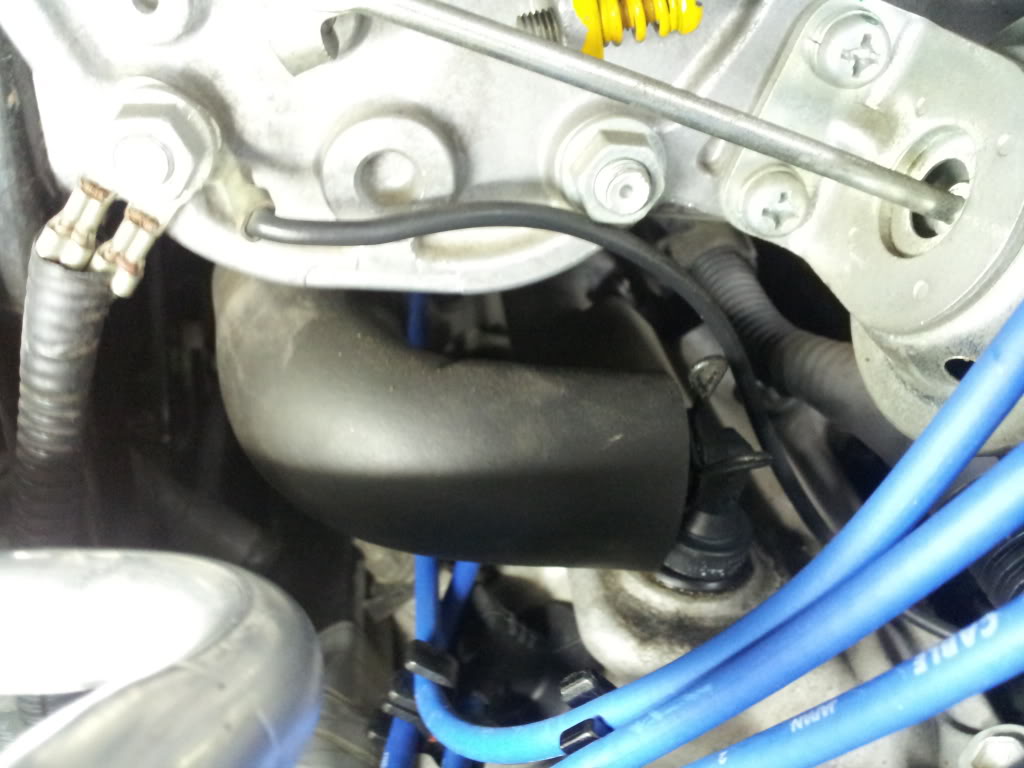
--f) Then connect the PCV hose onto the manifold plenum and then onto the PCV valve. Don't forget to slide the hose clamps back to their original locations. I installed a new PCV valve as the old one was suspect as it didn't make much noise when shaken compared to the new one. I had assumed perhaps that carbon had built up inside of it and perhaps it may be restricted as well.
View of the PCV hose installed onto the PCV valve:
![Image]()
Another view:
![Image]()
--g) then install the wire loom support 10mm screw you removed earlier from Step 2 c) and tighten snugly.
--h) Then I connected the spark plug wires to the coils. Make sure you have the connectors in their proper positions before trying to force them onto the coils. I had two of the rubber parts of the connector out of alignment with the hard plastic parts.
View of the the wiring all connected:
![Image]()
6) Now that all is left is the fuel rail cover. Just simply align it so that the screws start to take into the threads and then push firmly on the back side until the clips attach. Then tighten the front 5mm allen head screws, but don't overtighten them, just snug 'em down.
View of me pushing down on the left side to get the clips to snap on:
![Image]()
View of me pushing down on the right side:
![Image]()
View of me tightening the screws with the socket driver:
![Image]()
Do another once over and make sure everything looks ship shape.
View of the completed job:
![Image]()
Start up the car and see how you did.
That's all I got! Now partake of your favorite frosty beverage (or hot beverage if you just came in from the outside in sub freezing weather.) BTW I have more pics at my PostImage site if you want to spend some time looking thru them all (over 80 of them!)
https://postimg.cc/gallery/2a3bxeeka/
I did NOT remove the upper manifold plenum. Would've been a total waste of time for me given how easy it was to do with it in place (to me anyways). I've worked on other FWD vehicles and accessing the rear plugs on certain other makes were more "difficult" (ie took more time, sometimes way more time) compared to this Gen 4 Camry.
All that chatter aside, let's get down to work!
TOOLS:
10mm socket or wrench
5mm Allen head socket, or an L, or a T handle allen wrench
Flat blade screwdriver assortment, both regular and very small ones
16mm or 5/8" spark plug socket with a rubber insert to hold the spark plug into the socket
3/8" drive socket driver wrench. NOTE: if you have a swivel handle socket driver wrench, this will make your life SO much easier. To make your life even easier yet is if it also has a socket/extension push button release on it.
3/8" drive assortment of 3" extensions, I used up to three 3" extensions.
In lb. and ft. lb torque wrenches (can get by with just an in lb. wrench since the needed torque setting isn't very high)
PARTS:
6 spark plugs: either Denso PK20TR11 or NGK BKR6EKPB11, I chose NGKs.
Set of spark plug wires: I chose NGK part # RC-TE65
Optional: PCV valve, I chose a Toyota OEM one because of bad experiences with aftermarket ones in the past in all kinds of makes and models of cars. Usually resulting in oil blowbying into the air box, onto the ground, or out the exhaust (ie oil burning). Toyota OEM part # 12204-20010, $8.25 retail.
STEPS to Changing the Spark Plugs & Wires:
1) Remove the fuel rail cover by loosening the two 5mm allen head screws and then grasp the rearward sides of the cover and pull upward to release the hold down clips.
View of the 5mm Socket Bit on the allen screw:
View of the cover lifted up; note where it was attached:
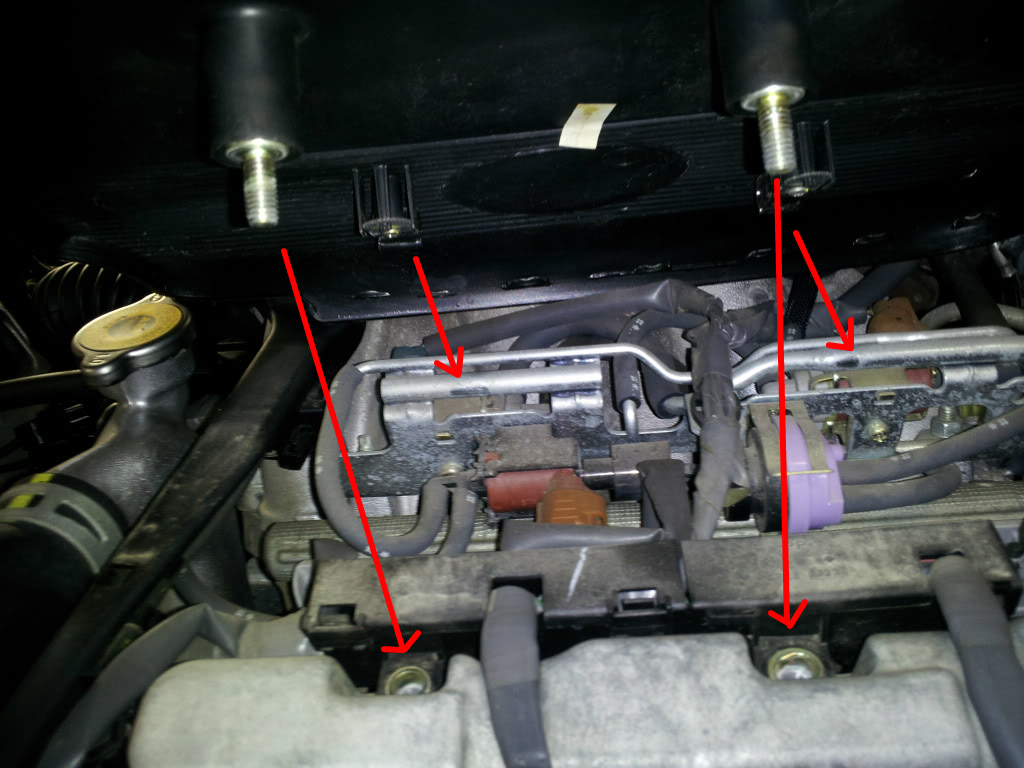
View of where the cover was attached:
2) Remove the spark plug wires by:
--a) first carefully studying the routing of the wires and how the loom is connected
View of the Wire Loom:
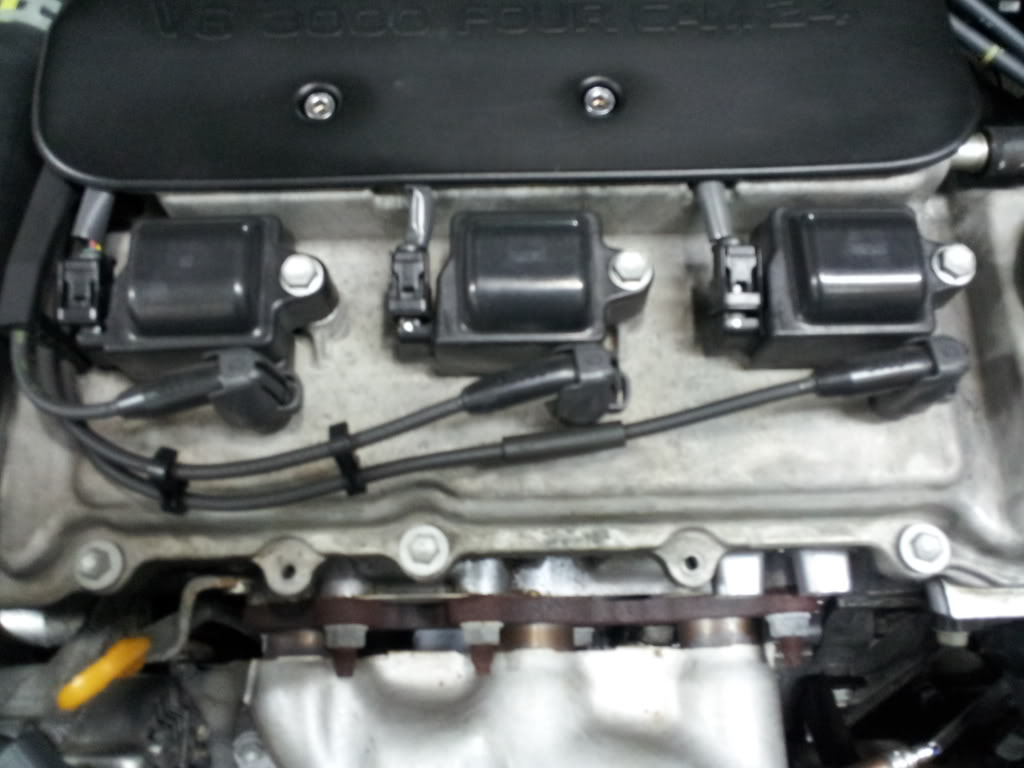
Another View:

--b) then unclip the coil wires by using a screwdriver and pulling out on the tab and then lifting up on the connector off each coil.
View of where the screwdriver is placed:

--c) then remove the 10mm screw located next to the left side ignition coil that holds the plastic wire loom, you'll need to push the wiring to the coil out of the way to reach it.
View of the wire pushed aside to show the screw:

--d) then remove the clip holding the loom at the top side by pulling out on the clip and pulling up
View of the Loom clip separated:

--e) then remove the vacuum line off the loom.
View of vacuum line separated off the loom:

--f) then remove the rearward hold-down clip by using a pair of needlenose pliers and pinching the tabs together and lifting up on the wire loom
View of the rearward loom clip with pliers in use pinching locking tabs together:

View of the rearward loom clip separated from its stay:

--g) then locate the PCV valve and depress the hose clamp and slide it back and then remove the hose off the PCV valve. On my car, the hose had been disturbed and wasn't properly installed onto the valve, so it simply came off super easy.
View of PCV hose separated off the PCV valve:
--h) then grasp the PCV hose firmly and see if it'll pull off of the intake manifold plenum as mine did. Otherwise you'll have to try and reach under there and grasp the clamp and try to slide it back so you can pull off the hose off the manifold plenum. You could then remove the PCV valve and tape over the hole, but IMO it wasn't really in the way so I left it there.
View of me grasping the PCV hose and removing it:

--i) then twist and pull up on each of the spark plug wire connectors off each of the rear cylinder spark plugs. I reached the two left side connectors from the passenger side and the right side connector from the driver side.
View of the spark plug wire connector to cylinder #1 from the passenger side:

View of the #3 & #5 Connectors from the passenger side:

View of me about to remove the #1 connector (BTW which very easy to get to):

View of me reaching in and breaking connector #3 loose from the passenger side:

Another view of me breaking #3 loose from the passenger side:

View of me reaching in from the driver's side to remove connector #5:

Another view looking thru the manifold plenum removing #5:

Removing #5:

#5 Removed:

--j) then remove the wires by carefully "snaking" them out through the passenger side. I also used compressed air to blow air into the tube wells to help clean them of debris that could drop into the engine when removing the spark plugs.
3) Remove the old and install new rear spark plugs:
--a) the two left most plugs were the easiest to remove and install. I used a 5/8" spark plug socket (which has a rubber insert that holds the spark plug firmly in place inside the socket) and attached 3" extensions to it and my socket driver.
--b) reaching in from the passenger side set the socket and one 3" extension down onto the #1 spark plug.
--c) then attach a second 3" extension to the first and make sure it's connected securely to the first extension and then make sure that the socket has dropped and locked down all the way onto the spark plug.
View of the second 3" extension installed:

I then attached my 3/8" drive socket driver (which has a swivel handle) and removed the #1 cylinder's spark plug.
--d) then remove the #3 spark plug in the same manner.
View of the socket swivel head driver removing #3 plug:

Both #1 & #3 spark plugs came out super easy, not tight at all. Just know that you'll have to separate one by one the socket driver off the top extension and then remove the top 3" extension in order to have enough clearance to remove the spark plug, socket, and first 3" extension. Installation simply was the reverse of removal. I like a dab of antiseize but some folks swear by not using it, so make your own judgement call.
View of the old Denso vs. new NGK plugs:

View of me getting ready to install the cylinder #1 spark plug with antiseize on the threads:
Just make sure to hand thread the spark plugs into the cylinder head first before using your socket driver, they should thread in super easy, any immediate resistance might mean you're "cross-threading" it. If you have a torque wrench and and an assortment of extension sizes and can get it all back behind there, tighten to 13 ft lbs (or 156 in lbs). I was barely able to get my 1/4" torque wrench back there to #3 plug, #1 was cake.
--e) the right side rear spark plug also wasn't too bad. I attached two 3" extensions to my socket and reaching in from the driver's side I set it onto the spark plug making sure the socket was all the way on.
View from above of socket and two 3" extensions installed onto #5 spark plug:

Then I attached a third 3" extension and then my swivel handle 3/8" socket driver and I removed the spark plug.
View of the socket wrench reaching #5:
Another view of socket wrench reaching #5:

Another view of socket wrench reaching #5:

Just like the other 2 plugs, you'll have to separate the socket driver & the top extension from the rest of the extentions in order to get enough clearance to get the socket and spark plug out.
4) And now for the easy ones, remove the old and install the new FRONT cylinder head spark plugs:
--a) Depress the release tab on the wire connector and pull firmly off each of the coils.
View of connector separated from the coil:

--b) then using a 10mm socket remove the screw holding the coil assembly to the engine.
--c) then twist the coil to help it break free of the spark plug and then pull firmly and straight up.
View of coil pack separated from the spark plug:
--d) I used two 3" extensions along with my 5/8" socket and driver to remove the front spark plugs. Same torque setting at 13 ft lbs (or 156 in lbs) when tightening the new plugs.
--e) Install the coils onto the spark plugs and align them with their screw holes and push down firmly. Tighten the 10mm head screws to only 69 in lbs. Reconnect the coil wire connectors.
5) Install new spark plug wires:
--a) I laid out the old spark plug wires/loom assembly as well as the new wires to get an idea of how things will go together. Thankfully NGK had taped a number on each wire let you know where it should go
.View of the old wire loom next to the new NGK wires:
--b) I used one or two small screwdrivers in order to separate the plastic hold-down clips on the loom assembly. Just take your time and one by one each wire separator/holddown tab will need to be unclipped so you can take each one of them off to allow you to remove and install the wires into the loom. Everything came apart fine with my loom assembly. I will admit it did take quite a bit of fiddling before I finally got the idea of what I needed to do to get them to separate
.A view of the two screwdrivers I used to separate the wire loom pieces:

View of one of the separators detached:

--c) Once I got all the separator/holders off, I removed one wire at a time when exchanging it with a new wire in the loom. I used the "witness marks" on the old wires to get an idea exactly where each of the new wires were to be located in the loom. If you took pictures beforehand, you'll be glad you did if you did a slight screw-up as I did, I had one of the wires on the wrong side of one of the wire holders, but it really wasn't a huge deal as I believe it would've worked fine.
View on the new wires installed into the loom:

Another view:

Another view:

Completed wire loom assembly:

--d) Once you have everything together with the loom assembly, place it on the engine and then lay everything out and then start by getting the wires in their proper locations before connecting stuff.
--e) I started by dropping the rear wires into the tube wells and then fiddled a bit with the wires back there until they seemed to be in their "proper" positions so that the wires weren't touching anything they shouldn't be or in a bind. I then clipped the plastic loom assembly into place starting with the rearward clip and then the clip on top. Then I fiddled some more with the wires and then finally after I was happy I snapped each of the rear connectors into place onto the spark plugs. I was able to get to the two left wires from the passenger side, the right one from the driver's side.
View of the wire loom installed:
Another view showing the connectors installed onto the spark plugs:

--f) Then connect the PCV hose onto the manifold plenum and then onto the PCV valve. Don't forget to slide the hose clamps back to their original locations. I installed a new PCV valve as the old one was suspect as it didn't make much noise when shaken compared to the new one. I had assumed perhaps that carbon had built up inside of it and perhaps it may be restricted as well.
View of the PCV hose installed onto the PCV valve:

Another view:
--g) then install the wire loom support 10mm screw you removed earlier from Step 2 c) and tighten snugly.
--h) Then I connected the spark plug wires to the coils. Make sure you have the connectors in their proper positions before trying to force them onto the coils. I had two of the rubber parts of the connector out of alignment with the hard plastic parts.
View of the the wiring all connected:

6) Now that all is left is the fuel rail cover. Just simply align it so that the screws start to take into the threads and then push firmly on the back side until the clips attach. Then tighten the front 5mm allen head screws, but don't overtighten them, just snug 'em down.
View of me pushing down on the left side to get the clips to snap on:

View of me pushing down on the right side:

View of me tightening the screws with the socket driver:

Do another once over and make sure everything looks ship shape.
View of the completed job:

Start up the car and see how you did.
That's all I got! Now partake of your favorite frosty beverage (or hot beverage if you just came in from the outside in sub freezing weather.) BTW I have more pics at my PostImage site if you want to spend some time looking thru them all (over 80 of them!)
https://postimg.cc/gallery/2a3bxeeka/


