Toyota Forum banner

DIY 2GR-FE V6 Spark Plug Replacement

386K views 193 replies 97 participants last post by  Daaavo  
#1 · (Edited)
Well I'm at 85k miles (obviously not the 120k recommended by Toyota), but I am replacing the the plugs anyway. Why? Because toyota.com (generic plug interval, not model specific) says no more than 110k miles, some Lexus models with iridium plugs go 60k mile intervals, online sources list iridium plug's life between 60-90k miles, etc etc. 120k miles just seems like a long time (especially after having vehicles in the past that change WAY more frequently). The stock OEM plug is a Denso FK20HR11, which is not your standard iridium plug. The center electrode is wider than most iridium plugs out there (.7mm IIRC) which allows it to be considered a "long life" plug. Still.....I'd rather not wait till I loose mpg/power due to old plugs to change them out. I'll replace them early so that I maintain the performance/mpg of the engine. Oh and please no rants/comments that its way to early to change, I know its earlier than maintenance schedule, its just the interval I'm comfortable with. :lol:
So here goes nothing :D

---------------------------------
I only replaced the front bank today (doing the dreaded rear bank tomorrow, I'll post that here then)

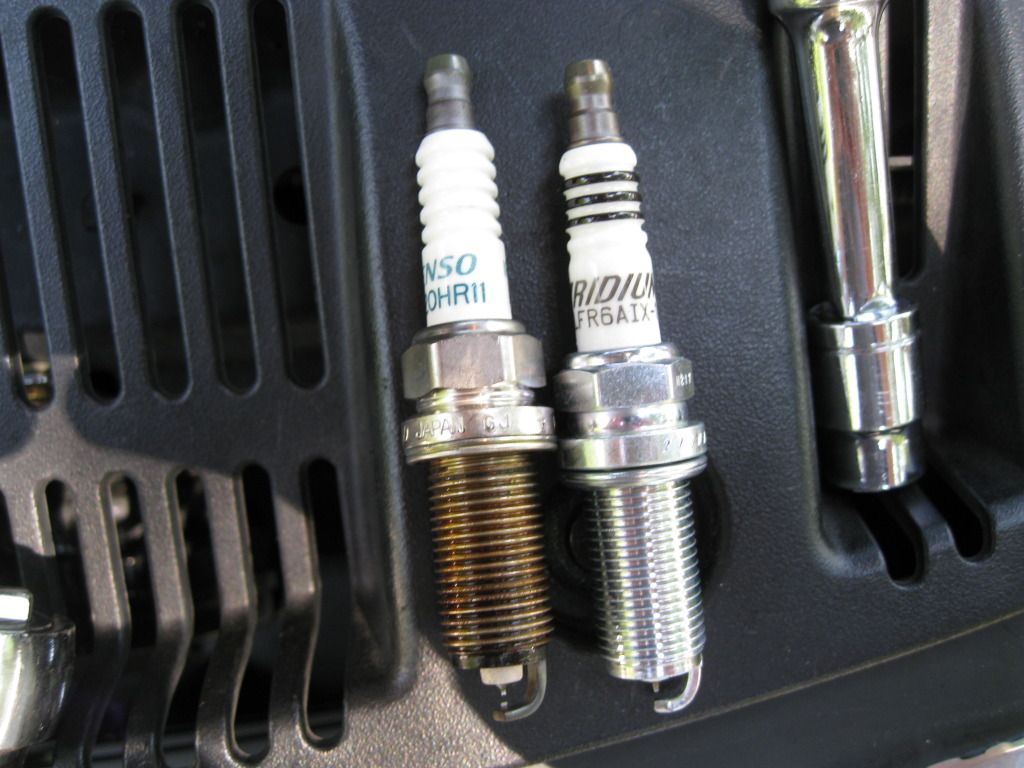
I am replacing the Denso FK20HR11's with NGK Iridium IX (Link - LFR6AIX-11) which were $7.50 from Advance Auto Parts. These aren't long life plugs (they are more on the performance side of iridium plugs), but they will last 60-90k miles.

Here is the front bank steps (the VERY easy side, only took ~20 min tops):

1) remove engine cover

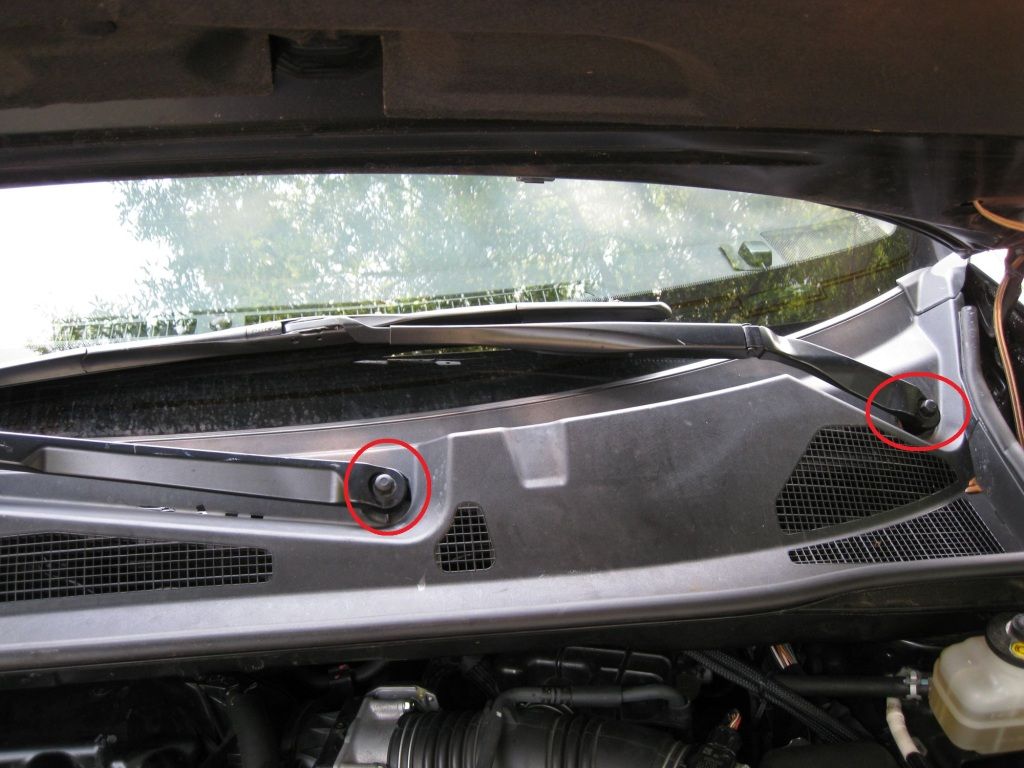
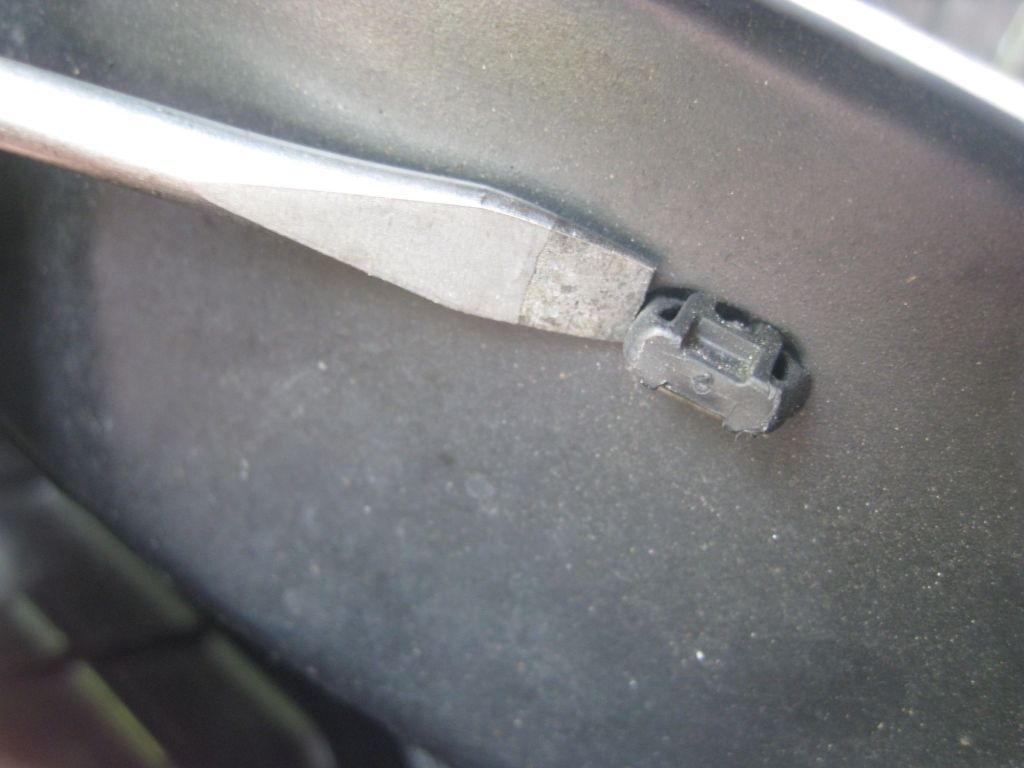
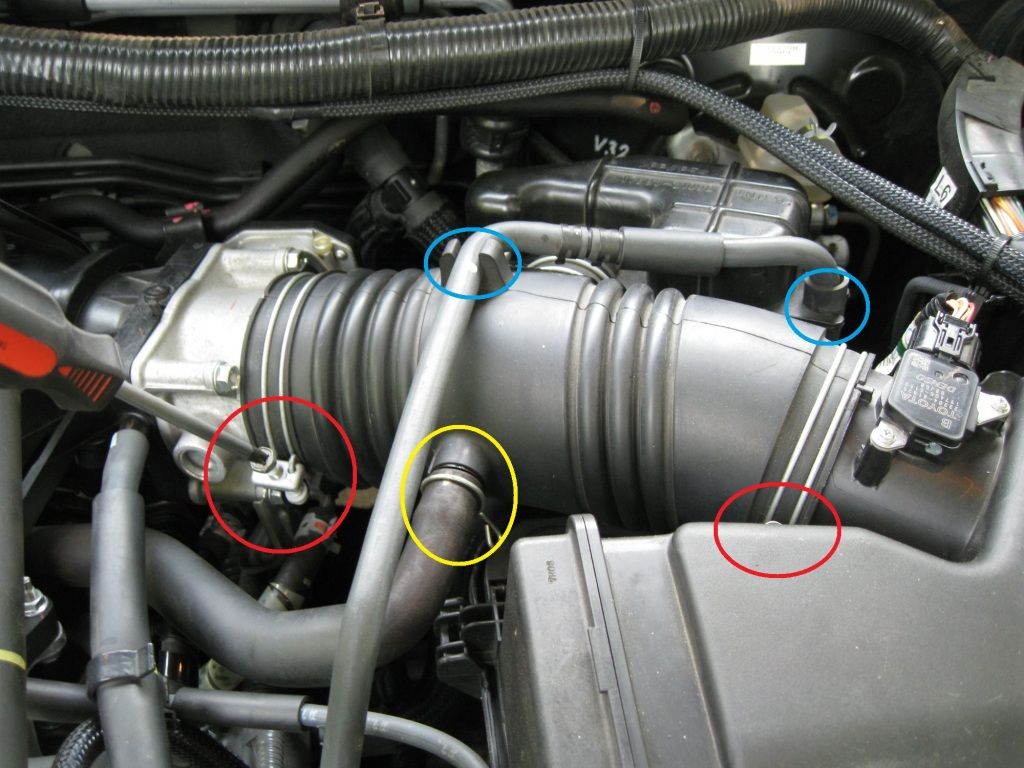
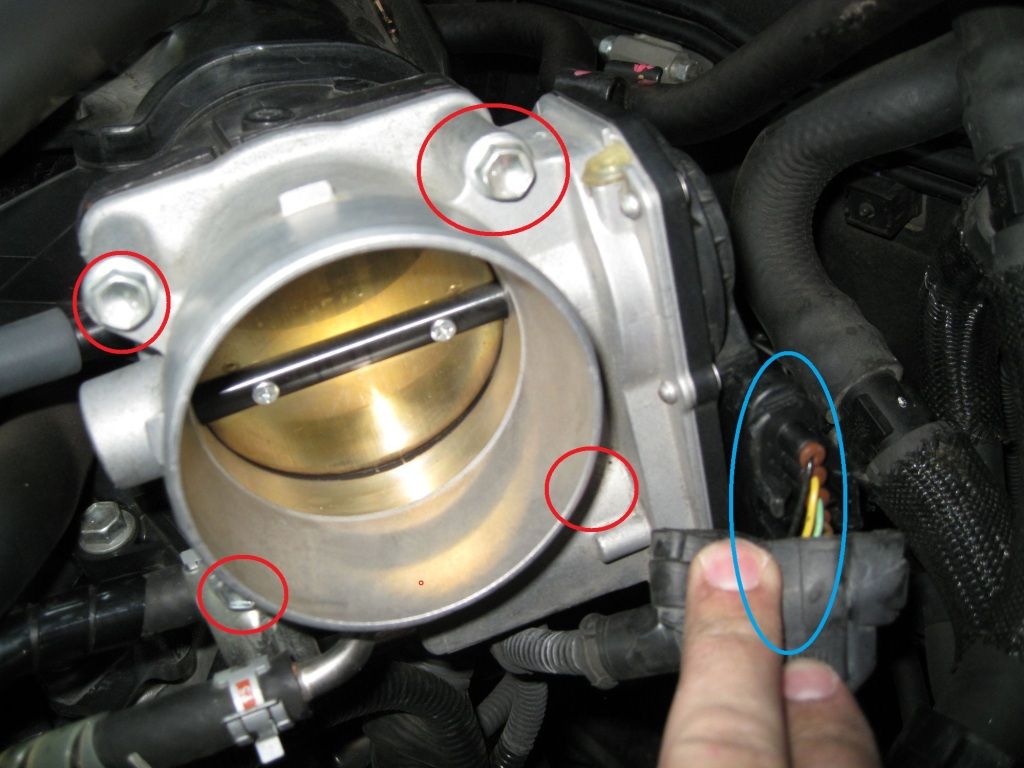
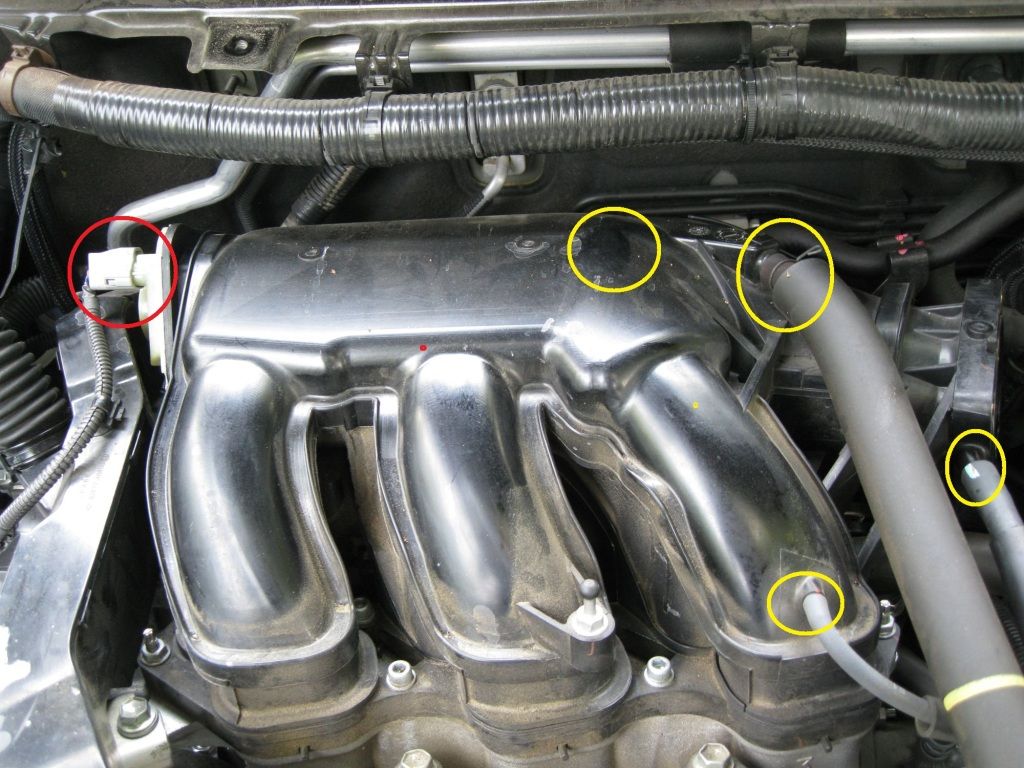
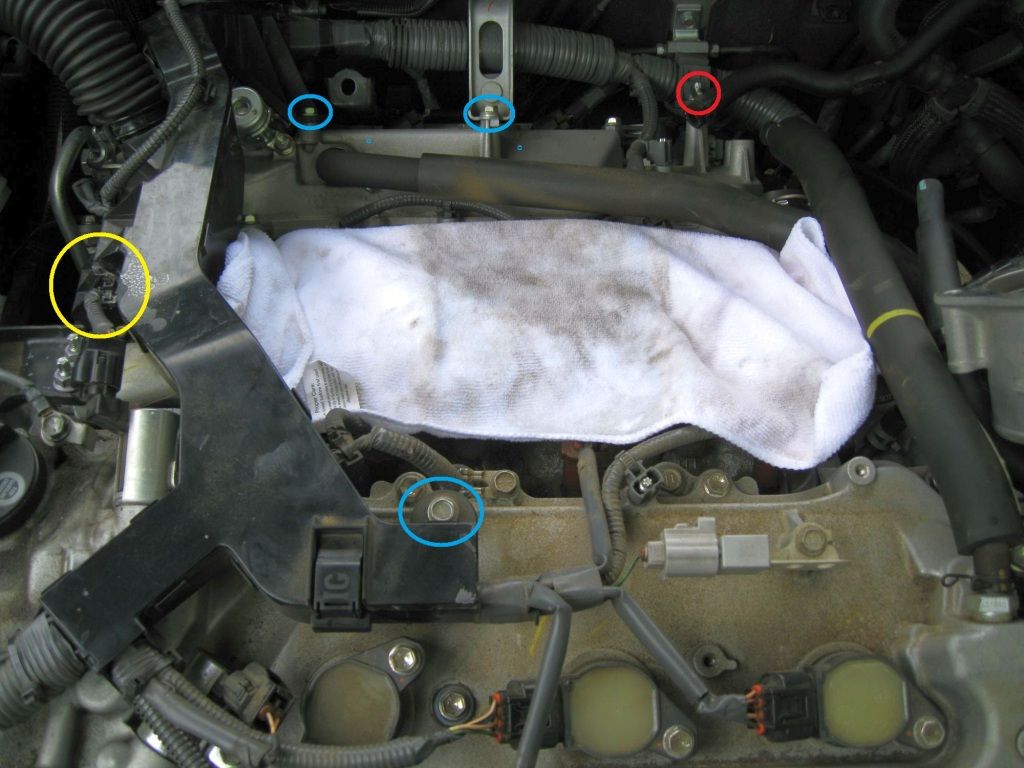
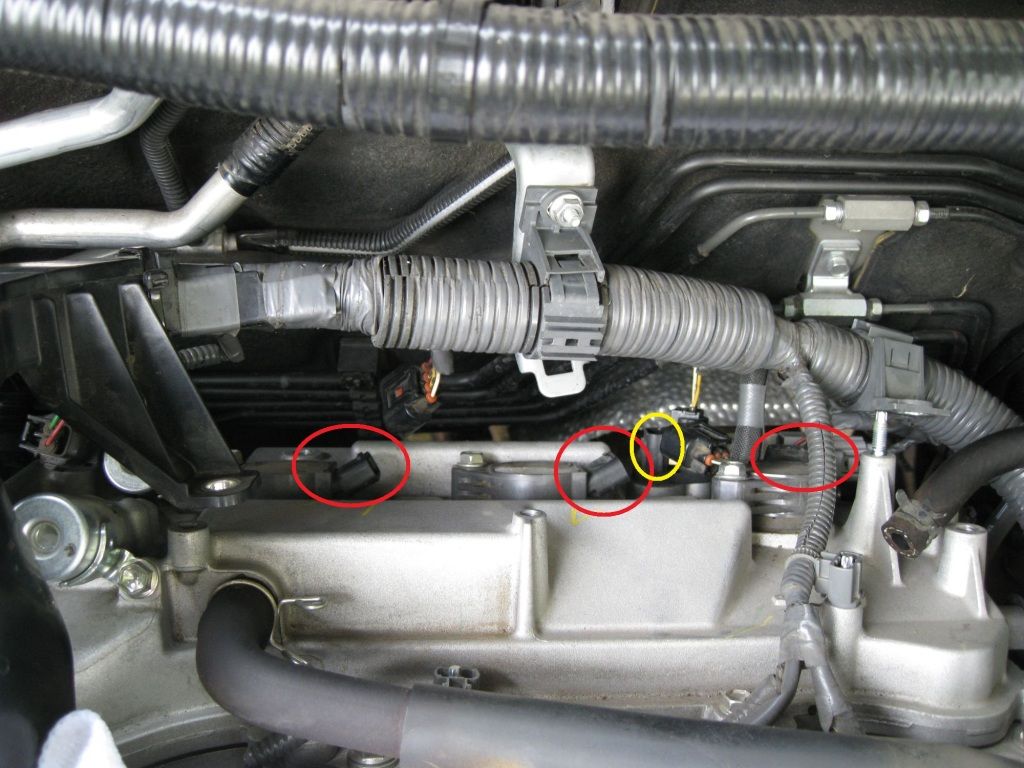
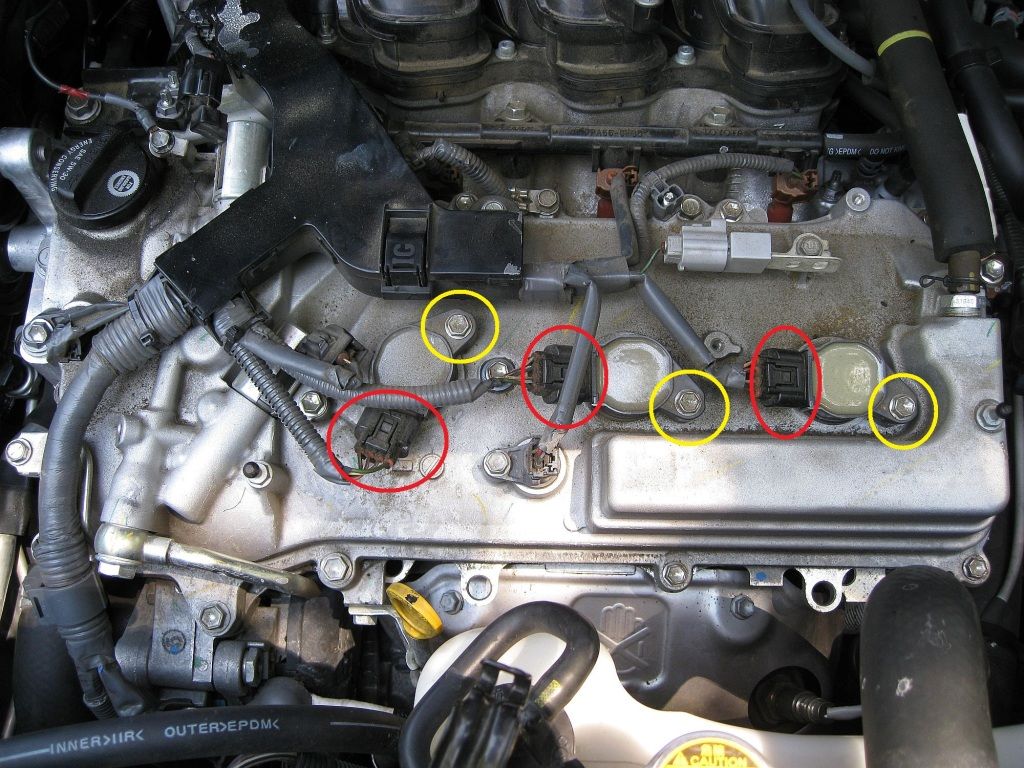
2) Disconnect the coil pack's connectors (red circles) & unscrew the bolts (10mm - yellow circles) that hold them to the top of the valve cover
Image


3) Clean area around the coil pack/spark plug opening of debris. The last thing you want is things falling into the opeining/cylinder while you have the plug out.

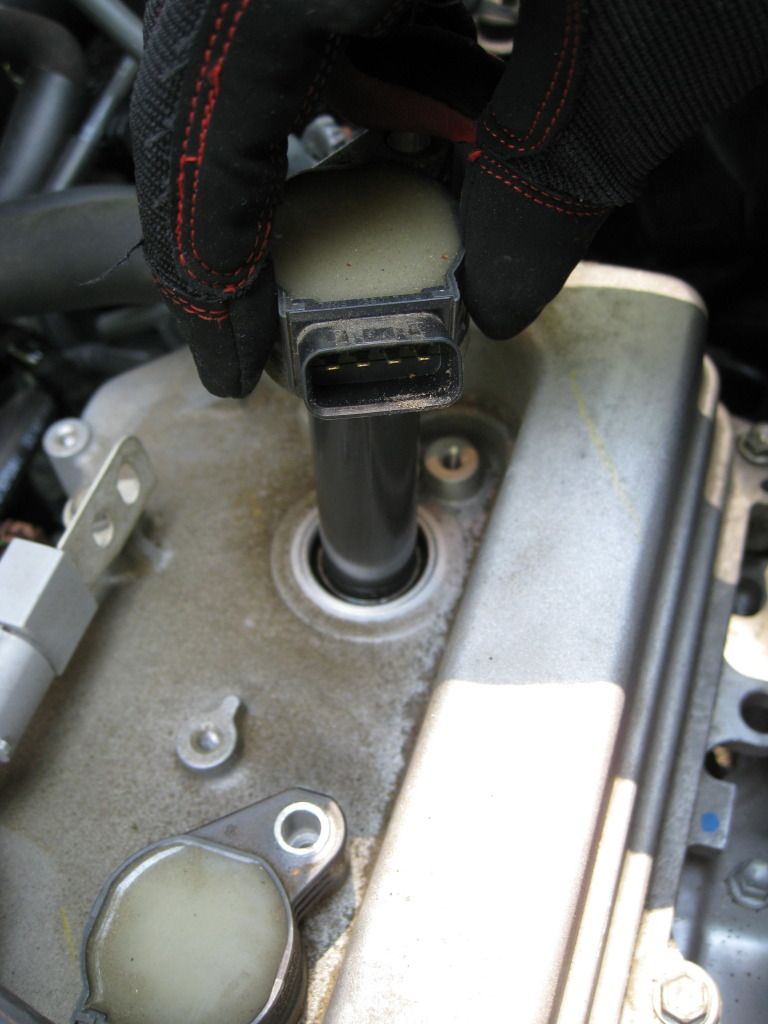
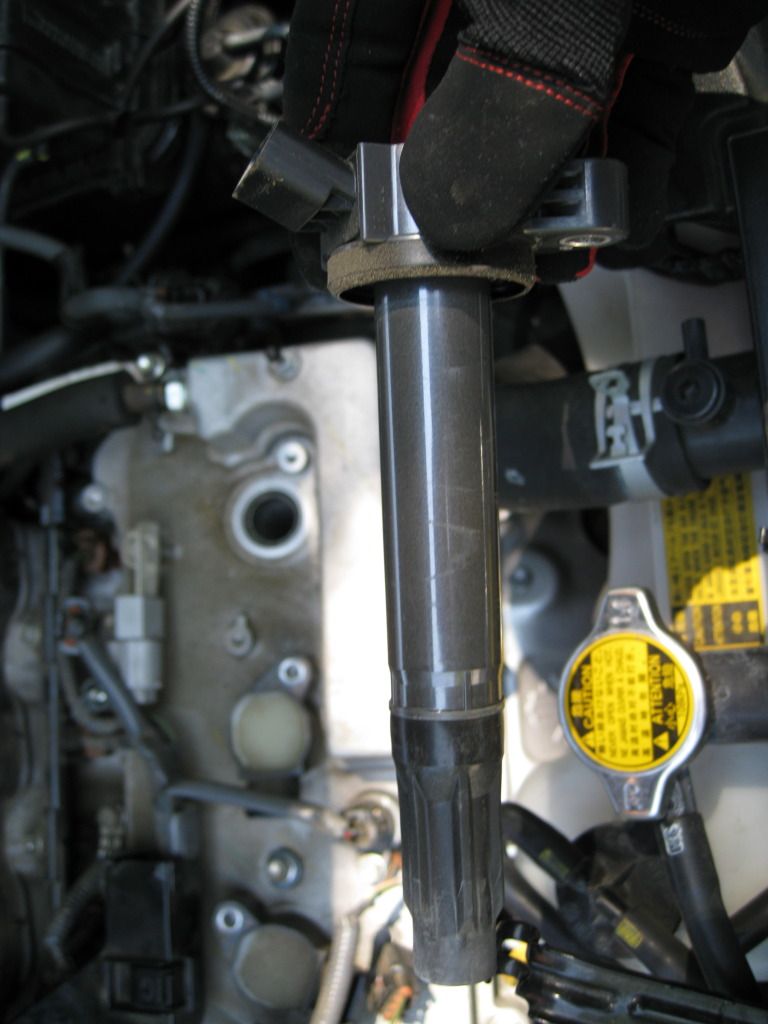
4)Just pull the coil pack straight out (will take a bit of force at first to get it off the plug, then it just slides right out)
Image

Image


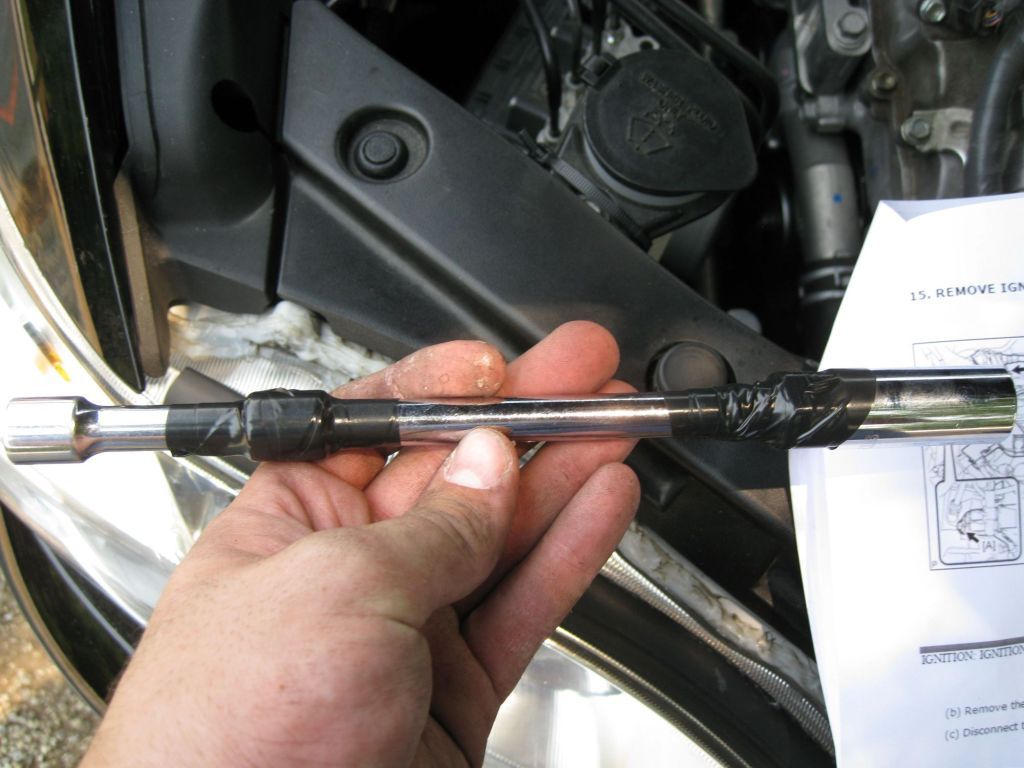
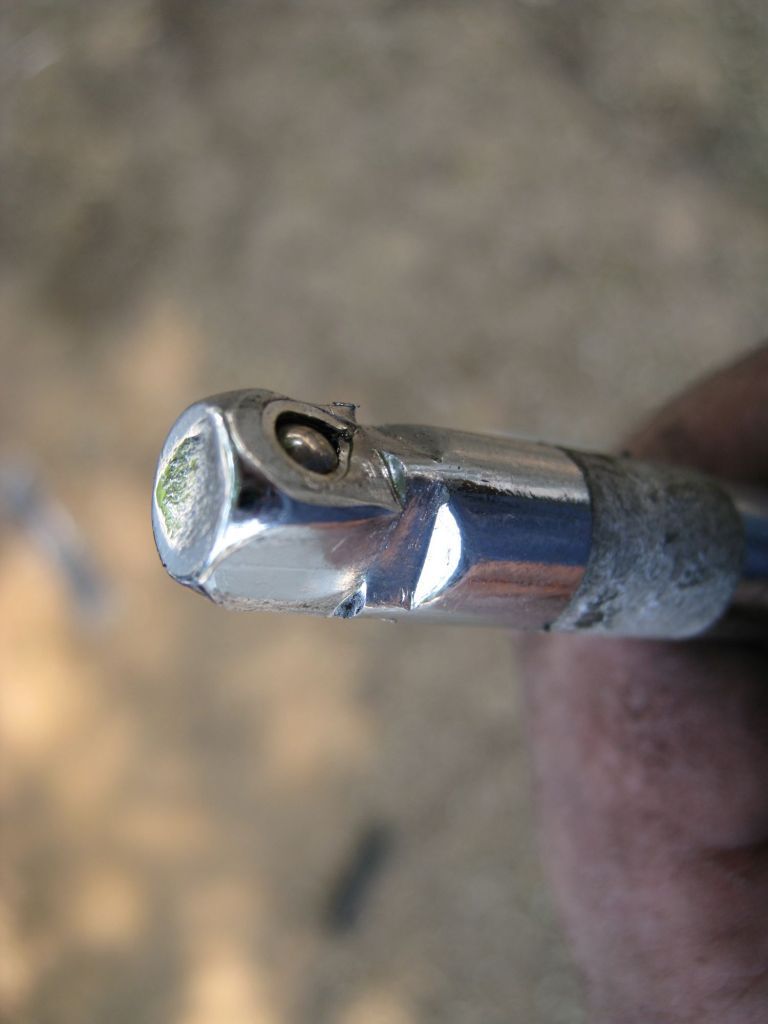
5) Remove the old spark plug. They came right out. The plugs weren't stuck inside the cylinder, just a little more force than you could apply by hand was required to break the plug free. You will need a 5/8" spark plug socket with at least a 6" extension. Look below to give you an idea of how deep in the engine the plug is. That is a single 6" extension, I attached another 6" to the end of that to make life easier.
Image

Image


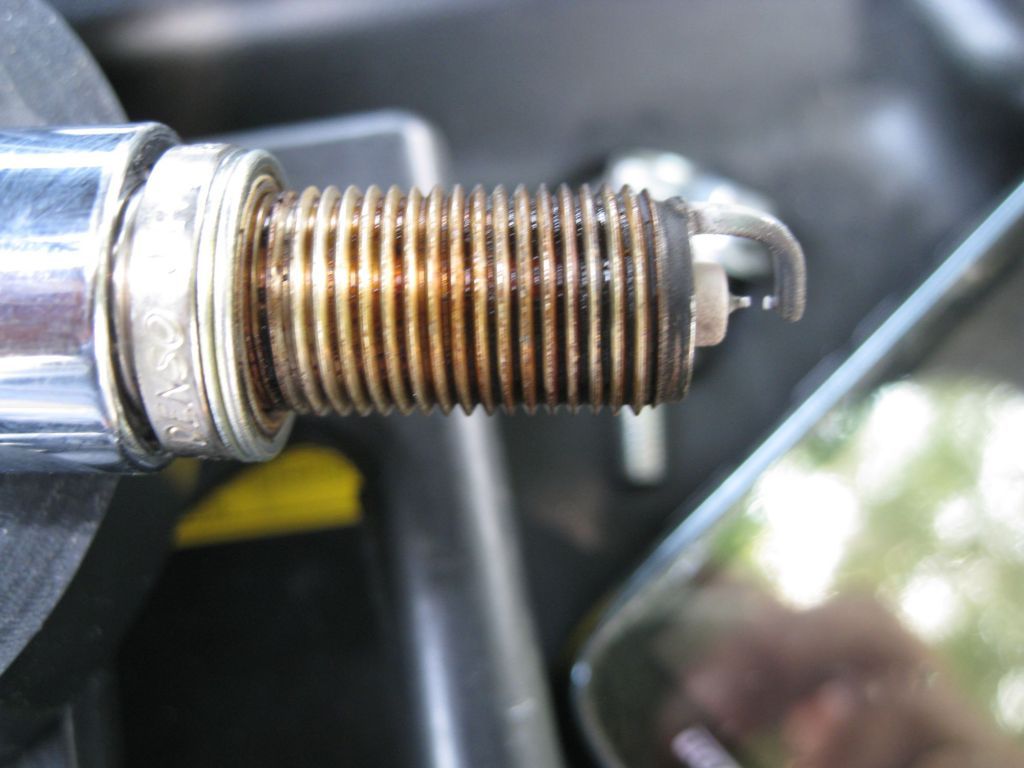
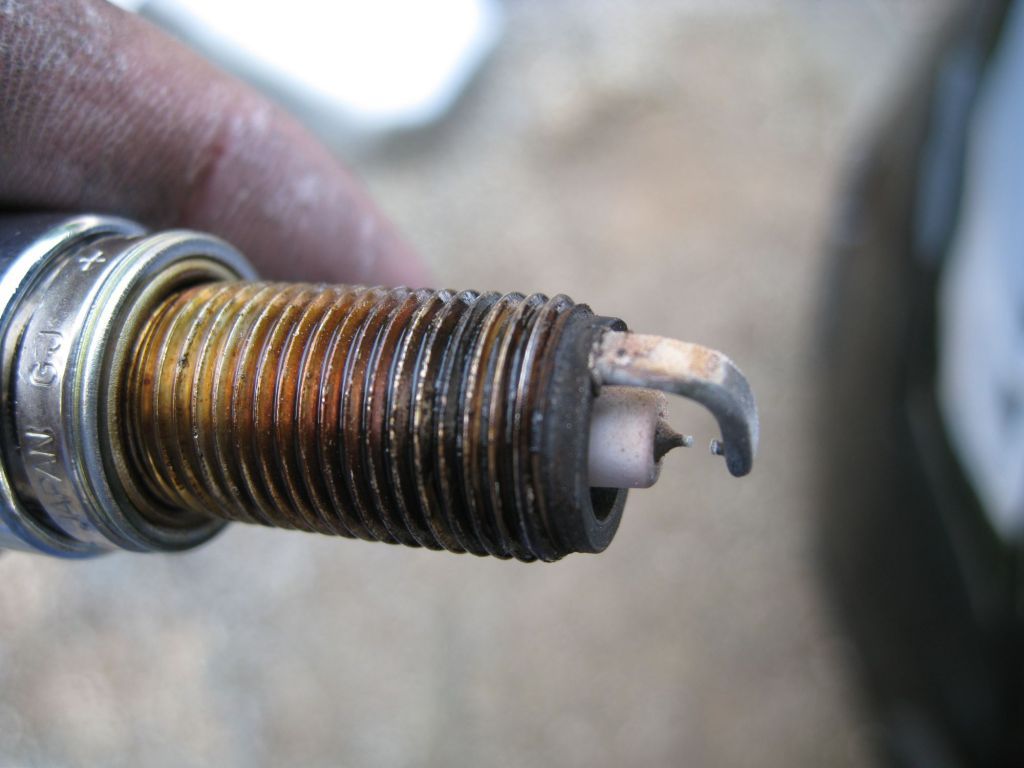
6) Check the old plugs for signs of unordinary wear...mine looked pretty good. I did notice the gap was too small on all of the OEM plugs. From what I have always understood, as plugs age, the gap usually gets larger due to material coming off the plug itself...well the OEM specs are that the plugs were to have a 1mm-1.1mm gap. The OEM plugs I removed had no larger than .9mm gap (one was .85'ish mm). So in theory the gap was even smaller when they were new????:facepalm: You would think the plugs would have been gaped correctly from the factory.....
Here is what mine looked like with 85k miles:
Driver Front Cylinder:
Image

Center Front Cylinder:
Image

Passenger Front Cylinder:
Image


And just for the hell of it...out with the old, in with the new (old on left, new NGK on right).
Image


7) Install the new plug. First make sure its gaped correctly (again between 1-1.1mm). The NGK box said don't gap it yourself as they are pre-gaped and you can break the center electrode off...just be careful. 2 of the plugs were at 1mm exactly, one was at 1.05mm from the plug factory. This part is not required for basic function (but its beyond highly recommended due to the life of these plugs), I put anti-seize lubricant on the threads of the new plugs to make life easy next time I change the plugs. OEM torque for the spark plug is 13 ftlb of force. Unfortunatly I don't have a torque wrench that will handle that low of a torque. Basic rule of thumb (and it is also what NGK suggests), is to fully hand tighten the new plug in (to make sure its properly seated and prevent cross threading), then use a socket wrench to turn/tighten the plug an additional 1/3-1/2 turn. That was enough to get it pretty snug without over tightening it. With a socket wrench it would be REALLY easy to overtorque it...watch out.
Image


8) Reinstall the coil pack. It will take a bit of downard force to seat it back down on the plug, but you will know when its seated properly. Then reinstall the 10mm bolt that holds it to the valve cover and reconnect the ignition wires to it.

9) Turn the car on and listen/feel for unusual vibrations, misfires, dead cylinders to make sure the new plugs are all working. If one isn't firing you will definitly know (very rough idle, strong vibrations).

And that's the front bank...took about 25 min to complete. Just a quick note, I unhooked all the coil packs at the same time, BUT I only did all the steps above 1 at a time (remove coil pack, replace plug, re-install coil pack). That way I only had 1 opening in the engine for debris to fall into at a time.

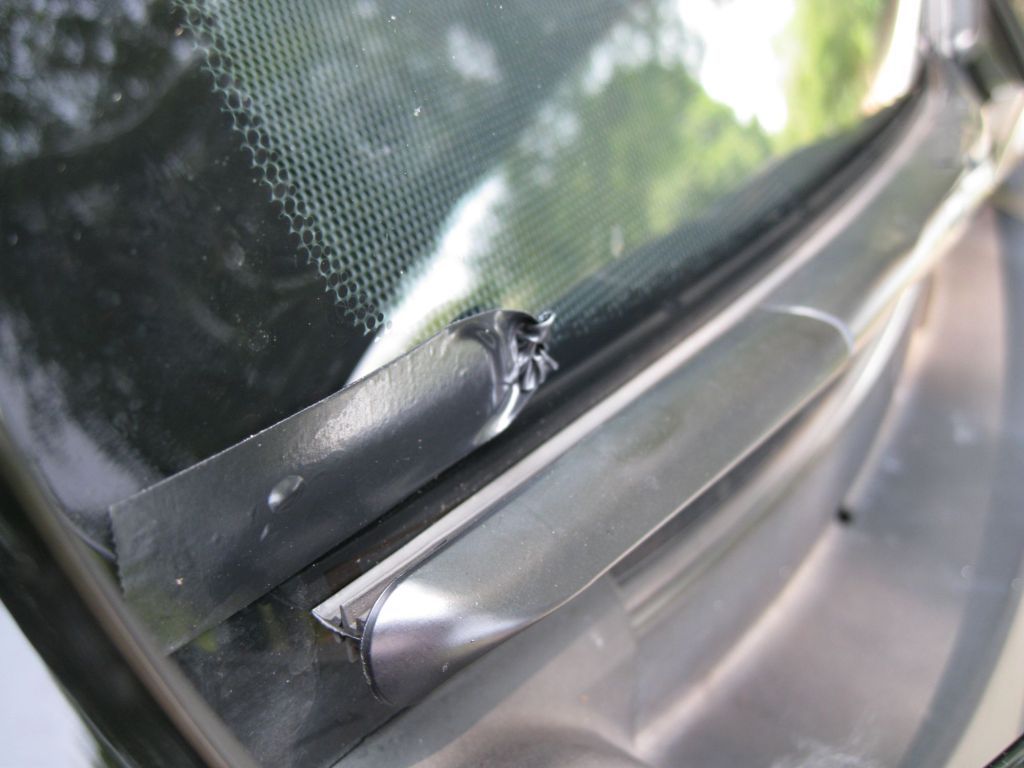
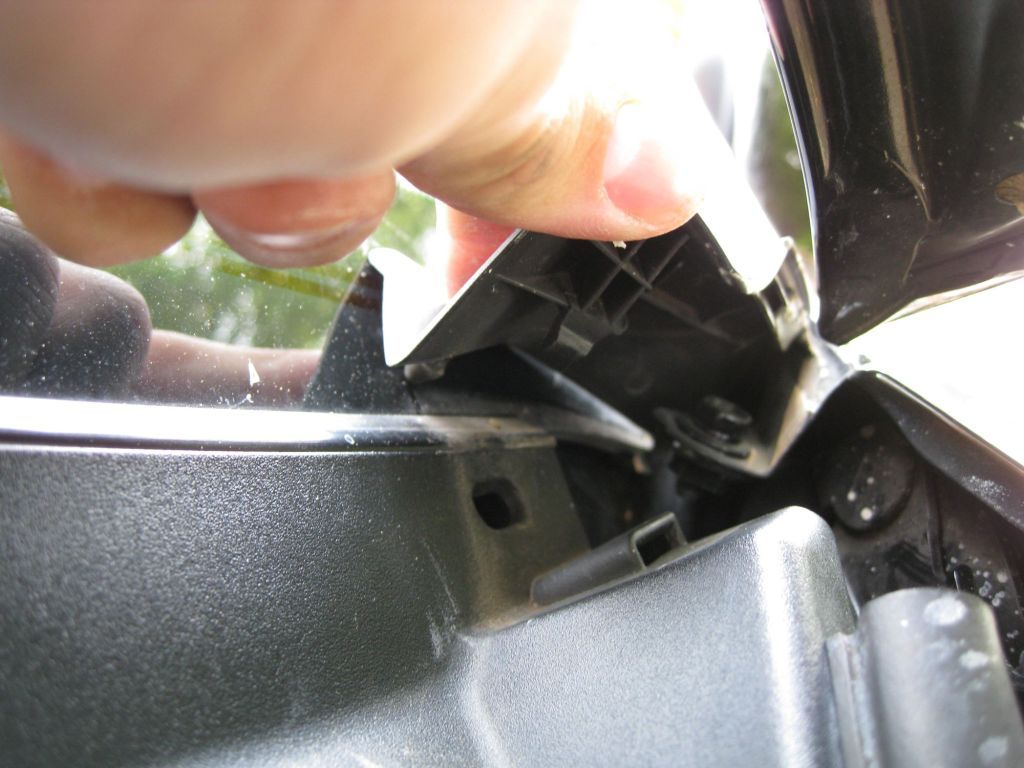
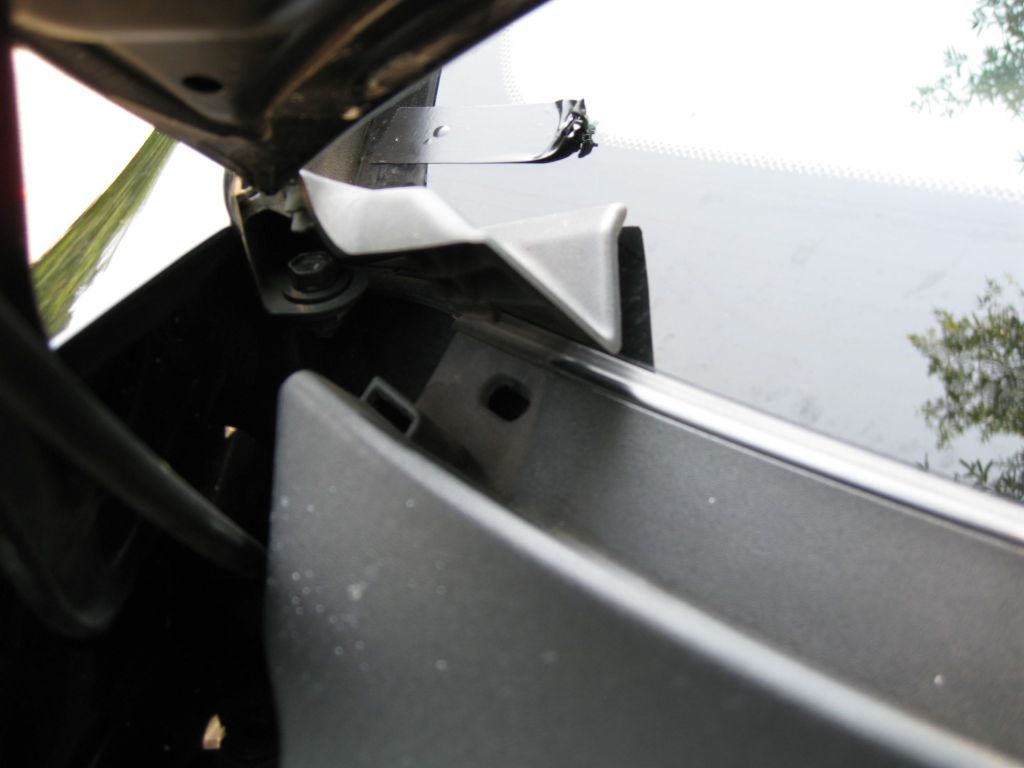
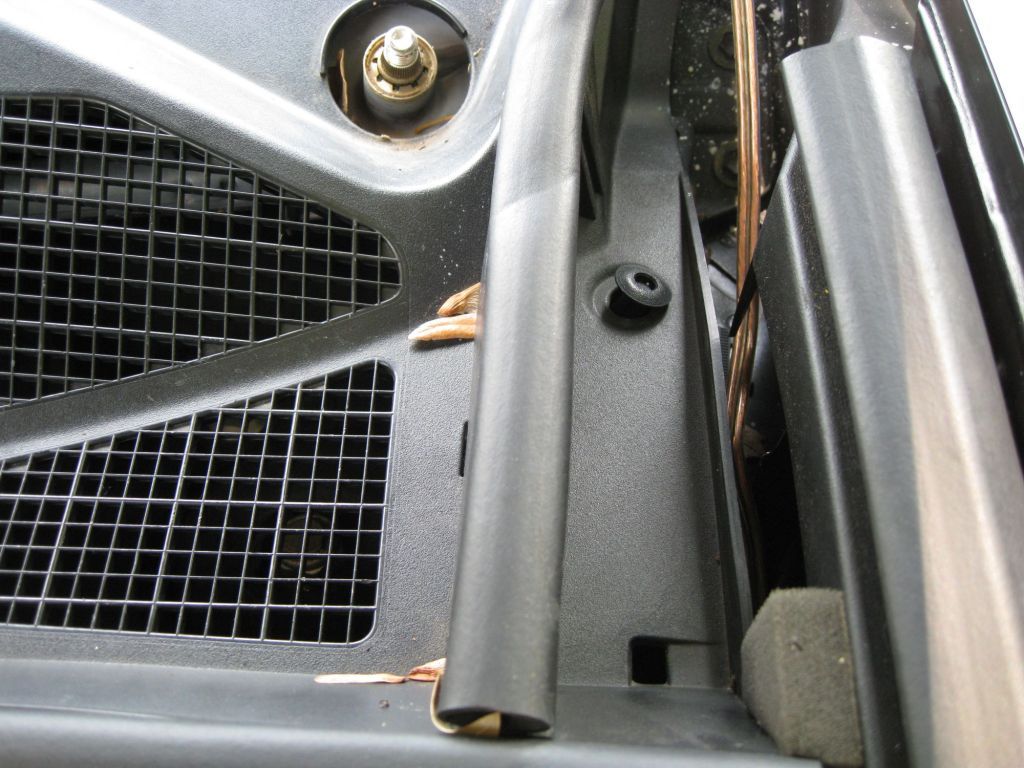
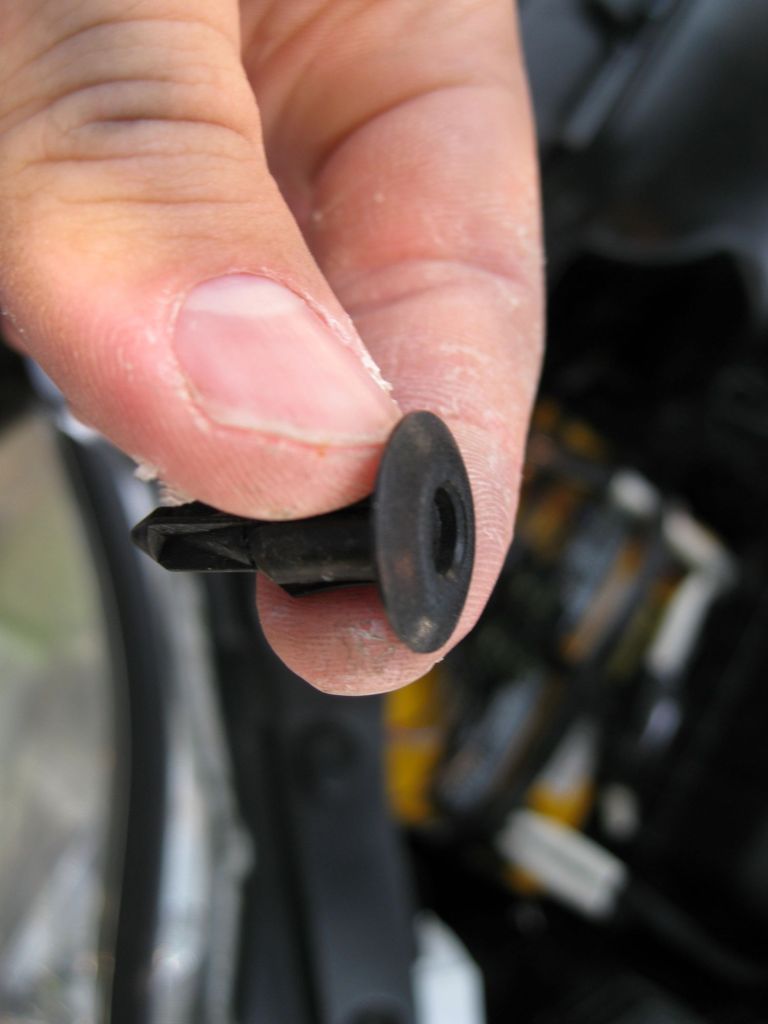
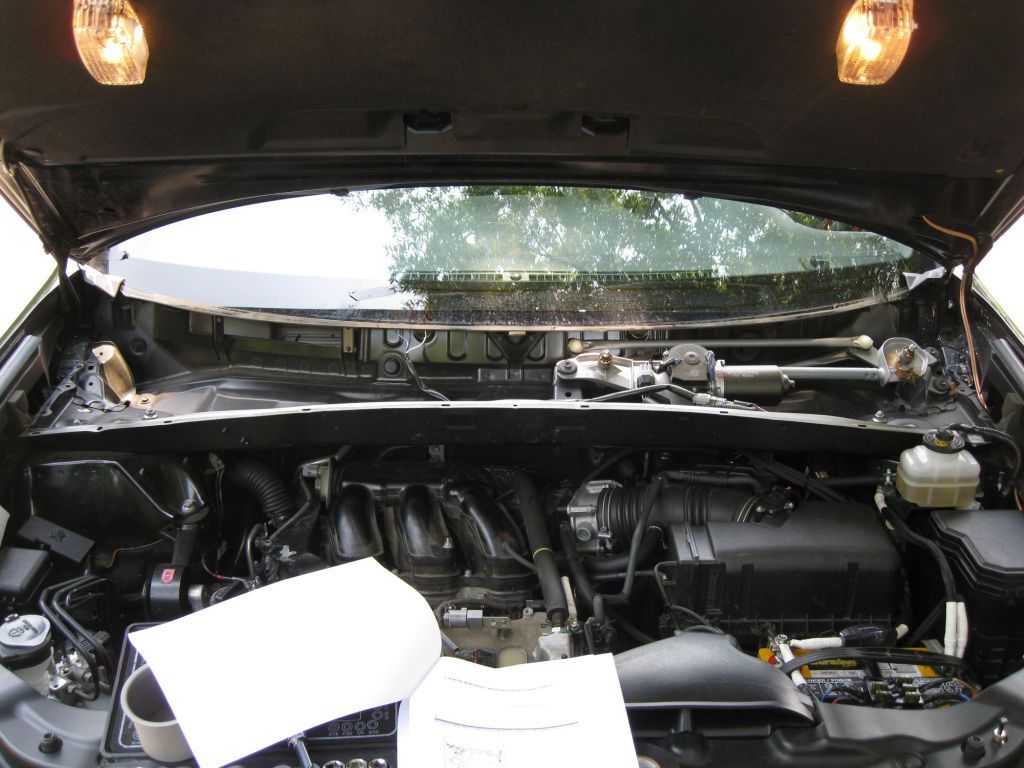
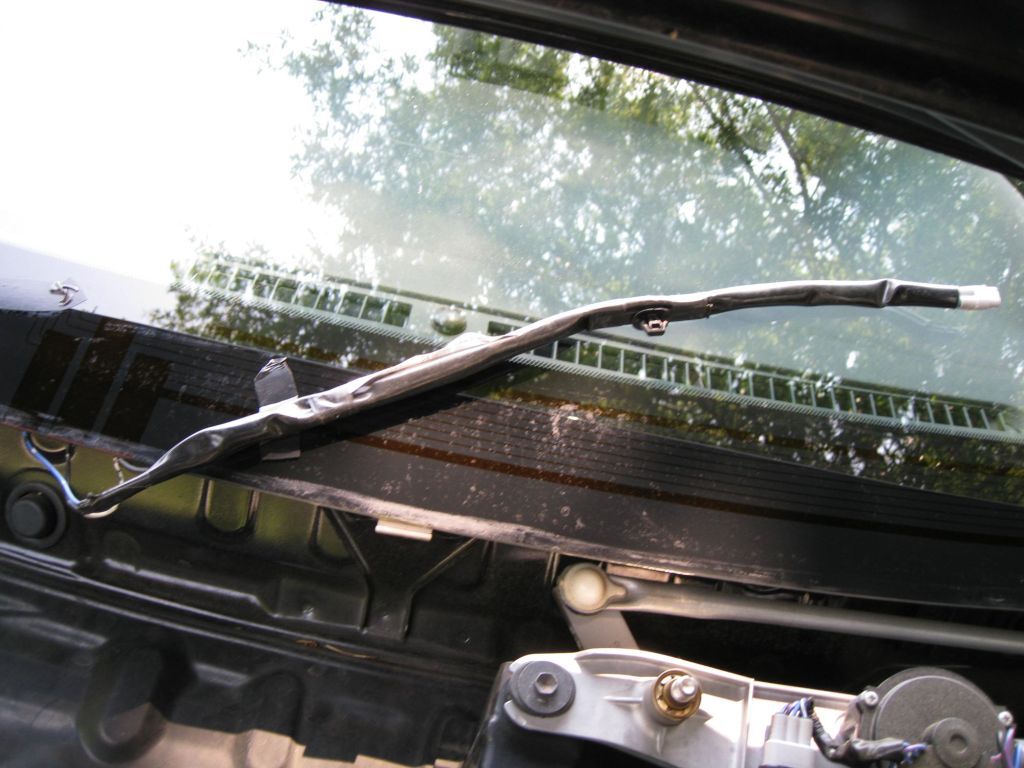
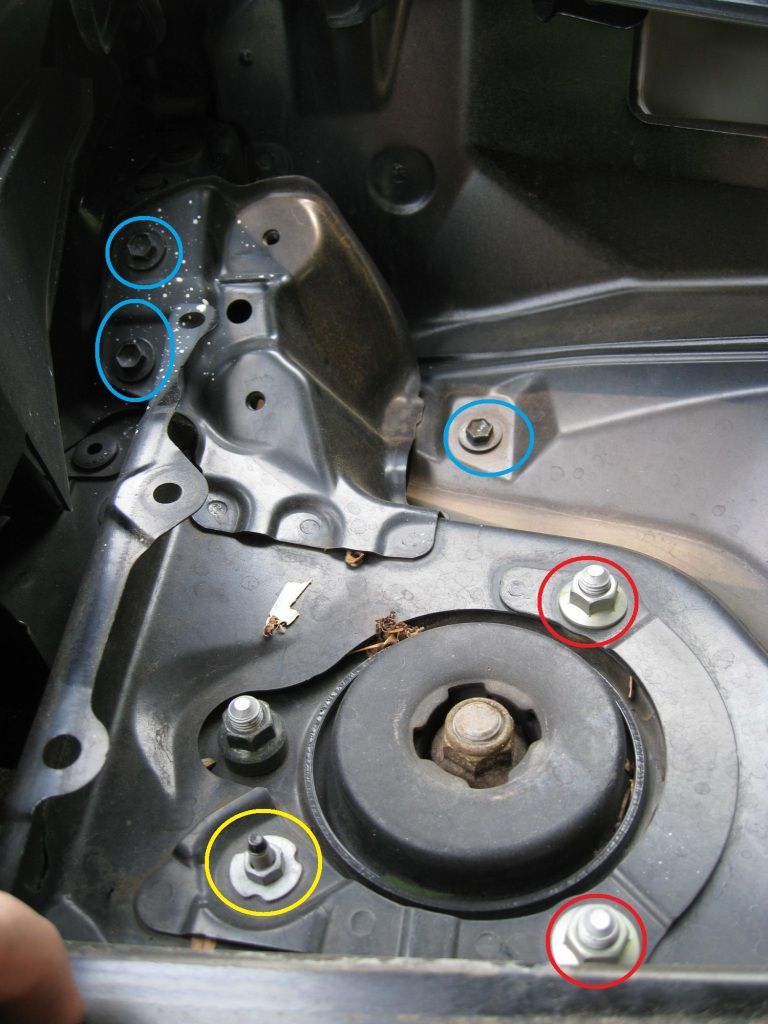
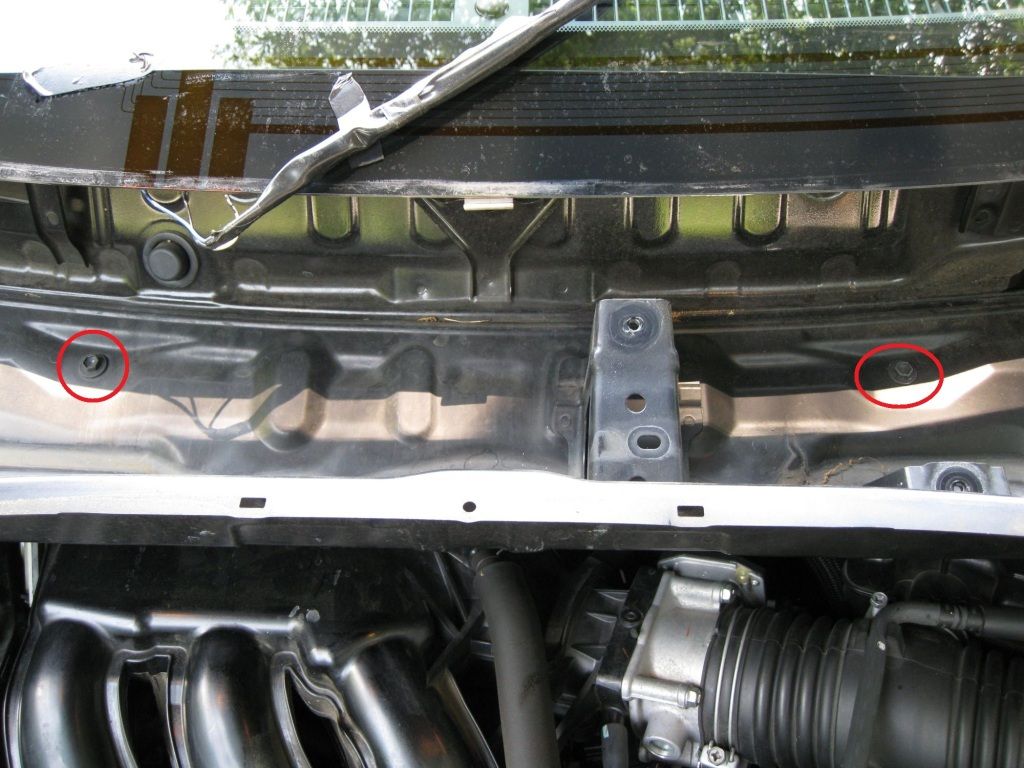
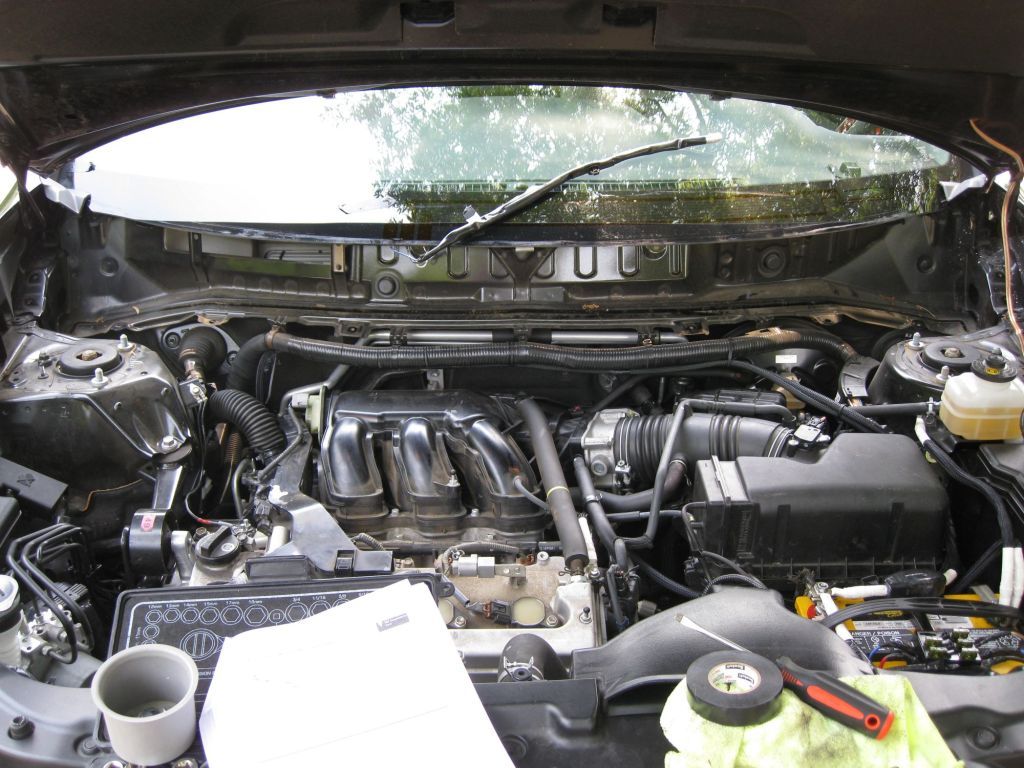
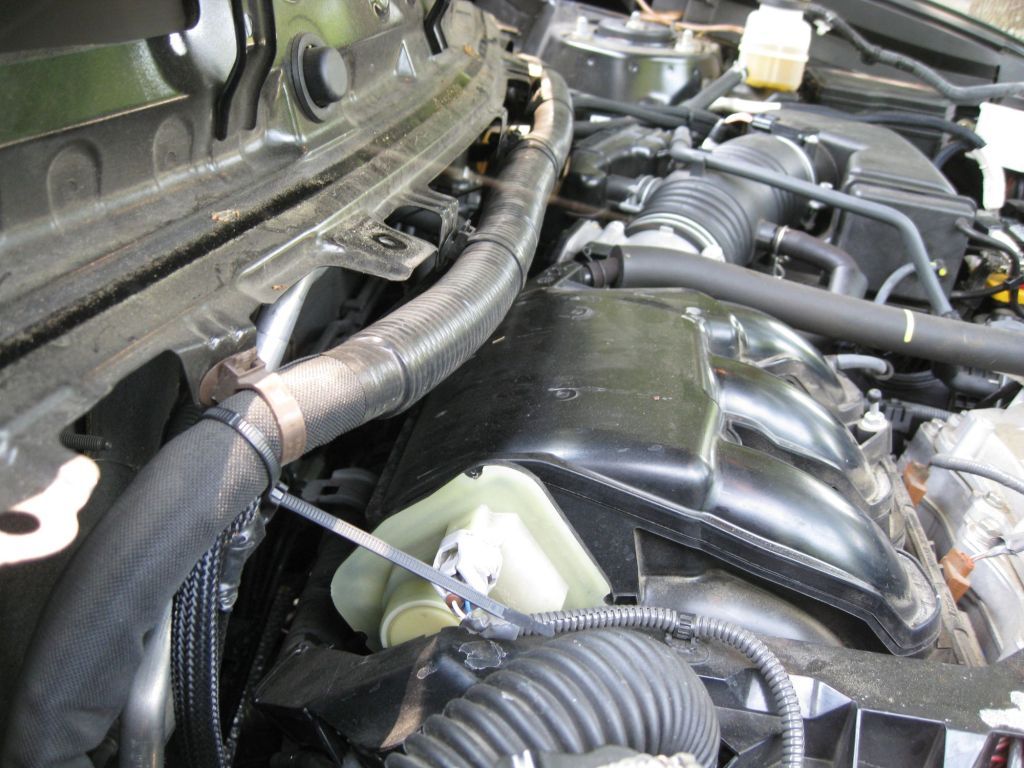
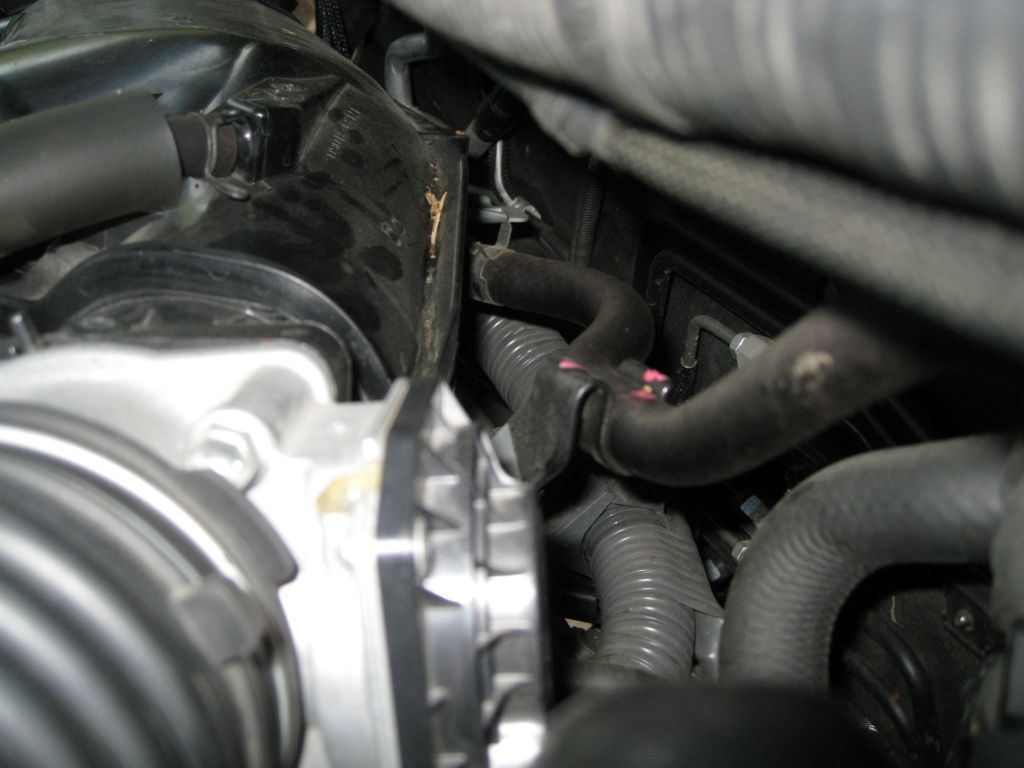
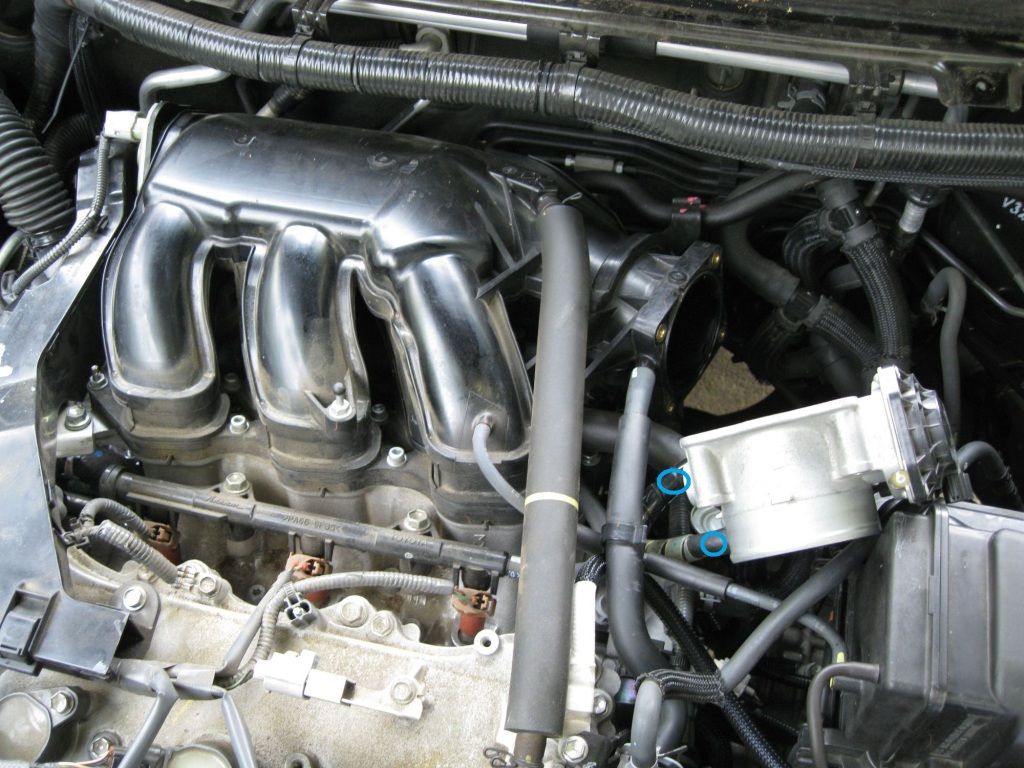
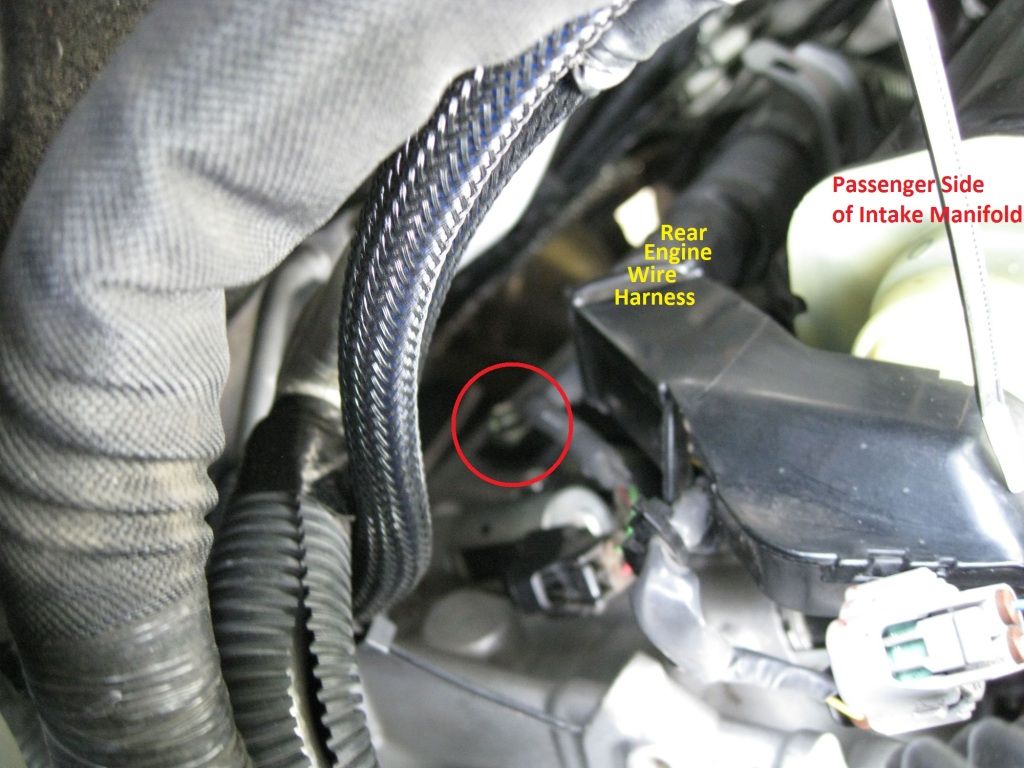
If anyone has ever looked at the rear bank...yall know its a epic pain to get back there. There is very little room...
Image

Image

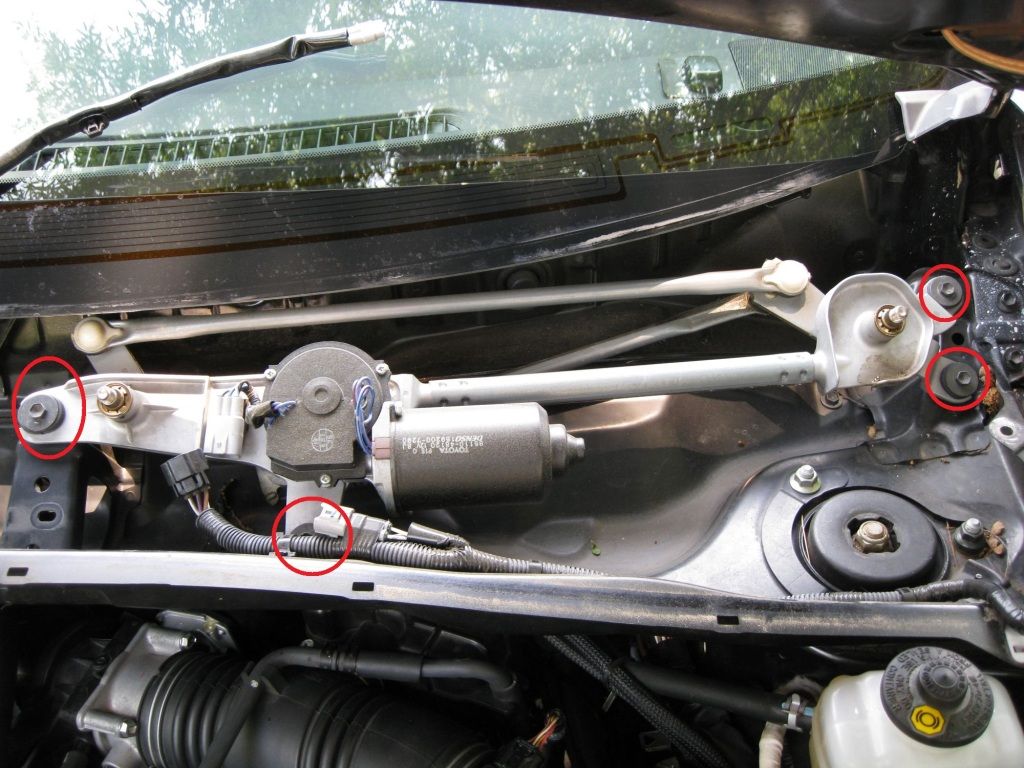
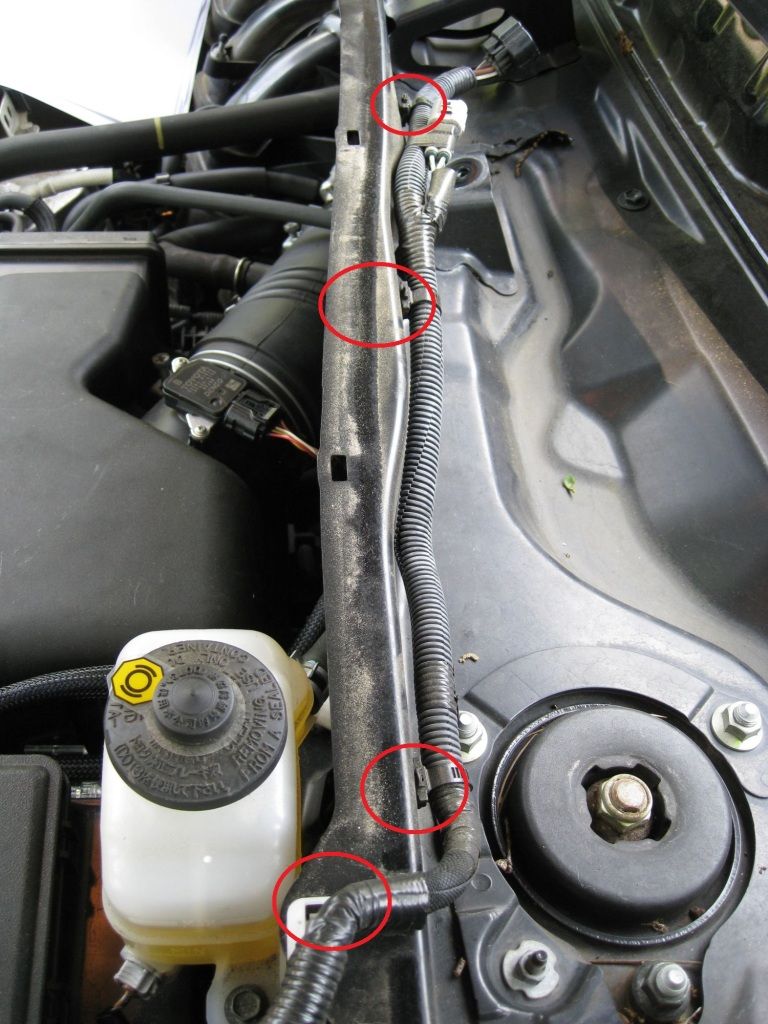
The OEM instructions on how to replace the plugs say to remove both the wiper motor/cowl structure and the intake manifold, but I've seen post on here before where poeple said they just removed the wiper/cowl and were able to get it to work. I'll take a crack at it tomorrow, but I'll probably end up taking both out (I'll show how to do it). You might be able to get your arm around the intake, but I'd rather take the extra time to remove everything and make more room, so I can be more careful and have more room installing the rear plugs.

so...until tommorrow :chug:

Tools/supplies list for front bank:
-10mm socket
-socket wrench
-5/8" spark plug socket
-anti-seize lubricant
-gaping tool
-minimum of 6" socket extension (I used 2x 6" extensions)


Disclaimer: Do at your own risk. I will not be held responsible for any damage to vehicle or bodily harm when performing these modifications, or any voidage of certain parts of your warranty.
 
#2 · (Edited)
Well, the rear bank is an EXTREME PITA to replace....just so you know going in :lol:

In overview, I'll document how to remove both the wiper/cowl box and the intake manifold. As previously mentioned (and posted below) some have gotten the plugs changed with the manifold still installed, but I found I could not.

Took 3.5-4 hours to complete.

-------------------------------------------------------

Here we go again:

1) Grab a beer...your gonna need it

2) Make sure the wipers are in the fully off position. Then use some kind of tape (I used electrical tape because it was handy, painters tape would be better) to mark the position of the windshield wiper on the window. Its to align the wipers when you re-install them later.
Image


3) Remove the wiper arms. There is a single nut at the end. Just remove the nut (its a 14mm nut) and the wipers pull somewhat straight off. You kinda have to push down on the spring in the arm (push the wiper toward the window) to get enough pressure off the screw threads to pull it off.
Image


4) Next you need to release a small trim panel on each side of the vehicle (I don't know the name of it, but its this below)
Image

All you have to do is pull that peice up toward the hood, then in the direction of the top of the window. It will release the clip/pin that holds it in place. Don't fully remove it as it uses some adhesive to hold it in place at the edge. You can let go and it will stay in place on its own.
Image

Image


5) Remove the top of the wiper/cowl box. There is a single push pin on each of the box that needs to be released. Depress the center of it with a small screwdriver, and it will disengage from the body panel.
Image

Image

To prep it to be re-installed, pull the "arms" of the pin back, and push the center "post" up till its above the surface. That way when you install it again, you press the center post to be flush with the rest of the surface.
Image

Next you remove the entire top cover. It hooks under the windshield at one side, and clips into the wiper/cowl box at the other. If you undo those clips, it will slide away (toward the engine) from the window. (blue circles are where the clips are located on the panel. They will be on the engine side edge when it is installed. Your looking at the bottom of the panel)
Image

There is a small space between the top panel and lower portion of the wiper/cowl box. To undo the clips, use a screwdriver, pushing it into that gap, to depress the clip's arm to allow it to come out.
Image

Leaving you with this
Image


6) Remove the wiper motor assembly
First you need to remove the electrical connections (2 blue circles). The one coming from the windshield will only be there if your highlander is equipped with the cold weather package. Those 3 wires are the windshield wiper de-icers (the package also includes heated side mirrors)
Image

To keep the wiper de-icer wires out of the way, I taped it to the windshield.
Image

Next you need to remove the 4 bolts that hold the wiper motor assembly to the car. They are all 10mm bolts and circled in red. The 2nd one from the left is under that wire harness (its completely accessible, its just the angle of the camera hides it.)
Image


7) Remove the wiper motor wire harness. It is held in by 4 clips (red circles)
Image

To remove the clips, compress each side of the clip while pulling back on it.
Image


8) Remove wiper/cowl box. It is held in with a lot of bolts and a few nuts. On each side of the box there is 6 bolts/nuts that need to be removed. The ones below in blue and yellow cirlces are 10mm and are easy enough to remove. The ones in red though, are 2 of the 3 mounting points for the shock absorber/strut. They are 14mm nuts. They are on TIGHT (as they should be), just be warned its going to take a whole lot of force to break then loose. The other side is identical (except mirrored)
Image

There are also 2 10mm bolts in the center of the box that need removal.
Image

It will pull straight up and off leaving you with this
Image


-------
Now to give you an idea of how much space there is around the intake manifold, take a look at these pics. I found there wasn't and went ahead with the manifold removal.
From Passenger side:
Image

From Driver side:
Image

To give you an idea of how hard this would be....the grey wire harness seen above is DIRECTLY above the coil packs. It would need to be moved to remove the pack...and that's pretty hard with the manifold on.
-------

9) Remove the tube connecting the air box to the throttle body. Loosen the clamps in the red circles. Remove the vacuum line in the yellow circle. And unhook the vacuum lines that clip to the tube in the blue circles. Pull the tube back from the throttle body and air box to free it and it will come right out.
Image


10) Remove the throttle body from the intake manifold. Pull back on the rubber boot and remove the connector from the throttle body in the blue circle. Remove the 4 bolts that hold the TB to the manifold (they are 10mm) in the red circles
Image

The TB has 2 coolant lines going into it (2 blue circles). I didn't want to deal with coolant, so I left the TB connected to them, and leaned the TB against the air box. It stayed there the entire install
Image


11) Remove the misc connections to the intake manifold. The red circle is a connector for air surge valve, remove it. The yellow circles are vacuum lines. The far left one is on the back side of the manifold. Remove those as well.
Image


12) Remove 2 bolts on the backside of the intake manifold that mount it to the engine. They are both 12mm bolts. The bolts are located on the engine valve cover, but are connected to brackets that are on the back side of the manifold. If you remove these 2 bolts the manifold + brackets will stay together when your remove the manifold in the next step.
On the passenger side of the manifold
Image

On the driver side of the manifold
Image


13) Remove 4 bolts and 2 nuts that hold the manifold to the engine. Now this part is VERY important. These have to be taken out in a specific order, otherwise it could warp the intake. (to give you an idea of how small the tolerance is, if the warpage of the 6 "openings" of the manifold to a flat surface is more that 0.1mm, toyota says to replace it)
The 4 red circles are 5mm Hex bolts. The 2 blue nuts are 10mm.
The order for removal is F -> A -> E -> D -> C -> B
Image

Pull straight up and the manifold will separate from the engine. Leaving you with this:
Image


14) Unbolt the engine wire harness to allow you to move it around to access the coil packs. First cover the intake openings. Then remove the bolts/nut (all 10mm). Red circle is the nut, blue circles are bolts on the valve covers, but the yellow circle, the bolt is on the side of the engine.
Image


15) Unplug the coil pack ignition plugs (red circles) and the misc plug in the yellow circle. After that, you will have plenty of slack in the wire harness to move it around.
Image


16) Remove coil pack (10mm bolts), remove old plugs, inspect old plugs, put anti-seize on new plugs threads, gap new plugs, install new plugs, install coil pack. Same procedure from the first post
Neat trick, found it in one of Dante's Taco's post. Tape the socket extensions and spark plug socket together to keep them from coming apart in the engine.
Image

Notes about the plugs. The rear bank plug's were hard as hell to remove. The plugs took a ton of force to break them loose from the engine (unlike the front bank)
Also, just stick with a 6" extension here, there isn't enough space to fit a longer one and clear the firewall (when removing the plug/socket)
Image

Driver Rear Cylinder:
Image

Center Rear Cylinder:
Image

Passenger Rear Cylinder:
Image

1 of the plugs was gaped correctly at 1mm, but the other 2 were .9mm. So for the record, only 1 out of 6 plugs were gaped correctly from the factory. The rest were too small.

17) Re-secure the engine main wire harness.
Reverse of removal directions.

18) Put the manifold back on the engine. Time to secure the 6 bolts/nuts again. Like before there is an order in which you must install the fasteners. The 5mm hex bolts (red circles) torque is 13 ft*lbs and the 10mm nut (blue circles) torque is 12ft*lbs.
The order of reinstall is B -> C -> D -> E -> A -> F
Image


19) Re-install the 2 bolts (12mm) in the back of the engine/intake manifold
Reverse step 12

20) Reconnect the vacuum lines and air surge valve connector from step 11 to the intake manifold.

21) Remount the throttle body to the manifold. reverse of step 10

22) Re-install the air tube between the TB and air box. Revere of step 9

23) Say a little prayer and start up the engine. Listen/feel for unusual vibrations, misfires, dead cylinders to make sure the new plugs are all working. If one isn't firing you will definitly know (very rough idle, strong vibrations). If you have a problem you have to take the entire intake manifold off again :headbang:

24) Re-install the wiper/cowl box. Replace all the bolts/nuts mentioned in step 8. red circles are 14mm. blue and yellow circles are 10mm.
Torque ratings for various bolts/nuts: Red circles 63ft*lbs ------yellow circle 78in*lbs ------- blue circles 78in*lbs (same for the 2 10mm bolts in the center of the box)
Image

Also make sure you use a quality socket extension... I nearly snapped the tip off of mine torquing the shock absorber/strut nuts in place :lol:
Image


25) Reinstall wiper motor wire harness. reverse of step 7

26) Re-install the wiper motor assembly. reverse of step 6. The 4 10mm bolts' torque is 62in*lbs

27) Reinstall the top of the wiper/cowl box. Reverse of step 5. Basically push the cover into the window (making sure the claws meet the window correctly), then clip the other side of the cover into place. Be careful, the clips can break easily, take your time putting them back in place. Then put the 2 push pins back in their spots.

28) Reinstall the trim panel remove in step 4. Just push down, they will lock back in place.

29) First clean off the wiper motor screw threads, then re-install the wiper arms. Making sure to align the arms with the tape from the 2nd step. The arms can be mounted in any direction, that is why the tape is key. You will need to push down on the arms (to flatten the spring) so that the 14mm nut can be tightened down. Also hold the arm in place while you are tightening, as they can and will want to move. Torque is 18ft*lbs on the nut. Then turn on the wiper and make sure they are working normally and not hitting the car body anywhere. If they do, take the arms off again and start over.

30) Get more beer and relax :lol:


Let me know if you have any Q's, or typos above :thumbsup:


Tools/supplies needed:
10mm socket
12mm socket
14mm socket
6" socket extension
3" socket extension
5/8" spark plug socket
5mm hex socket
electrical tape
torque wrench
anti-seize lubricant
spark plugs
spark plug gaping tool


Disclaimer: Do at your own risk. I will not be held responsible for any damage to vehicle or bodily harm when performing these modifications, or any voidage of certain parts of your warranty.
 
#5 ·
will do.

Just remove the wiper box, and youll be good, although a PITA!
I had planned on taking that off first and seeing how much room there actually was. Its just I don't have small forearms, and have a hard working in tight spots/getting my arms into there. so well see tomorrow, I'll take a pic or 2 showing the space with each component off to let people see.
 
#12 ·
I'm with you on this one. There was a time when anything short of a major engine/trans/rear end overhaul would be done in my garage. (Buy a case of 'soft drinks' and invite a few friends and it's amazing how fast most things can be done.)

Now, at my age, there are many other things I'd rather be doing than cleaning grease from under my finger nails. Found a dealership that I've been using for the last 10 years or so that has yet to do anything questionable insofar as recommended service or quality of work so I trust them. Since my kids are paying the bill (through reduced inheritance) I'm good with it. :thumbup: ;)
 
#9 · (Edited)
Good job. Especially smart on your part to reserve the 2nd post to finish the other side.:thumbsup:

Two things I'll add. The Taco change interval is 30K on the V6 and everyone recommends using anti-seize (like you did) on the plugs due to the risk of seizure. I didn't used to use it in the past and never had a problem, but they convinced me. I think you should remove the comment about it being optional and just say "do this." The argument was very convincing, especially when you consider the mileage between change intervals on the iridiums.

Second thing I would add (and this may be more of an impact when doing the other side) is that you should have a spark plug socket that has a rubber donut inside it. This donut holds the spark plug inside the socket for both removal and installation.

And last, I'll be interested to hear if the V6 with iridiums also come with Denso in one bank and NGK in the other.
 
#10 ·
Two things I'll add. The Taco change interval is 30K on the V6 and everyone recommends using anti-seize (like you did) on the plugs due to the risk of seizure. I didn't used to use it in the past and never had a problem, but they convinced me. I think you should remove the comment about it being optional and just say "do this." The argument was very convincing, especially when you consider the mileage between change intervals on the iridiums.

Second thing I would add (and this may be more of an impact when doing the other side) is that you should have a spark plug socket that has a rubber donut inside it. This donut holds the spark plug inside the socket for both removal and installation.

And last, I'll be interested to hear if the V6 with iridiums also come with Denso in one bank and NGK in the other.
Your proabably right about the anti-seize on the threads...I'll change that. I had always changed plugs on my old '94 5.2L Grand Cherokee every 30-40k miles and never used the stuff. What you said about the length of the lifetime of iridiums was the exact reason I got some of the anti-seize for the Highlander.

I actually mentioned using the 5/8" spark plugs socket. It was rather frustrating though. That stupid rubber donut inside of mine would not stay in the socket. Whenever I inserted the new plug to be installed (just barely enough for the socket to grab hold of the "nut" on the plug), and tightened the plug onto the engine, every time I tried to remove the socket, it would leave the donut ON the plug in the engine... I had to take the donut out of the socket when trying to install new plugs. But it definitly is extremely helpful removing the old ones. I tried 2 different sockets I have (a generic one and a Stanley one), and they both did this. I've never had problems with this in the past, has this happened to anyone else? I don't know if the rubber lost its "grip" to the socket with age (the Stanley socket is less than a year old though :facepalm:)... its strange :ugh3:

I did some research before I got the new plugs (average life, types of iridiums, etc...) And I had see a ton of posts about the yall's v6 (and I believe the previous gen 4runner's 4L v6 as well) splitting the plugs. I never saw anything about any other toyota engine doing that, but well see tomorrow. For what its worth, I called my local dealers trying to find OEM plug prices (~$15) and they only carried Toyota branded Denso plugs for the 2GR-FE, they had no NGK ones. I had asked them specifically about that.
 
#11 ·
My dad was a Toyota mechanic and he said that every V6 in the 90's had Denso in one bank and NGK in the other. That's what I'm expecting you to find. With a few exceptions, dealerships tend to only carry Denso. So no surprise there. FYI on the donut, my socket is from the 80's, so maybe they don't make 'em like they used to? :)
 
#130 · (Edited)
He was right. My Camry 2009 V6 2GR-FE has NGK spark plugs (model: FR6AIX-11) in the back bank and Denso (model: FK20HR11) in the front bank. See my pictures attached.


Image


The instruction in this post is really useful and it helps me successfully replace the spark plugs of my Camry 2009 V6 2GR-FE. However, I have some tips for those are going to do the first time:

1. Make sure you have angle tools to be able to remove two bolts behind the manifold. Space is pretty tight.
2. Even after removing the manifold, you still almost cannot see inside the holes of the spark plugs in the back bank (inside bank). Keep this in mind. The hole is not vertical but 30 degrees slanted back to the windshield (imagine V shape, left is the back bank, right is the front bank).
3. You do need a tool to take the spark plugs out after loosing it. I have to create a tool by attaching magnet bar to a wire rod (you can use a metal hanger) using duct tape. Make sure the magnet bar carefully secured to the head of the rod so it never falls off inside the spark plug hole. You may need to bend the rod to make a U-shape head, just to hold the magnet, then carefully wrap them using duct tape. Insert this tool inside the hole to get (suck) the spark plugs out.

Image
 

Attachments

#14 · (Edited)
Well that was an ordeal (this plus installing a 7 way trailer connector today)....Took about 3.5-4 hours to disassemble the engine bay, put the new plugs in, and reassemble everything (~6.5 to do everything I did today). Ended up having to take both the intake manifold AND the wiper/cowl box off the car (the engine bay gets surprising massive with the box off, that thing eats up more room than you realize). Novo798 I have no idea how you got access to the plugs with the intake still installed. There is still no room to work. Also 1 of the brackets for the intake manifold go across one of the coil packs....you must have tiny hands :lol:

Its a lot of pics and notes about the pics I gotta put up so I'll get that up later tonight. Until then I'm just going to enjoy air conditioning and drink about 100 gallons of water. :lol: Of course the day I chose to do this, its the hottest day of the summer so far (~95-100 degrees + the good old south's ridiculous humidity :thumbsdow) here in SC :facepalm:

Btw it was Denso's in all 6 cylinders 05Moose.

Also, worth noting, the back plugs (I don't know why) were hard as hell to break loose from the engine. I don't know if its because the plugs are at more of a horizontal angle (opposed to almost straight up, in the front bank) causing oil/fluids to seize up the threads, but it was definitely a PITA to get them out.
 
#20 ·
Sweeney, thank you for this epic thread! I really appreciate the time and effort you put in to this thing. The annotated pictures, the helpful hints and tricks are going to help of lot of us 2GR-FE owners when the time comes for new plugs.

One thought: You said the rear bank plugs were much harder to break free? Could it be that the engine was hot when you removed the front plugs and that's why they were easier to remove?

Thanks again!!
 
#21 · (Edited)
thanks

I can't believe I didn't think about the temperature effecting it :facepalm: When I took the fronts out, the engine was very close to running temperature. The engine was dead cold when taking the rears out. I had to put way more force on the plugs to break them free than I was comfortable with (or had to in the past on other vehicles, though those had 30k change intervals), and the temp difference probably caused it. Good call :thumbsup:
 
#22 ·
Wow, that goes way, way beyond being a major PITA!!! :yikes:

Great writeup and pics. Convinced me that it's not something I'll be doing myself when the time comes. There's a little pub about 2 blocks from my dealer that will for sure be getting some business when the time comes. :chug:
 
#23 · (Edited)
Figured I'd post this.
While I changed the plugs, I cleaned the mass airflow sensor, throttle body, and installed a new K&N Filter within a 2 week period. I've driven ~1500 miles after this, and I've netted a 1.2-1.4mpg gain under the same driving conditions as I normally drive. So something in that list did help restore missing mpg (50/50 split city/highway).

edit: I'm about to drive 800 miles of pure highway this weekend. I'll post if the highway only mpg increase as well
 
#25 ·
I think next time I will remove the manifold. I assume those are o-rings that seal the manifold to the plenum? If so then thats cool, as those are pretty easy to deal with. I have rather large hands, and it was a total PITA to get my hands in there, but being a motorcycle mechanic for many years I am used to dealing with limited space for fixing things. Want even more fun, try working on Sea-Doos, and getting fiberglass splinters in your hands in a limited space, URGHH!
 
#26 ·
Question to sweeney about the spark plug replacement on the Highlander: Is this procedure valid for the hybrid model as well? Reason I ask is this comes up occasionally with hybrid owners, and if the procedure is valid I/we can direct hybrid owners to this thread for that info.
 
#27 ·
Yes & no. I don't have docs for the hybrid models, so I can't be certain, but...

Certain things will be similar/the exact same. The wipers and cowl removal/install for example. From what I've looked at, it is the same or very similar to the non hybrid.

But the intakes will be different based off years.

08-10: They use the old 3.3L 3MZ-FE v6 from the gen 1 highlander, its intake is totally different from ours, so that portion of the install will be different. They can look at the gen 1 HL 3.3L spark plug sticky on how to remove the intake to get to the back plugs.

11+: They use a variant of the 3.5L 2GR-FE (called the 2GR-FXE) V6. One of the key differences between the normal and hybrid engine is that it uses a exhaust gas re-circulation system supposedly. I don't know if the exhaust inlet is built into the intake manifold/plenum or into the engine block itself. It should be basically identical to ours, but it could be different because of the EGR system. Just something for them to keep an eye out for. Also the piping between the throttle body and air filter box will be different since they use a different filter assembly and location. So basically its goign to be pretty similar but not identical.
 
#28 ·
Nice Write up! I will not be looking forward to this job when the time comes.

Couple of questions:

1. To me the cowl removal looks like the biggest PITA. Would it be possible to just remove the intake and manifold without removing the cowl? Is this how the Toyota maintenance manual states how to gain access to the rear spark plugs?

2. Are there any gaskets on the manifold that should be replaced?

3. When reinstalling the bolts on the manifold is it best to get all the bolts finger tight first then torque them in the order specified or is it better to install one bolt at a time torquing each one in the specified order?

Thanks!
 
#30 ·
1. To me the cowl removal looks like the biggest PITA. Would it be possible to just remove the intake and manifold without removing the cowl? Is this how the Toyota maintenance manual states how to gain access to the rear spark plugs?

2. Are there any gaskets on the manifold that should be replaced?

3. When reinstalling the bolts on the manifold is it best to get all the bolts finger tight first then torque them in the order specified or is it better to install one bolt at a time torquing each one in the specified order?
1) FSM calls for this (and a little more). Some have said they can get it off plenum (black plastic bit) off with the cowl in place...I haven't been able to. My forearms won't fit to access the bolts on the bracket that hold the plenum to the engine :dunno:

2) The are rubber gaskets on the bottom of the plenum (as well as the throttle body) where it sits on the intake manifold, no you don't have to replace them as long as you don't damage them. I put a thin coating of oil on them before re installation.

3) I don't have an official answer, but I put in all 6 bolts finger and torque in the order I posted

Do you think you could have pushed them to 120k Sweeny?

Wondering what the dealership charges for this?
Yes I could. they were in fairly good condition. I just don't like to wait till they start wearing out personally. I'd rather replace before I lose performance vs wait till performance isn't there and replace. Granted I could just be overreacting and the iridiums could last way longer than 120k without the performance degrading, who knows. But that's my view on it.

I THINK it was a few hundred, I can't remember. It wasn't as much as my sisters audi though. Get this, she has a 2010 A4, was in for the 35k mile service. They charged her $900+ in normal maintenance (plugs, CVT fluid (they charge ~$50 a qt WTF), filters, etc). She called me wondering wtf was going on. That car has a 4 cyl turbo, they charged $45 for each plug and ~200 in labor....to change a 4 cyl plugs that take all of 5 min to do. So look at it this way, at least this isn't the most expensive spark plug replacement out there :lol: :disappoin
 
#32 ·
Reading thru sweeneyp's fine write up - it seems one of the biggest issues was getting the spark plugs to break loose(rear plugs).

I'll be doing this to an 06 Avalon XL in June. Have a number of long breaker bars. I noticed sweeneyp used a traditional ratchet that's maybe short for stubborn plugs. Hopefully my long breaker will take care of this as I would be performing plug removal on a stone cold engine.
 
#33 · (Edited)
Thanks for the write up.

Just did mine today with a whole bunch of other stuff at 120k miles. But I didn't remove the wiper panels and I also left the rear 12 mm bolt out on the passenger side. I could get it out, but was having a hard time getting it in after 13 hours of working on it today.

My rear plugs were easier to break free than the front for me.

OK. I removed the wiper panel today and placed the bolt in the rear passenger side.. Wish I did it yesterday, but I was hoping to get it done after all that work.
 
#36 ·
Did the plugs on my 2008HL today using the awesome step by step instructions. Had 145k miles, and very glad I did them. They were long past due for a change. Thanks for the write up. Took me about 5 hours.
Someone previously mentioned that the dealer quoted about $263 for the job, including the six plugs. Not a bad price if you ask me.