

I'm not doing a step-by-step DIY, just posting a bit of info that isn't readily available online.
OEM interval: 100k mile initial change, 50k mile changes subsequently
Cooling System Capacities:
With Tow Package, With Rear AC: 12.4 qts
With Tow Package, Without Rear AC: 10 qts
Without Tow Package, With Rear AC: 11.6 qts
Without Tow Package, Without Rear AC: 9.3 qts
Useful Things to have:
Tool
-I used this, really handy funnel for bleeding the system. There are other guides online on how exactly to utilize this specialized funnel.
[ame]http://www.amazon.com/Lisle-24680-Spill-Free-Funnel/dp/B00A6AS6LY/ref=sr_1_fkmr1_1?ie=UTF8&qid=1403409678&sr=8-1-fkmr1&keywords=radiator+bleeder+funnel[/ame]
-Some kind of hose for the engine block drains. I unfortunately don't know the exact size, I just found some random hose that fit and I didn't measure...sorry.
Coolant
You want either Toyota Pink or Valvoline's Zerex Asian. Both are non-silicate coolants required for this engine, its the only ones I know of at the moment that are compatible.
OEM Pink P/N: 00272-SLLC2
Valvoline Zerex Asian: [ame]http://www.amazon.com/Zerex-675130-Vehicle-Anitfreeze-Coolant/dp/B0033QO022/ref=sr_1_1?ie=UTF8&qid=1403409804&sr=8-1&keywords=asian+zerex[/ame]
I found the zerex to be half the price of the pink at the dealerships, you can get the pink online at OEM retailers for ~$15-20 though. I can only find pre-diluted ones unfortunately. I just went with the Zerex because I could get it w/ free shipping.
According to Toyota, this is what they require of coolants for this motor. Match your coolant to meet this:
Radiator Drain
The radiator drain is on the bottom driver side of the radiator. Its a simple plastic wing nut to control the flow, drains out the whole shown. Its a very small valve, it won't flow very much so it takes a long time to drain.
![Image]()
Radiator Bleeder Valve
Its a 6mm hex fitting on top of the upper radiator hose inlet, however I didn't use it during this as I had that funnel that eliminated it from the equation.
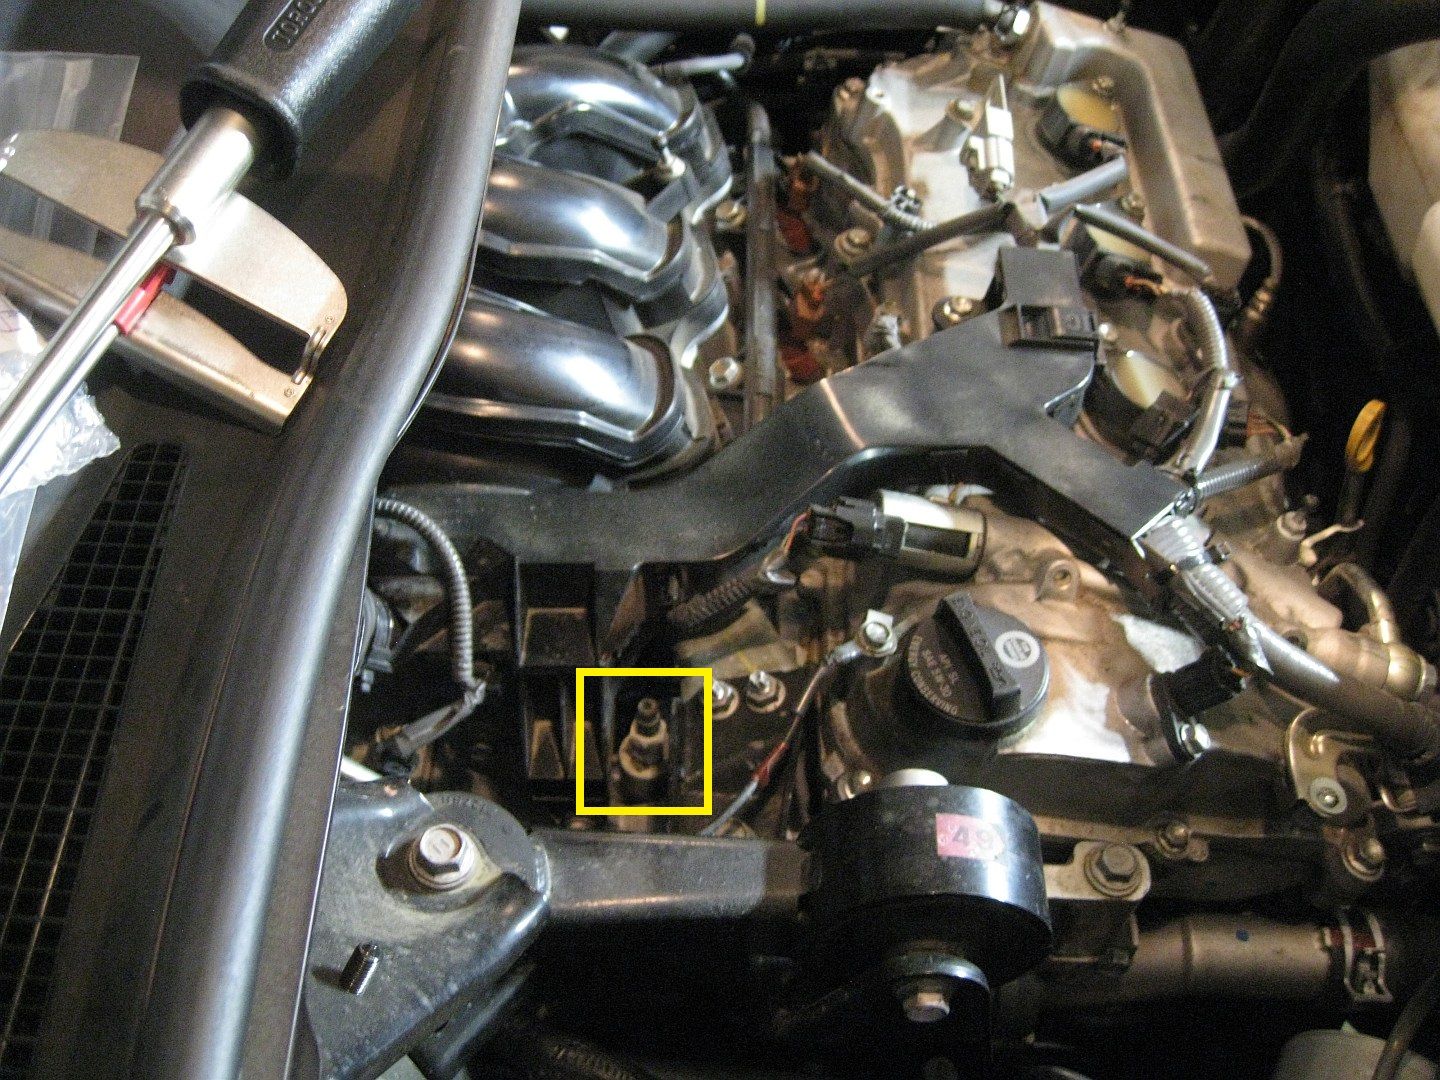
Engine Bleeder Valve
Pop the engine cover off and its shown below. Actual valve portion is a 10mm bolt. Don't remove the main valve, just open the darker bolt in the center.
![Image]()
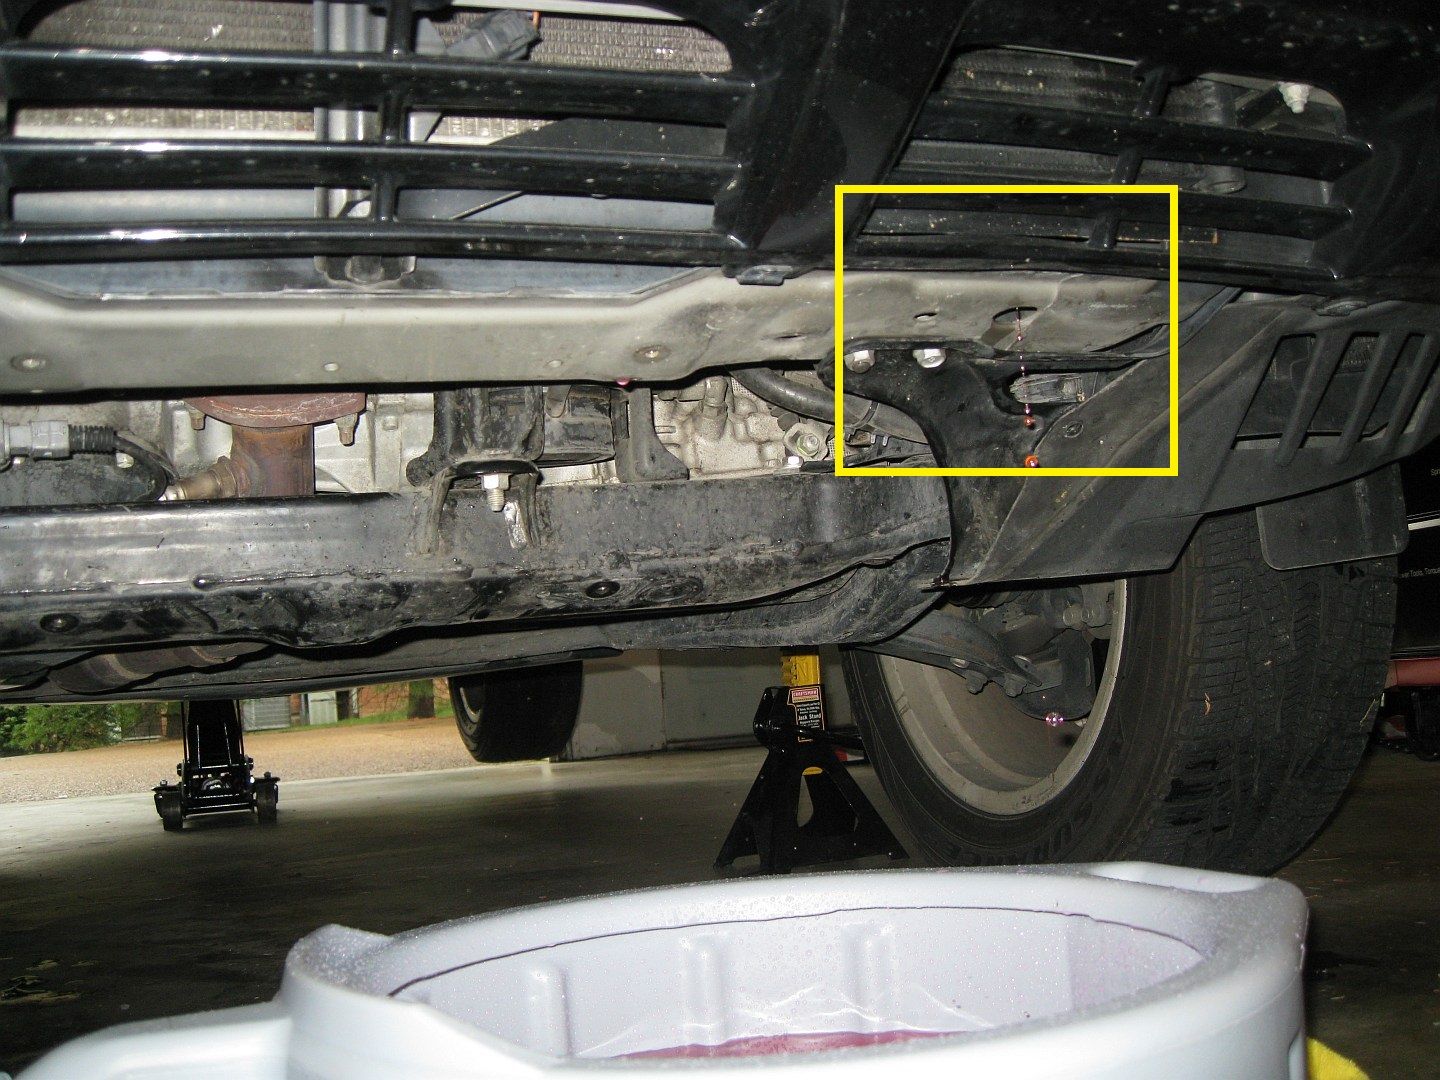
Engine Block Rear Bank Drain
Its on the back of the block (facing the firewall). It is directly behind where the transfer case would be on a awd model and directly below the rear bank exhaust manifold. That's the passenger side wheel axle casing in the bottom and the transaxle in the bottom left to give you an idea of the area. Valve bolt is 10mm, DON'T loosen the valve itself just the center bolt.
![Image]()
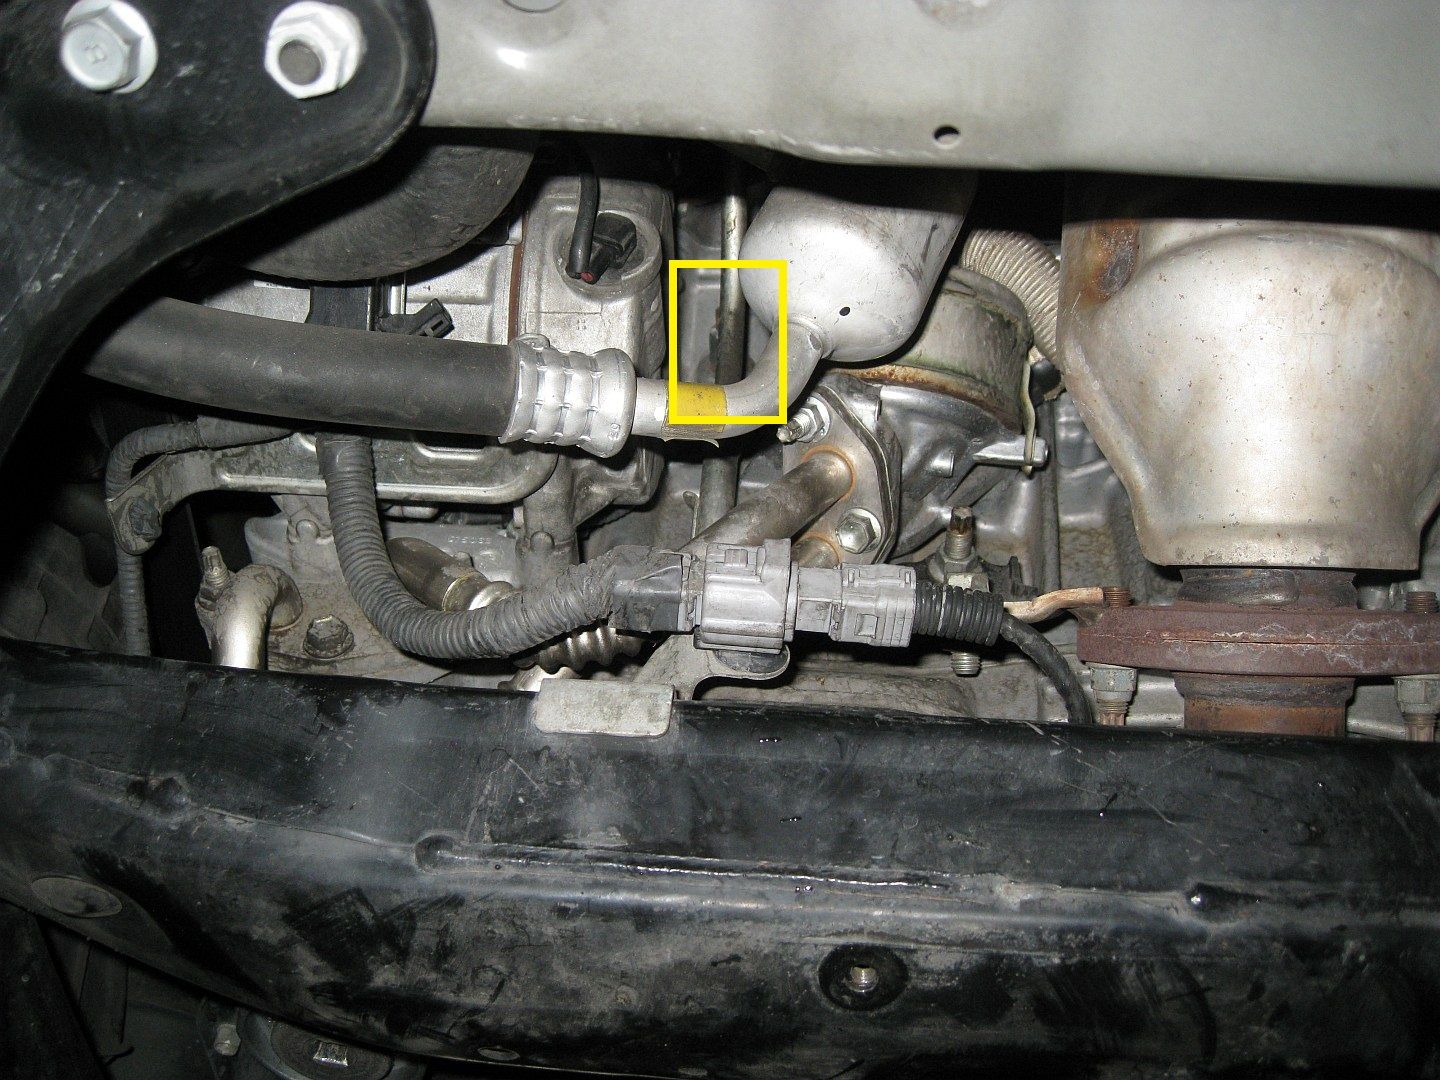
Engine Block Front Bank Drain
The front one is much harder to get too. It sits between the AC compressor and engine oil cooler. Directly behind the dipstick, about half way up the block. I found its much much easier if you get the dipstick out of the way. A 12mm bolt holds it up top, undo that and pull it straight up, and it will pop free.
![Image]()
![Image]()
What I Did and Comments
I did not do a flush using distilled water, just a simple fluid exchange. Because there was no concentrate available (only 50:50 split), I'd never get the concentration right if I did a flush.
What I did do: As near 100% exchange as possible, replaced both upper and lower radiator hoses, replaced thermostat and thermostat steal.
Part numbers for OEM parts used:
Lower Radiator Hose: 16572-0P220 ~$19
Upper Radiator Hose: 16572-0P210 ~$19
Thermostat:90916-A3002 ~$15
Thermostat Gasket: 16325-62010 ~$4
So what I did was drain everything (engine and radiator) then removed the both the front and rear heater core coolant lines. Those were still full of coolant as they don't drain with the engine drain. I used my air compressor with the regulator set to about 10psi (or ball parked, my regulator between 0->20psi isn't very clear.) to push out all the old coolant out of the heater core/lines. It gets the vast majority of the lines, and gets the bulk out of the heater core (though not all). It gets enough for me to be comfortable with. Considering it took just short of 2.8gal to refill it all back up and the total capacity is ~3.1-3.2gal, I think I got enough of it.
While it was all drained, went ahead and replaced the hoses and the thermostat.
Here is how you get to the thermostat...
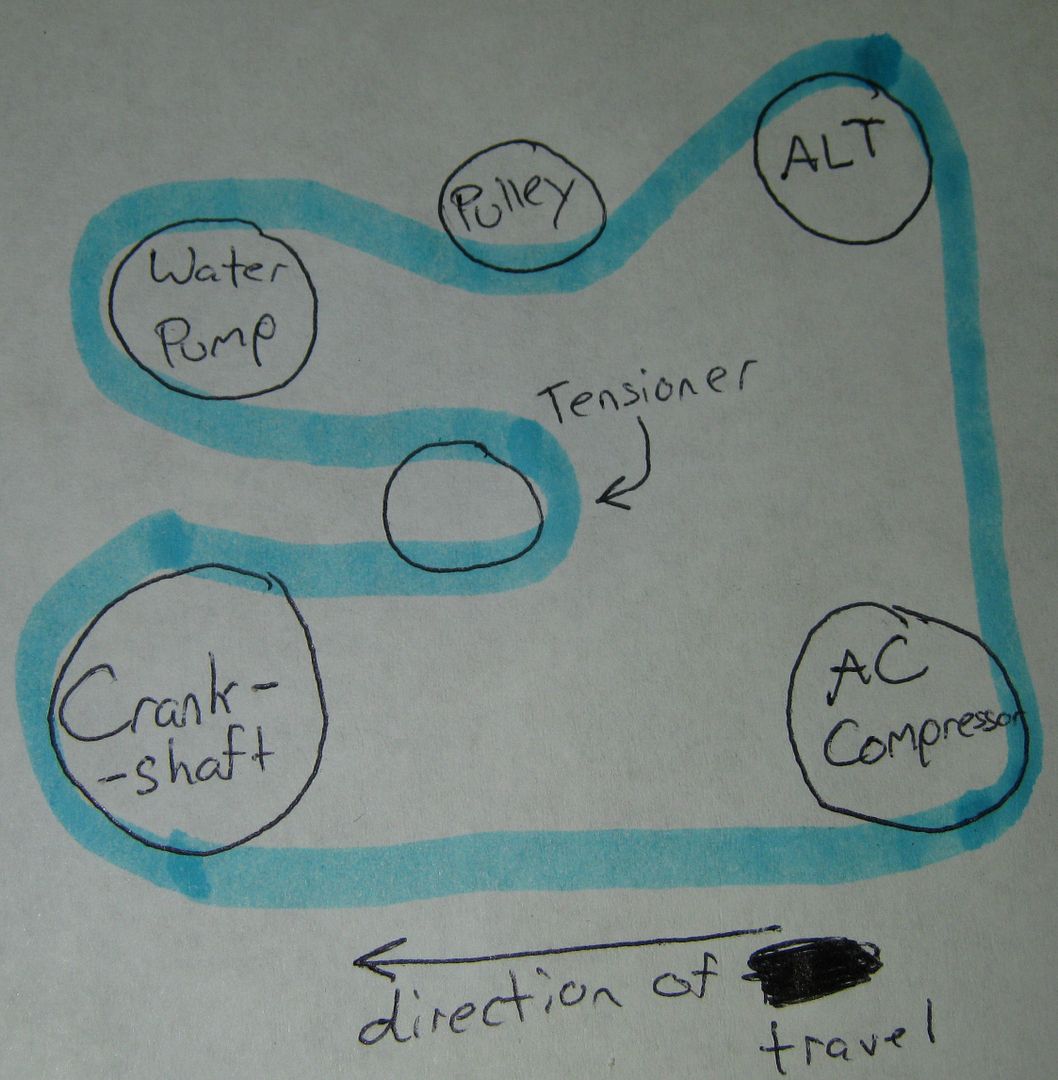
-The hose that comes out above the serpentine belt is the one your after. The thermostat is on the outlet port. But first...the belt/idler pulley.
-You need to loosen the belt tensioner; I've posted in the past how to do it here: http://www.toyotanation.com/forum/122-2nd-generation-2008-2013/586945-diy-serpentine-belt.html You don't need to remove the belt, just give it some slack.
-Next the idler pulley. Its simple, once the tension is off the belt, take a 14mm socket and remove the bolt. Don't lose the washer that's on it, its what makes the bolt only put pressure on the bearing casing and not the pulley itself.. idler is marked below as "pulley"
![Image]()
-Note: when re-installing, simply rebolt on the pulley, the torque rating is ~35-40ftlbs (I can't remember exactly atm), I did it to 45ftlbs. Once its back in place, remove the key from the tensioner and your good to go.
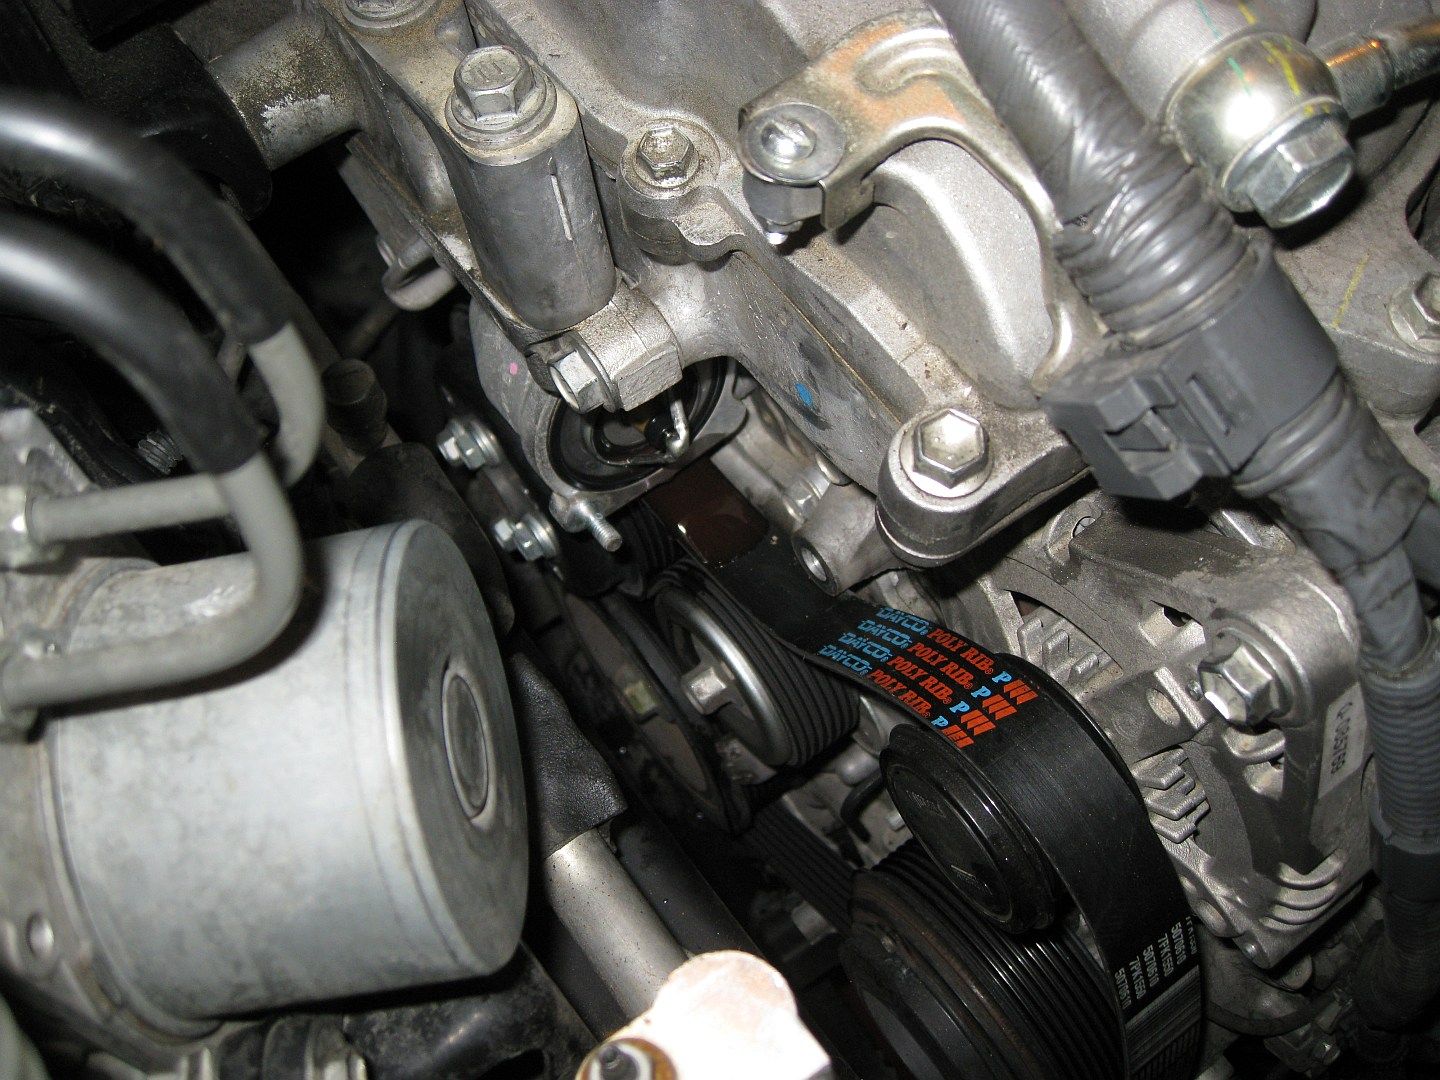
-Next the outlet port needs to come off to get to the thermostat. There are 2 nuts that hold the outlet to the block, marked below in yellow. The one not visible is a a bit difficult to get too. They are 10mm nuts. I used a deep socket and a 6" extension to get to the hidden one. Pass it over the alternator pulley, it will reach and allow easy access with a ratchet.
![Image]()
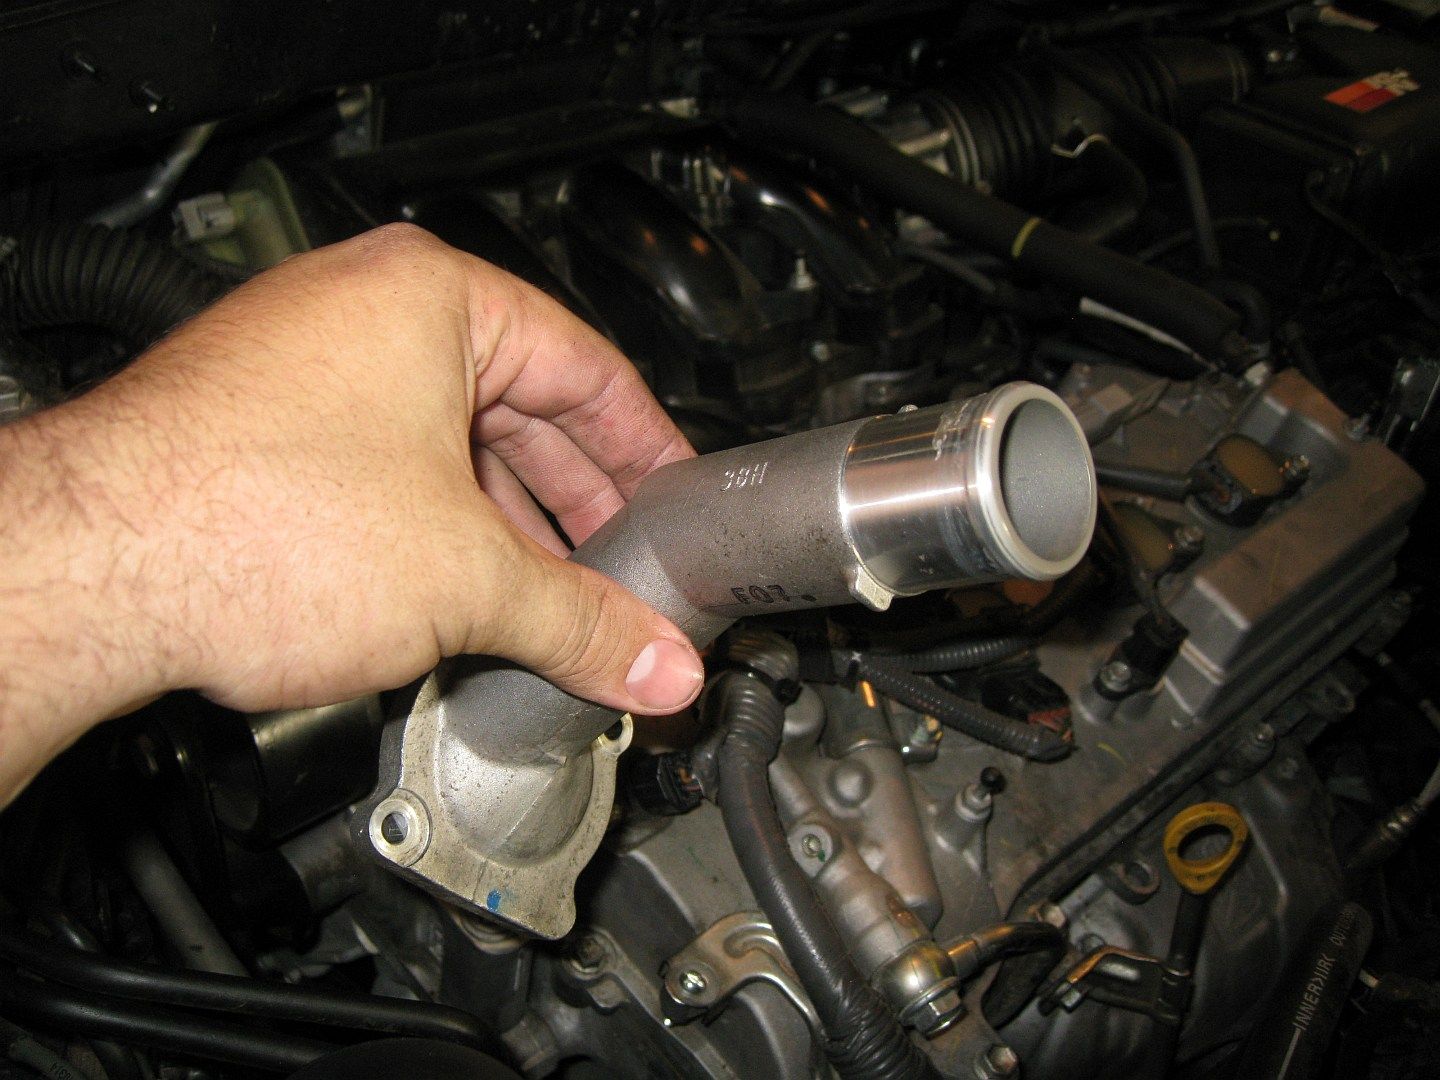
And your prize.
![Image]()
And your 2nd prize, just pull it out.
![Image]()
The thermostat has a jiggle valve on the casing to allow air to escape when bleeding. It needs to be facing up at 12o'clock on re-installation.
Reverse for reinstall, there is a torque for those nuts, but its fairly low, I just snugged it all up with the ratchet.
And now for the headache, the rear heater core had been the biggest PITA to deal with. It got air in it (obviously) and I couldn't for the life of me get it out. The front core and engine didn't have any air in it. When I was bleeding the system, I had the front jacked up as high as I could make it (~20" lift on my floor jack), and had the RPM at 2000rpm, it wasn't enough pressure in the cooling system to force the air out. Though idiot me didn't try to really put my foot into it to try and force it that way. I ended up driving up the steepest hill I know of at 6500rpm to force the air out, and it did the trick. Toyota really should have done some kind of bleeder valve way back there, would have made my life so much easier.
OEM interval: 100k mile initial change, 50k mile changes subsequently
Cooling System Capacities:
With Tow Package, With Rear AC: 12.4 qts
With Tow Package, Without Rear AC: 10 qts
Without Tow Package, With Rear AC: 11.6 qts
Without Tow Package, Without Rear AC: 9.3 qts
Useful Things to have:
Tool
-I used this, really handy funnel for bleeding the system. There are other guides online on how exactly to utilize this specialized funnel.
[ame]http://www.amazon.com/Lisle-24680-Spill-Free-Funnel/dp/B00A6AS6LY/ref=sr_1_fkmr1_1?ie=UTF8&qid=1403409678&sr=8-1-fkmr1&keywords=radiator+bleeder+funnel[/ame]
-Some kind of hose for the engine block drains. I unfortunately don't know the exact size, I just found some random hose that fit and I didn't measure...sorry.
Coolant
You want either Toyota Pink or Valvoline's Zerex Asian. Both are non-silicate coolants required for this engine, its the only ones I know of at the moment that are compatible.
OEM Pink P/N: 00272-SLLC2
Valvoline Zerex Asian: [ame]http://www.amazon.com/Zerex-675130-Vehicle-Anitfreeze-Coolant/dp/B0033QO022/ref=sr_1_1?ie=UTF8&qid=1403409804&sr=8-1&keywords=asian+zerex[/ame]
I found the zerex to be half the price of the pink at the dealerships, you can get the pink online at OEM retailers for ~$15-20 though. I can only find pre-diluted ones unfortunately. I just went with the Zerex because I could get it w/ free shipping.
According to Toyota, this is what they require of coolants for this motor. Match your coolant to meet this:
Part Locations:
Radiator Drain
The radiator drain is on the bottom driver side of the radiator. Its a simple plastic wing nut to control the flow, drains out the whole shown. Its a very small valve, it won't flow very much so it takes a long time to drain.
Radiator Bleeder Valve
Its a 6mm hex fitting on top of the upper radiator hose inlet, however I didn't use it during this as I had that funnel that eliminated it from the equation.
Engine Bleeder Valve
Pop the engine cover off and its shown below. Actual valve portion is a 10mm bolt. Don't remove the main valve, just open the darker bolt in the center.
Engine Block Rear Bank Drain
Its on the back of the block (facing the firewall). It is directly behind where the transfer case would be on a awd model and directly below the rear bank exhaust manifold. That's the passenger side wheel axle casing in the bottom and the transaxle in the bottom left to give you an idea of the area. Valve bolt is 10mm, DON'T loosen the valve itself just the center bolt.
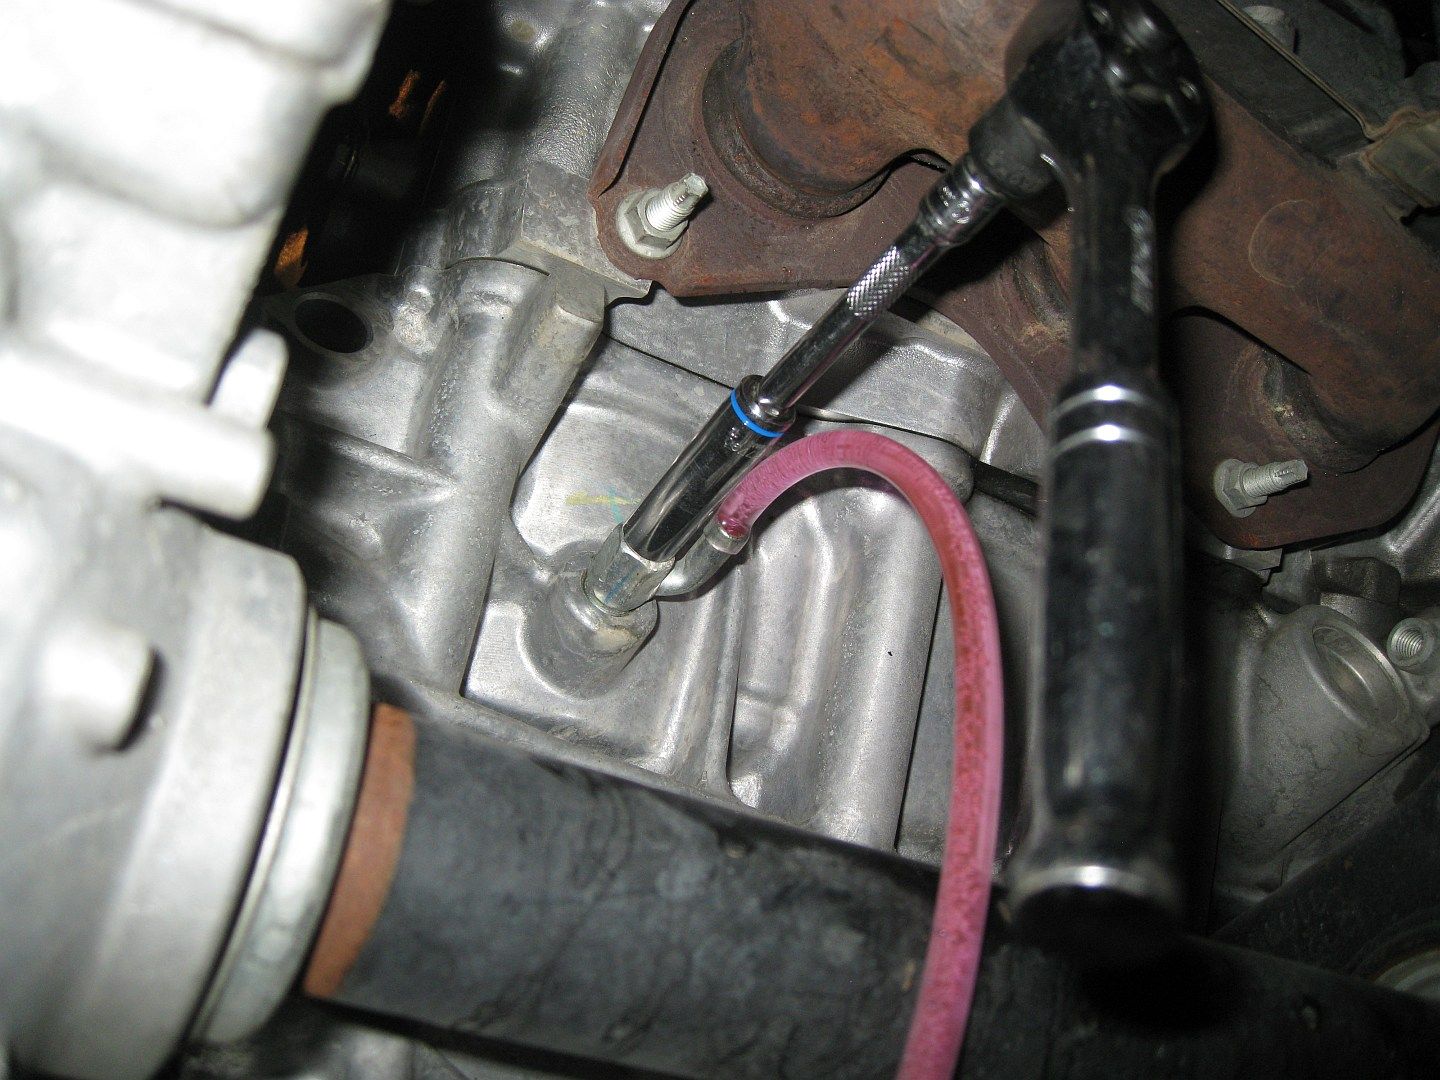
Engine Block Front Bank Drain
The front one is much harder to get too. It sits between the AC compressor and engine oil cooler. Directly behind the dipstick, about half way up the block. I found its much much easier if you get the dipstick out of the way. A 12mm bolt holds it up top, undo that and pull it straight up, and it will pop free.

What I Did and Comments
I did not do a flush using distilled water, just a simple fluid exchange. Because there was no concentrate available (only 50:50 split), I'd never get the concentration right if I did a flush.
What I did do: As near 100% exchange as possible, replaced both upper and lower radiator hoses, replaced thermostat and thermostat steal.
Part numbers for OEM parts used:
Lower Radiator Hose: 16572-0P220 ~$19
Upper Radiator Hose: 16572-0P210 ~$19
Thermostat:90916-A3002 ~$15
Thermostat Gasket: 16325-62010 ~$4
So what I did was drain everything (engine and radiator) then removed the both the front and rear heater core coolant lines. Those were still full of coolant as they don't drain with the engine drain. I used my air compressor with the regulator set to about 10psi (or ball parked, my regulator between 0->20psi isn't very clear.) to push out all the old coolant out of the heater core/lines. It gets the vast majority of the lines, and gets the bulk out of the heater core (though not all). It gets enough for me to be comfortable with. Considering it took just short of 2.8gal to refill it all back up and the total capacity is ~3.1-3.2gal, I think I got enough of it.
While it was all drained, went ahead and replaced the hoses and the thermostat.
Here is how you get to the thermostat...
-The hose that comes out above the serpentine belt is the one your after. The thermostat is on the outlet port. But first...the belt/idler pulley.
-You need to loosen the belt tensioner; I've posted in the past how to do it here: http://www.toyotanation.com/forum/122-2nd-generation-2008-2013/586945-diy-serpentine-belt.html You don't need to remove the belt, just give it some slack.
-Next the idler pulley. Its simple, once the tension is off the belt, take a 14mm socket and remove the bolt. Don't lose the washer that's on it, its what makes the bolt only put pressure on the bearing casing and not the pulley itself.. idler is marked below as "pulley"
-Note: when re-installing, simply rebolt on the pulley, the torque rating is ~35-40ftlbs (I can't remember exactly atm), I did it to 45ftlbs. Once its back in place, remove the key from the tensioner and your good to go.
-Next the outlet port needs to come off to get to the thermostat. There are 2 nuts that hold the outlet to the block, marked below in yellow. The one not visible is a a bit difficult to get too. They are 10mm nuts. I used a deep socket and a 6" extension to get to the hidden one. Pass it over the alternator pulley, it will reach and allow easy access with a ratchet.

And your prize.
And your 2nd prize, just pull it out.
The thermostat has a jiggle valve on the casing to allow air to escape when bleeding. It needs to be facing up at 12o'clock on re-installation.
Reverse for reinstall, there is a torque for those nuts, but its fairly low, I just snugged it all up with the ratchet.
And now for the headache, the rear heater core had been the biggest PITA to deal with. It got air in it (obviously) and I couldn't for the life of me get it out. The front core and engine didn't have any air in it. When I was bleeding the system, I had the front jacked up as high as I could make it (~20" lift on my floor jack), and had the RPM at 2000rpm, it wasn't enough pressure in the cooling system to force the air out. Though idiot me didn't try to really put my foot into it to try and force it that way. I ended up driving up the steepest hill I know of at 6500rpm to force the air out, and it did the trick. Toyota really should have done some kind of bleeder valve way back there, would have made my life so much easier.


