

About two days after I bought my 97 Avalon, the check engine light came on. I took it down to Advance Auto Parts to have them read the codes. It came back with a P0420. That is - catalytic converter working below efficency threshold. All that means is your cat is not working as well as it did when the car was new. But it leaves the check engine light on all the time, unless you replace the cat ($1000's).
One option is to use some spark plug defoulers to set the o2 sensor out from the exhaust a few inches. This usually tricks the o2 sensor into believing the cat is working correctly. I did this, but I think I damaged my o2 sensor in the process, because then it started throwing a P0141, which means the o2 sensor heater is bad.
So I decided the bypass the o2 sensor entirely. I bought an o2 sensor simulator from o2sim.com. They are $30, a lot cheaper than a new cat or even an new o2 sensor (which would have solved the bad heater error code, but not the bad cat error code.) These simulators are also useful for those who have gotten rid of their cat with a high flow exhaust.
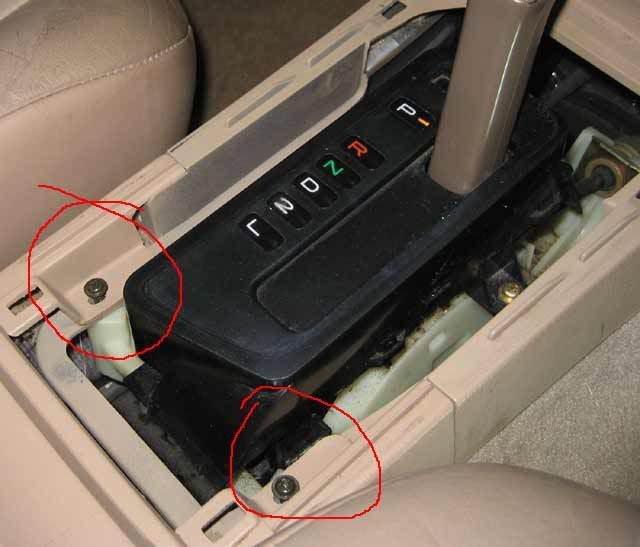
My Chilton manual said to remove the passenger seat to get to the o2 sensor plug. This may not be required, now that I've gotten in there and seen where everything is, but it definately makes it easier. I would suggest removing the rear half of the center console, too, as it makes the carpet a lot easier to pull out of the way. It comes out easily - two bolts inside the storage compartment and two screws under the trim:
![Image]()
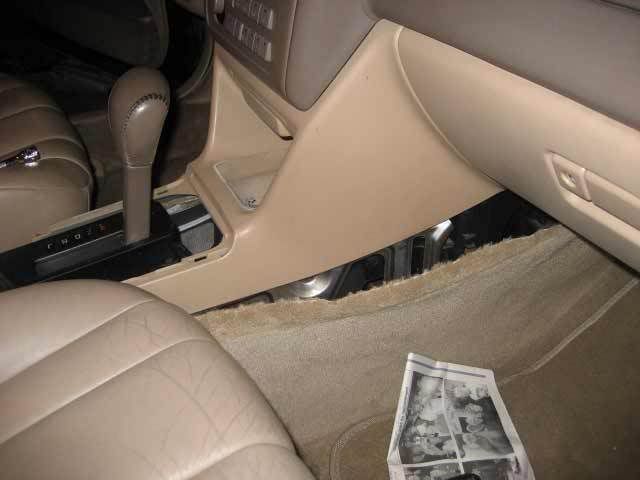
Then pull back the carpet, starting up under the dash:
![Image]()
Here you can see the location of the o2 sensor plug. To remove it from the white clip that holds it in place, pull the grey plug towards the front of the car. If you can do this then you may be able to get the harness out without removing the seat. If you look to the far left of this picture, you can see why it makes it easier if you remove the rear part of the colsole and the passenger seat. The carpet wouldn't be pulling back this far if those were still there.
![Image]()
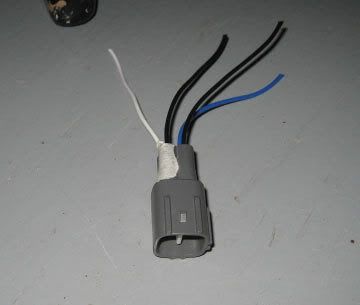
Here is the wiring on the plug (o2 sensor side, not the car harness side)
black = heater +
black = heater -
white = sensor ground
blue = sensor signal
I marked which of the black wires was positive with a piece of white tape (just test the black wires with a volt meter or test light with the key on), then cut out the harness:
![Image]()
Then wire up the o2 simulator as described in the instrutions that come with it (red to +12v, black to o2 sensor ground, and white to sensor output).
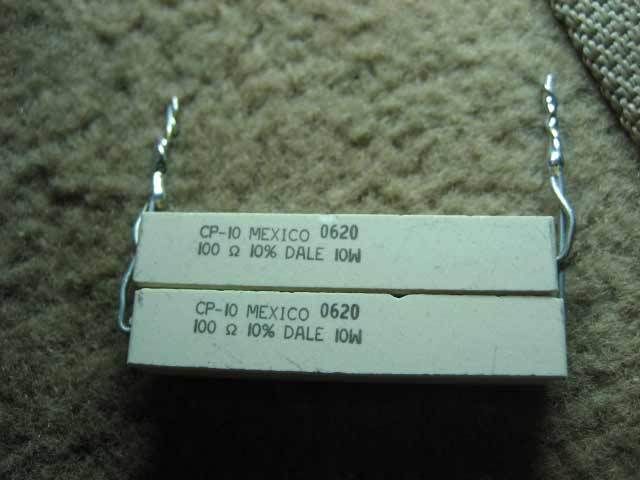
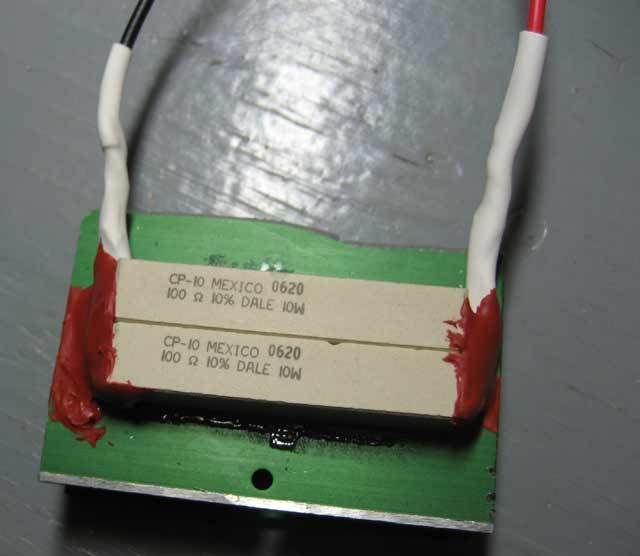
You can leave your existing o2 sensor heater wires hooked up to prevent the bad o2 sensor heater code from being thrown. But that would be much harder to wire up, you'd have to reconnect those two wires back into the old o2 sensor. Or not cut it out in the first place, and just wire in the 02sim with the harness in place. Or completely remove the o2 sensor and harness, and do all the wiring on the bench, then put the whole thing back in. Since my heater was bad, this wasn't an option for me. o2sim.com sells a power resistor that you can use in place of the o2 heater. They are $5, but I decided to make my own from resistors at radio shack for $1.79. I'm glad I did, because the the power resistor 02sim sells is a 20ohm - that would draw 10 watts. I made a 50ohm resistor - that only draws 4 watts - which creates a lot less heat. The 02sim guy told me I could use anything from 20-60 ohms.
![Image]()
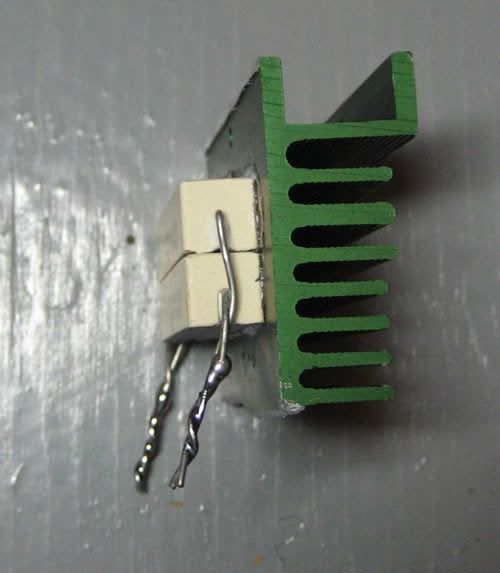
In my test drive with everything wired up on the floor (wanted to make sure it was hooked up right and the code wouldn't come back before I put everything back together), my 50ohm resistor still ran so hot that it would burn your finger if you touched it. So I epoxyed it to half an old CPU heat sink I had laying around:
![Image]()
In my tests the next day hooked up to a power supply, this ran much cooler. But I still wouldn't suggest mounting it where it will touch the carpet.
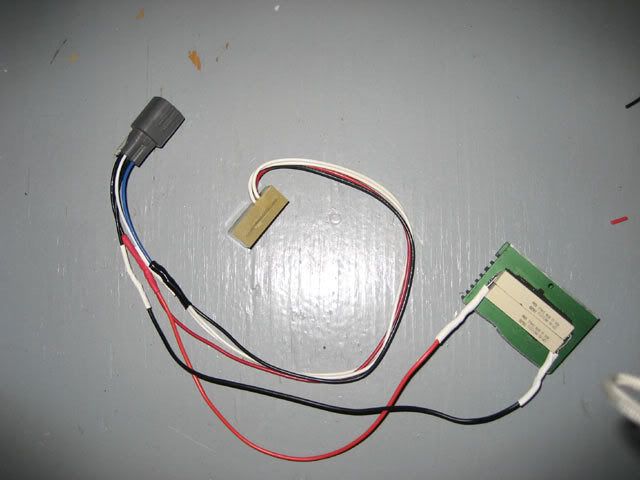
Here is the harness all wired up with the o2sim and the power resistor:
![Image]()
BUT I couldn't heat shrink the resistor leads all the way into the resistor, so there was still a little wire exposed there. So I put a dab of high temp caulk on each side. Regular caulk may have been fine, I don't know. I had this stuff around so I used it.
![Image]()
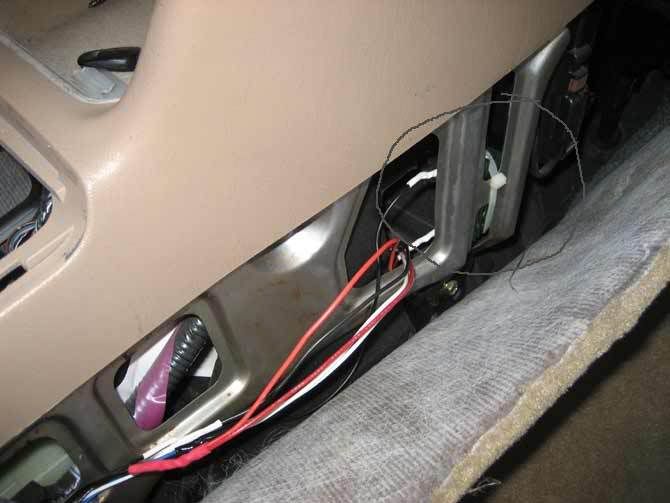
Then I plugged it in and mounted the resistor to a metal support bar where it wouldn't touch anything else:
![Image]()
Its been working great so far!
One option is to use some spark plug defoulers to set the o2 sensor out from the exhaust a few inches. This usually tricks the o2 sensor into believing the cat is working correctly. I did this, but I think I damaged my o2 sensor in the process, because then it started throwing a P0141, which means the o2 sensor heater is bad.
So I decided the bypass the o2 sensor entirely. I bought an o2 sensor simulator from o2sim.com. They are $30, a lot cheaper than a new cat or even an new o2 sensor (which would have solved the bad heater error code, but not the bad cat error code.) These simulators are also useful for those who have gotten rid of their cat with a high flow exhaust.
My Chilton manual said to remove the passenger seat to get to the o2 sensor plug. This may not be required, now that I've gotten in there and seen where everything is, but it definately makes it easier. I would suggest removing the rear half of the center console, too, as it makes the carpet a lot easier to pull out of the way. It comes out easily - two bolts inside the storage compartment and two screws under the trim:
Then pull back the carpet, starting up under the dash:
Here you can see the location of the o2 sensor plug. To remove it from the white clip that holds it in place, pull the grey plug towards the front of the car. If you can do this then you may be able to get the harness out without removing the seat. If you look to the far left of this picture, you can see why it makes it easier if you remove the rear part of the colsole and the passenger seat. The carpet wouldn't be pulling back this far if those were still there.

Here is the wiring on the plug (o2 sensor side, not the car harness side)
black = heater +
black = heater -
white = sensor ground
blue = sensor signal
I marked which of the black wires was positive with a piece of white tape (just test the black wires with a volt meter or test light with the key on), then cut out the harness:
Then wire up the o2 simulator as described in the instrutions that come with it (red to +12v, black to o2 sensor ground, and white to sensor output).
You can leave your existing o2 sensor heater wires hooked up to prevent the bad o2 sensor heater code from being thrown. But that would be much harder to wire up, you'd have to reconnect those two wires back into the old o2 sensor. Or not cut it out in the first place, and just wire in the 02sim with the harness in place. Or completely remove the o2 sensor and harness, and do all the wiring on the bench, then put the whole thing back in. Since my heater was bad, this wasn't an option for me. o2sim.com sells a power resistor that you can use in place of the o2 heater. They are $5, but I decided to make my own from resistors at radio shack for $1.79. I'm glad I did, because the the power resistor 02sim sells is a 20ohm - that would draw 10 watts. I made a 50ohm resistor - that only draws 4 watts - which creates a lot less heat. The 02sim guy told me I could use anything from 20-60 ohms.
In my test drive with everything wired up on the floor (wanted to make sure it was hooked up right and the code wouldn't come back before I put everything back together), my 50ohm resistor still ran so hot that it would burn your finger if you touched it. So I epoxyed it to half an old CPU heat sink I had laying around:
In my tests the next day hooked up to a power supply, this ran much cooler. But I still wouldn't suggest mounting it where it will touch the carpet.
Here is the harness all wired up with the o2sim and the power resistor:
BUT I couldn't heat shrink the resistor leads all the way into the resistor, so there was still a little wire exposed there. So I put a dab of high temp caulk on each side. Regular caulk may have been fine, I don't know. I had this stuff around so I used it.
Then I plugged it in and mounted the resistor to a metal support bar where it wouldn't touch anything else:
Its been working great so far!


