

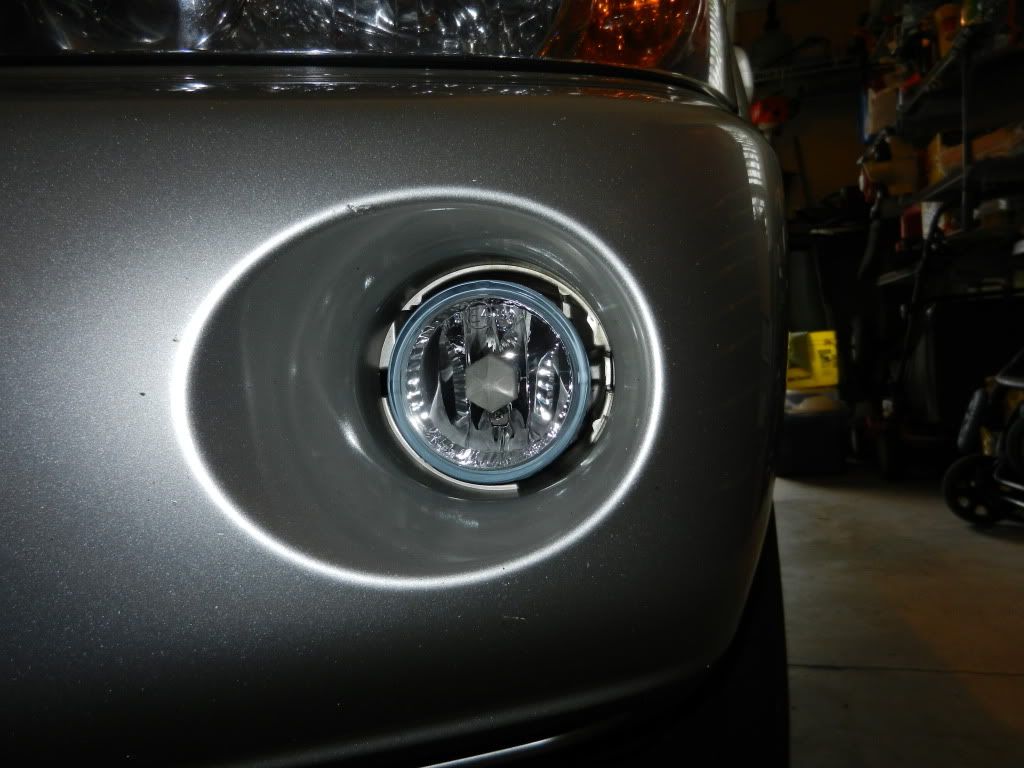
Here is a DIY tutorial on how to change-out the complete fog light assemblies without removing the bumper. My vehicle is a 2004 Highlander Limited with factory fog lights.
I found terrific replacement foglight assemblies on Amazon for about $80 USD (for both L & R) including shipping. I'm sure there are other sources. They came with the # 9006 bulbs as well. Note: there are different part numbers for the LEFT & RIGHT side fog light assemblies.
Total Time to perform this job: (1st fog light assembly) 20-30 minutes: (2nd fog light assembly) 10 minutes.
Total investment: About $82.00 USD
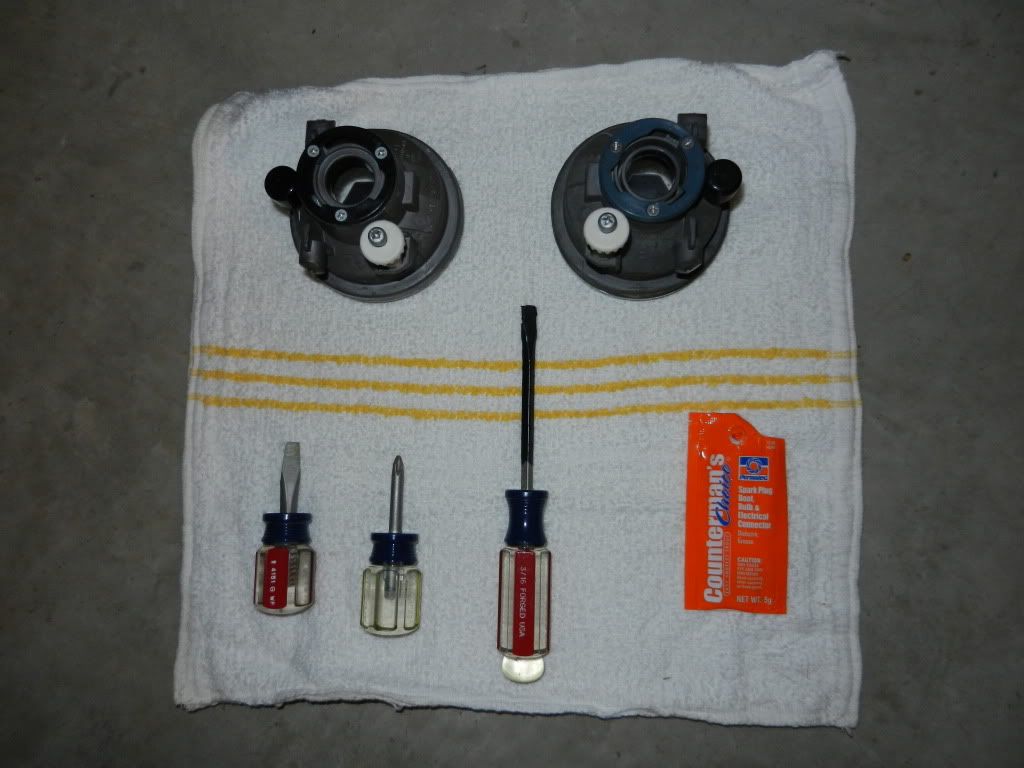
Parts & Materials needed: New foglight assemblies (or just one if that is all you want to do); short 1/4 flathead screwdriver; short #2 phillips screwdriver; narrow flathead screwdriver, approx 6" long and TAPE the tip, then downward including at least 3" of the shank using electrical tape; small amount of dielectric grease, rubber glove(s), small flashlight and a rag.
![Image]()
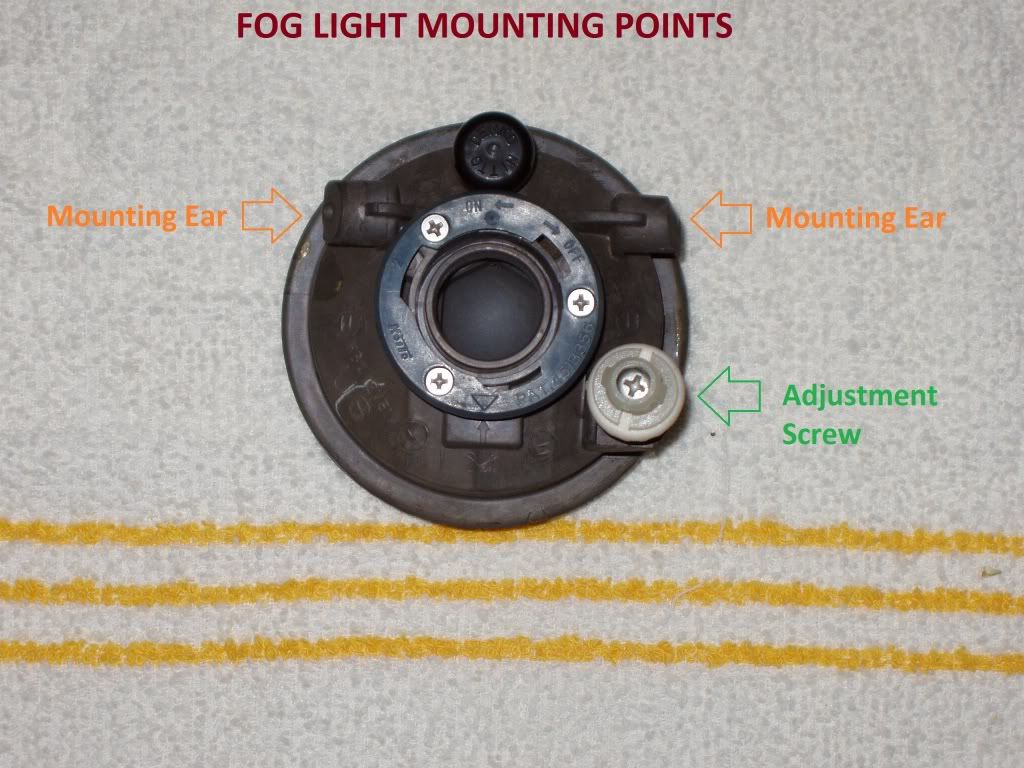
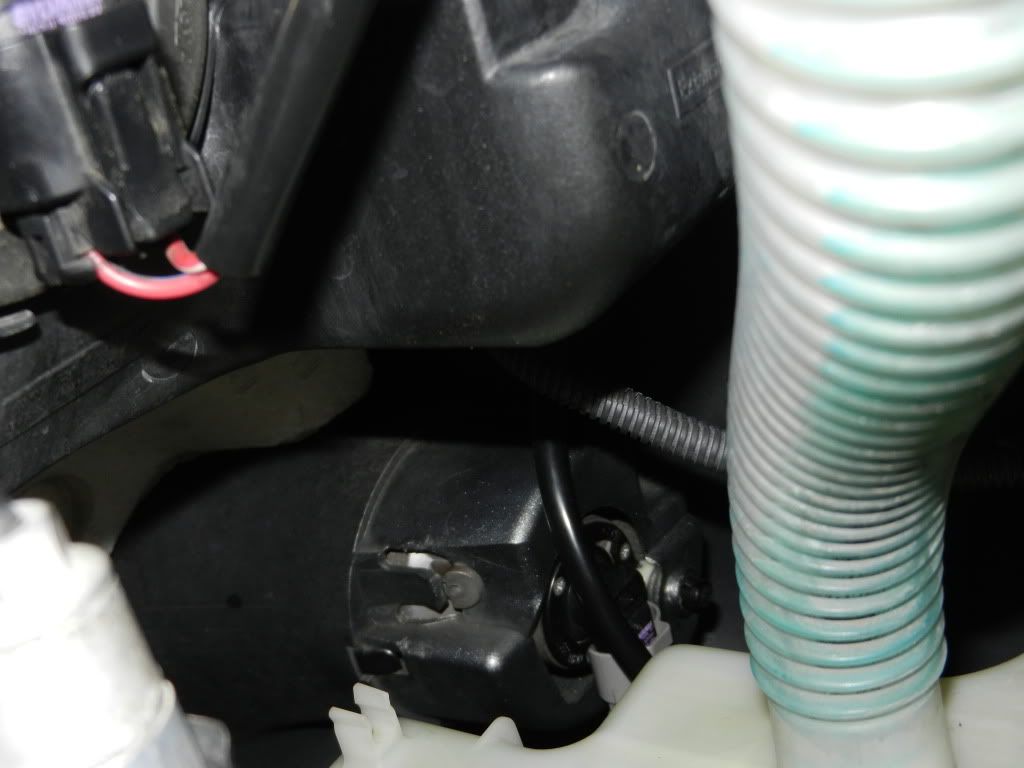
Fog Light Mounting Points: There are three points on the fog light assembly that hold it in place within the bumper/moulding housing. TWO ears, one on each side, that slide in at approx. the 3 & 9 o'clock position; and the adjustment screw, which will be on the bottom left or right, depending on which fog light you are working on.
![Image]()
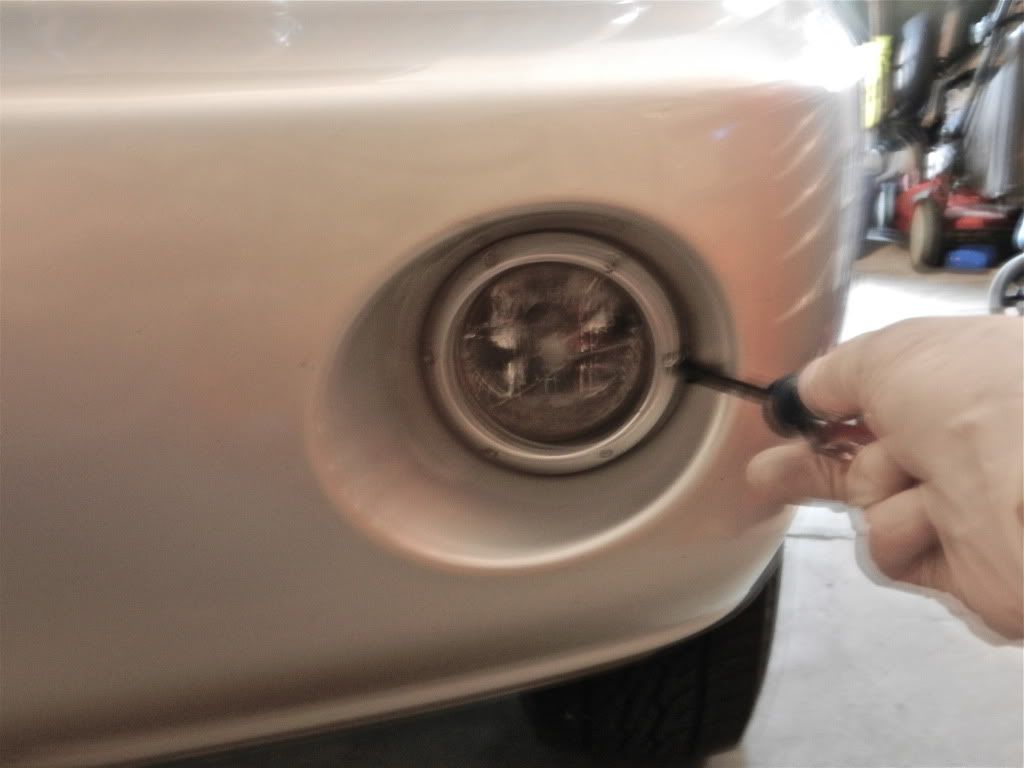
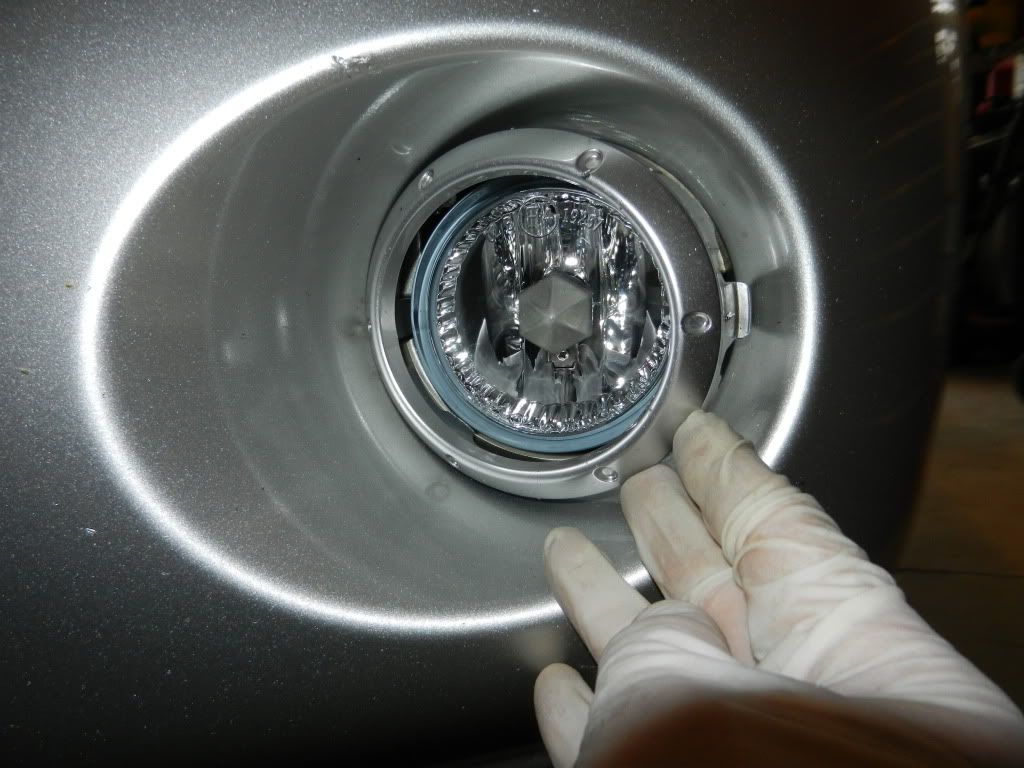
Remove the Trim Ring: First, remove the outer trim ring by inserting the long flathead screwdriver on one side of the gap. Gently pry inwards, then outwards towards you to disengage the tab from its mounting slot. You will then be able to completely remove the trim ring by hand. Make sure to tape the screwdriver or you may scratch the finish of the bumper/moulding.
![Image]()
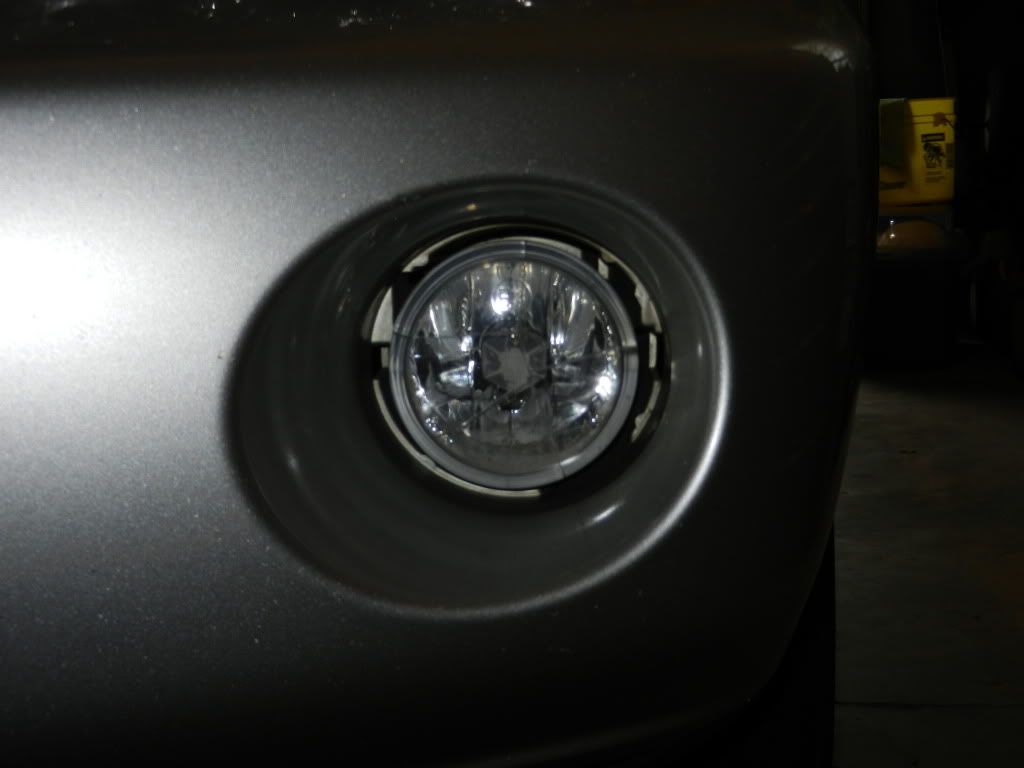
Trim Ring removed:
![Image]()
Pic of Passenger side Fog Light Housing: This side was easier to get a pic of. I wanted to show this because I found it easier to complete the removal & installation of new fog light assembly(s) from the TOP. I stood right in front of the front grill/radiator and reached down to access the fog light housing on each side.
![Image]()
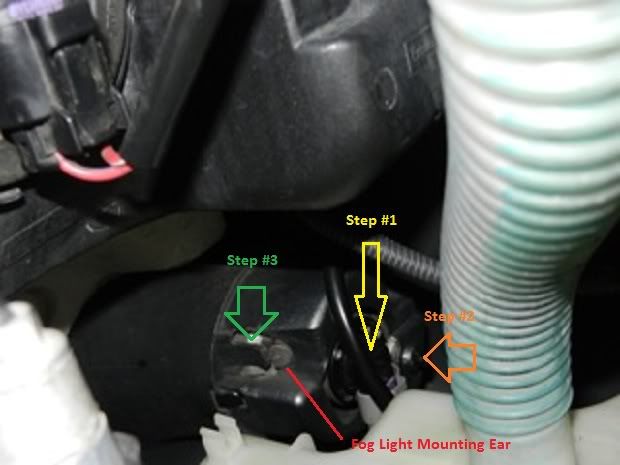
Removing the Fog Light Assembly: 1. Reach down & remove the bulb/plug from the back of the housing (Yellow arrow in pic below). Twist approx 45 degrees and pull it out straight back. Let it dangle out of the way. (Wear a rubber glove when performing steps with the bulbs). 2. Using the #2 phillips, reach down and insert screwdriver horizontally through the black plastic guide cap to access the adjustment screw (orange arrow in pic) and turn counter-clockwise 5-7 turns. this will push the fog light slightly forward which will enable the mounting ear to disengage easier in the next step. 3. Using the short flathead screwdriver, insert it downward behind the black tab as shown by the green arrow in the pic below. Then gently pry the tab out to disengage the mounting ear from it's slot. You may need to reach around to the fog lens face with your other hand and pull slightly. 4. Now look at the fog lens face & assembly from the front of the bumper & it should be partially disengaged. You may need to slightly twist or pry it to disengage the opposite side mounting ear from it's slot. 5. Next take the #2 phillips and again turn the adjustment screw counter-clockwise while holding the fog lens face with your other hand. Keep turning until the entire assembly pops out the front into your hand. Note: The adjustment screw stays behind, still part of the moulded housing back.
![Image]()
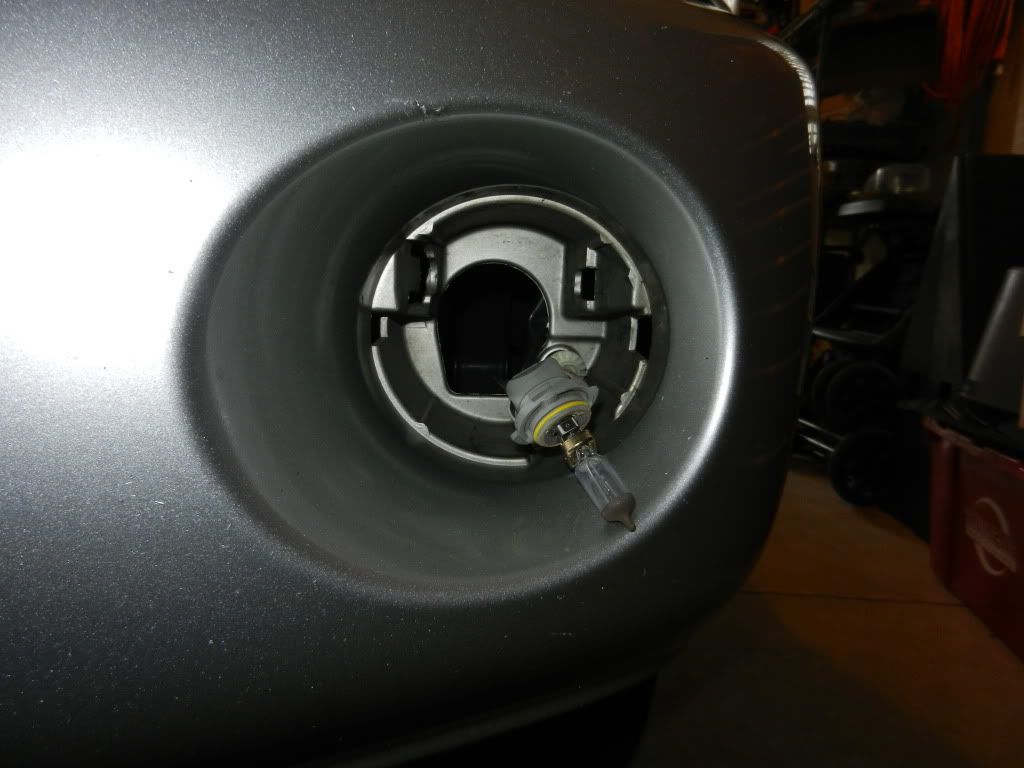
Change the lamp/bulb: Now is a good time to change-out the old #9006 bulb. Pull the harness & old bulb/plug out the fog light hole in the bumper. Use new bulb of choice & replace. Use a small amount of dielectric grease on the socket & plug. Then stick the harness back through the hole and let dangle. Caution!! wear rubber gloves when handling the bulb & plug. Wipe bulb if contaminated using clean white cloth, or paper towel & rubbing alcohol.
![Image]()
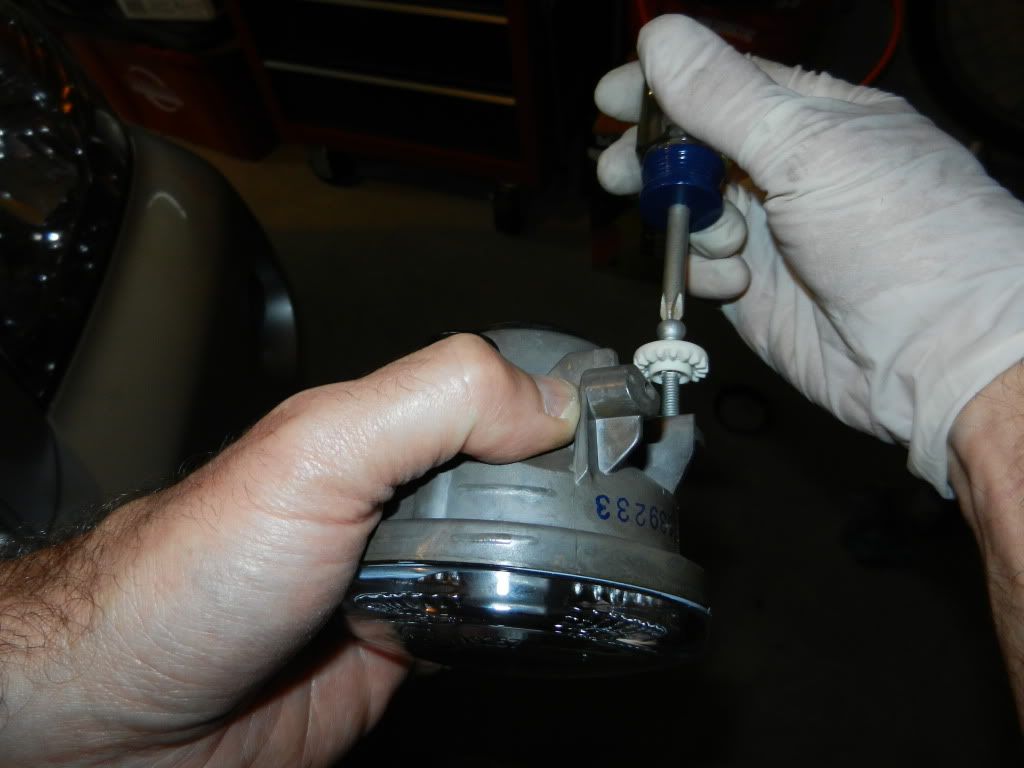
Remove Adjustment Screw: 1. In preparation for installing the new fog light, we must first remove the adjustment screw. Remember...the original screw stayed within the housing when we removed the "old" fog light. Use the #2 phillips and remove the screw. Note: The white plastic "splined" wheel (shown below) that the screw goes through comes off as well.
![Image]()
Install New Fog Light: We are basically reversing the above steps, only this is much easier. 1. Ensure you have the right fog light assembly. 2. You will need to guide the new assembly into the opening/housing. The first mounting point to hit is the adjusment screw. Line up the hole on the white plastic "nut" on the new fog light with the "old" adjustment screw sticking out at you. Hold the fog light in place and with the other hand reach down & turn the adjustment screw CLOCK-WISE with the #2 phillips. Wiggle the fog light with the other hand until you get it to thread. Turn several turns to be sure the screw threads through the white nut. 3. Look at the front of the lens and you should be able to see the slots for the mounting ears on each side. Gently push the entire assembly in until the ears snap into their respective slot. Inspect from the inside and make sure the inboard ear has been locked in properly by it's housing tab.
![Image]()
Install Bulb into Fog Light: Reach down and re-insert the bulb/plug into the opening & twist approx 45 degrees to secure. Hint: If you can't turn the plug, you may have to turn the adjustment screw counter-clockwise to create a bigger gap for the lamp base to turn.
Re-install Trim Ring: Examine the trim ring tabs and note they are different sizes. Look at the slots in bumper housing and match trim ring tabs to proper slot size. Start at one side and partially guide the tab in. Then the other side. Push slightly inward on the tab then forward. The new assembly will have a small amount of "play" when correctly installed.
![Image]()
FINAL ADJUSTMENT: You will have to use the #2 phillips to adjust the position of the fog light. Turn the adjustment screw as needed to bring the fog light out (forward). It should be nearly centered(but not perfectly) within the trim ring, and forward enough so there is a slight gap between the fog lens and the trim ring. Adjust per your personal preference. NOW, repeat all of the above steps for the other side fog light assembly!! :clap:
I found terrific replacement foglight assemblies on Amazon for about $80 USD (for both L & R) including shipping. I'm sure there are other sources. They came with the # 9006 bulbs as well. Note: there are different part numbers for the LEFT & RIGHT side fog light assemblies.
Total Time to perform this job: (1st fog light assembly) 20-30 minutes: (2nd fog light assembly) 10 minutes.
Total investment: About $82.00 USD
Parts & Materials needed: New foglight assemblies (or just one if that is all you want to do); short 1/4 flathead screwdriver; short #2 phillips screwdriver; narrow flathead screwdriver, approx 6" long and TAPE the tip, then downward including at least 3" of the shank using electrical tape; small amount of dielectric grease, rubber glove(s), small flashlight and a rag.
Fog Light Mounting Points: There are three points on the fog light assembly that hold it in place within the bumper/moulding housing. TWO ears, one on each side, that slide in at approx. the 3 & 9 o'clock position; and the adjustment screw, which will be on the bottom left or right, depending on which fog light you are working on.
Remove the Trim Ring: First, remove the outer trim ring by inserting the long flathead screwdriver on one side of the gap. Gently pry inwards, then outwards towards you to disengage the tab from its mounting slot. You will then be able to completely remove the trim ring by hand. Make sure to tape the screwdriver or you may scratch the finish of the bumper/moulding.
Trim Ring removed:
Pic of Passenger side Fog Light Housing: This side was easier to get a pic of. I wanted to show this because I found it easier to complete the removal & installation of new fog light assembly(s) from the TOP. I stood right in front of the front grill/radiator and reached down to access the fog light housing on each side.
Removing the Fog Light Assembly: 1. Reach down & remove the bulb/plug from the back of the housing (Yellow arrow in pic below). Twist approx 45 degrees and pull it out straight back. Let it dangle out of the way. (Wear a rubber glove when performing steps with the bulbs). 2. Using the #2 phillips, reach down and insert screwdriver horizontally through the black plastic guide cap to access the adjustment screw (orange arrow in pic) and turn counter-clockwise 5-7 turns. this will push the fog light slightly forward which will enable the mounting ear to disengage easier in the next step. 3. Using the short flathead screwdriver, insert it downward behind the black tab as shown by the green arrow in the pic below. Then gently pry the tab out to disengage the mounting ear from it's slot. You may need to reach around to the fog lens face with your other hand and pull slightly. 4. Now look at the fog lens face & assembly from the front of the bumper & it should be partially disengaged. You may need to slightly twist or pry it to disengage the opposite side mounting ear from it's slot. 5. Next take the #2 phillips and again turn the adjustment screw counter-clockwise while holding the fog lens face with your other hand. Keep turning until the entire assembly pops out the front into your hand. Note: The adjustment screw stays behind, still part of the moulded housing back.
Change the lamp/bulb: Now is a good time to change-out the old #9006 bulb. Pull the harness & old bulb/plug out the fog light hole in the bumper. Use new bulb of choice & replace. Use a small amount of dielectric grease on the socket & plug. Then stick the harness back through the hole and let dangle. Caution!! wear rubber gloves when handling the bulb & plug. Wipe bulb if contaminated using clean white cloth, or paper towel & rubbing alcohol.
Remove Adjustment Screw: 1. In preparation for installing the new fog light, we must first remove the adjustment screw. Remember...the original screw stayed within the housing when we removed the "old" fog light. Use the #2 phillips and remove the screw. Note: The white plastic "splined" wheel (shown below) that the screw goes through comes off as well.
Install New Fog Light: We are basically reversing the above steps, only this is much easier. 1. Ensure you have the right fog light assembly. 2. You will need to guide the new assembly into the opening/housing. The first mounting point to hit is the adjusment screw. Line up the hole on the white plastic "nut" on the new fog light with the "old" adjustment screw sticking out at you. Hold the fog light in place and with the other hand reach down & turn the adjustment screw CLOCK-WISE with the #2 phillips. Wiggle the fog light with the other hand until you get it to thread. Turn several turns to be sure the screw threads through the white nut. 3. Look at the front of the lens and you should be able to see the slots for the mounting ears on each side. Gently push the entire assembly in until the ears snap into their respective slot. Inspect from the inside and make sure the inboard ear has been locked in properly by it's housing tab.
Install Bulb into Fog Light: Reach down and re-insert the bulb/plug into the opening & twist approx 45 degrees to secure. Hint: If you can't turn the plug, you may have to turn the adjustment screw counter-clockwise to create a bigger gap for the lamp base to turn.
Re-install Trim Ring: Examine the trim ring tabs and note they are different sizes. Look at the slots in bumper housing and match trim ring tabs to proper slot size. Start at one side and partially guide the tab in. Then the other side. Push slightly inward on the tab then forward. The new assembly will have a small amount of "play" when correctly installed.
FINAL ADJUSTMENT: You will have to use the #2 phillips to adjust the position of the fog light. Turn the adjustment screw as needed to bring the fog light out (forward). It should be nearly centered(but not perfectly) within the trim ring, and forward enough so there is a slight gap between the fog lens and the trim ring. Adjust per your personal preference. NOW, repeat all of the above steps for the other side fog light assembly!! :clap:
")


