Toyota Forum banner

TPMS bypass DIY

226K views 133 replies 76 participants last post by  Jcmetals  
#1 · (Edited by Moderator)
05-06 TPMS bypass DIY

Well folks, here's the TPMS bypass some of you have asked about. Hopefully this will help. Sorry if the images are not the best, I took them at full resolution, reduced and moved them from Canon Zoombrowser to My Documents ( where they are about 70K each), then uploaded them to Car Domain so they can be picked up here. :rolleyes: I'm no computer expert, but here we go...

Image
Image


Image


Undo bottom of glove box shock from glove box by pinching the post, pull in sides of glove box to get stops past the surrounding dash plastic, then lower glove box more and POP the glove box off its hinge points.


Image


Remove the shock temporarily to get it out of your way.


Image


This picture is of the harness change with the TPMS light in the always off possition.

Image


Here I'm holding the wire that is the output of the TPMS computer, I have put a male crimp here. This wire puts out a ground of just a few ohms when it wants the light out.

Image


Here is the ground lead I've put in, a simple fuse link with a loop connector for the ground lug, and a male connector for the TPMS light connection.

Image


Here you see the female connector attatched to the light lead (About an inch out of the harness), plugged into the TPMS computer lead. This is the factory configuration for the light to function according to the TPMS output.

Image


This is just a pull away shot to give you a better overall view of the area. The wiring is here configured for the light to be off.

Image


This is a close up shot to show you the way the harness should look and the correct wire to cut into. Again, I've cut the wire about an inch out of the harness plug.

Image


Here is the best place to ground the fuse link wire. In case your wondering, I've used a three amp fuse, you can probably get away with much less if you use a glass fuse holder. I've fused the connection for an added safety level. The light gets its power from the instrument cluster, if there were a problem with the light, how much current would go thru it before the cluster fuse blows? I don't care to find out. Better safe than sorry.

Image


Zip tie the harness back in place when you're done, it makes it neater.

Image


This is a picture of a crimping tool and the types of crimps you'll need for the job.

BIG NOTE: I WANT TO STRESS THAT THE TPMS LIGHT WILL BE DISABLED!!! THE TPMS COMPUTER MAY BE COMPLAINING ALL IT WANTS, BUT YOU'LL NOT KNOW ABOUT IT, UNLESS YOU RECONFIGURE THE LEADS TO THE FACTORY SET-UP. IF YOU DON'T PAY ATTENTION TO YOU'RE TIRE PRESSURE ON A REGULAR BASIS, DON'T DO THIS MOD! THE AUTHOR TAKES NO LIABILITY OR RESPONSIBILITY FOR ANY PROBLEMS OR SITUATIONS ARRISING FROM FOLLOWING WHAT I DID TO MY TRUCK.

I can say that I've had no trouble with my truck from doing this mod. When I change the configuration back to factory, it works just fine. The TPMS computer does not seem to communicate to the ECU or anything else for that matter. This mod is now several months in my truck without any issue. BUT I CHECK MY TIRE PRESSURE WITH A QUALITY GUAGE REGULARLY!!! Remember, Uncle Sam thinks you're an incompetent imbicile and he wants you to be safe from yourself more than anything else. :lol:

Good luck in all your endevours, Richard.

P.S. Sorry for any grammatical or spelling errors.:disappoin
 
#6 ·
I eventually do this mod one day. I guess when I'm over there under the glove compartment I'll pop the 4x4 harness out and do the 4LO on the go mod as well. :D
 
#8 ·
Pb said:
Good work. I like a man that uses real crimpers. :thumbup: I've got several Klein crimpers like that.

This is now added to the DIY sticky.
Thomas & Betts crimpers I believe, they are the only thing I use, for stripping as well as crimping.

Marc M
 
#9 ·
You're correct, the crimpers in the photo are Thomas & Betts, but I also have a set of Klein crimpers. Way back, when I was a professional car and home A/V installer, I bought these as I can't stand cheap tools. Snap On for everything else.:naughty:
 
#10 · (Edited)
Yeah, they are great for stripping, once you get the feel for them. I rarely use conventional wire strippers. I get a good discount on Klein stuff through a friend that works at an electronics warehouse. About 50% off retail.
 
#11 ·
Wow - that's a huge addition to this forum. Nice work paladin. question though:

Image


Is the connector in the background (by your index finger) where you grounded the TPMS wire out of the harness, and then the male connector you are holding is if you wanted to put it back to stock so that the TPMS light would function again?
 
#13 ·
The low tech method

Hi, just thought I'd chime in with my solution (borrowed from an earlier TN message board contributor) to a constantly lit tpms light.

When I switched my wheels to Ivan Stewart 16x8s, the dealer confirmed what I already knew going in. The sensors would not fit the IS wheels. When I got the truck back, I had a solid TPMS light.

Thanks to a TN forum search, I saw that someone suggested using a handtruck (dolly) wheel from Home Depot to contain the sensors. I went to home depot and found a small 8" wheel for $20. I placed the 4 sensors into the tire and inflated it to 35 psi. The light went out right away. It's been about 2 weeks now and no light. I keep the tire in the rear storage compartment behind the back seat in the double cab.

The hardest part was getting the tire back onto the rim.
 
#16 ·
cool I will be doing this tomorrow.
 
#17 ·
Whooooo Yaaa That god damn light is gone. Though after driving with it on for 7 months I did not notice it anymore :lol: But maybe now I will notice if some dash light actually comes on (knocks on wood)

Thanks for this super simple mod. This was allot easier than the way the other guy did his. Pulling 1/2 the dash apart to get to the brain.
 
#18 ·
Hey lotust? What about this mod that you posted?
lotust said:
here is another way from the boards of TTORA

Hope this might be helpful...

Why clip a wire or buzzer when you can disable the entire system? Just "Pull the plug!"

More literally, remove the power from the TirePressure Monitor ECU. It's pretty easy to fins & access too. There is no fuse to pull. It's wired in with the ignition fuse, BUT there is only one power wire powering the TPM ECU (light green), so no complicated stuff.

Here's the other wires to the TPM ECU: There are 2 grounds... one of them for the reset switch (green, the other is white/black). You have 3 wires for the TPM reciever module (Red w/ white stripe, light blue w/ white stripe, and a grey one). You then have the speed sensor from the combo meter (violet w/ white stripe) and the indicator light wire (light blue, as you know). Last 2 wires go to the Data Link Conector #3. (one is pink w/ black stripe, the other is white). That Data link #3 is not dependent on the TPM ECU alone... it also recieves info from ABS, skid control and the main ECU, so it shouldn't cause issues if you just "de-power" the TPM ECU. After all the '05 has the same Data Link except without the TPMS.

Ok now some pics so you can find it.

The Light Green wire (power) you need to disconnect is under the left kick panel. I would recommend cutting it and inserting a switch to toggle the power off or on. That way you can disable it for off roading or leave it on for cruising around town. It's "Instrunment Panel J/B No. 1."

Here's where it's at:
Image


Here is the Connector (DA) where the wire is at. It's pin #2 (light green).

Image


If you want to test if before you clip it, pull the plug, tape off pin #2 (light green) with electrical tape and plug it back in. That should remove power, then deflate a tire or toggle the reset switch to verify it's not working. Simple. (pull tape off when done)


Clip the wire and run leads to a switch if you want to be able to toggle it on or off.

Here's one last pic to show you the location, AND the TPM ECU if you still want to find & clip the Blue wire to turn off the light.
Image


Well... Good Luck Fellas.
Has anyone tried this way?
 
#47 ·
Well I did the ground out version of this, but my 07 taco light is still on! Now i wonder what i grounded out? possible it dont work on all trucks??
Same color wire, same looking plug, same position, but light still on, put my stock tires / wheels on my 96 isuzu rodeo, perfect fit! guess i have to do some swaping of valve stems! If anyone with an 07 tacoma has the grounding mod work, let me know! thanks!:)

After a few hours out in the garage, I can confirm it no workie! I have tried everything and backwards. Tomorrow, I will try the power disconnect method.
 
#20 · (Edited)
As many of you know, my truck came with steel wheels, so I was anxiously awaiting the day to have my alloys put on. I new the '06 Tacoma came with TPMS sensors, but I had no idea there were two models; one for steel wheels (40*) and one for alloy (20*).

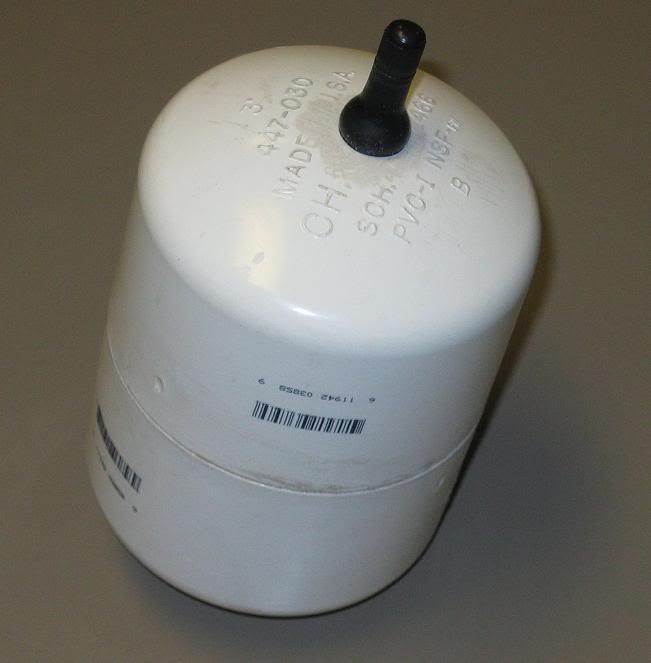
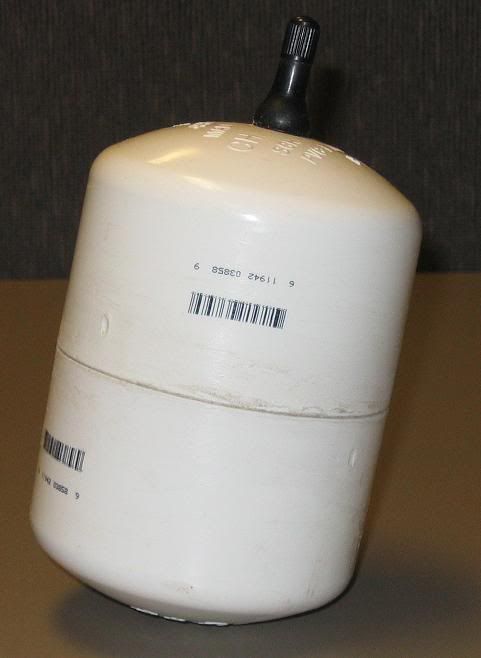
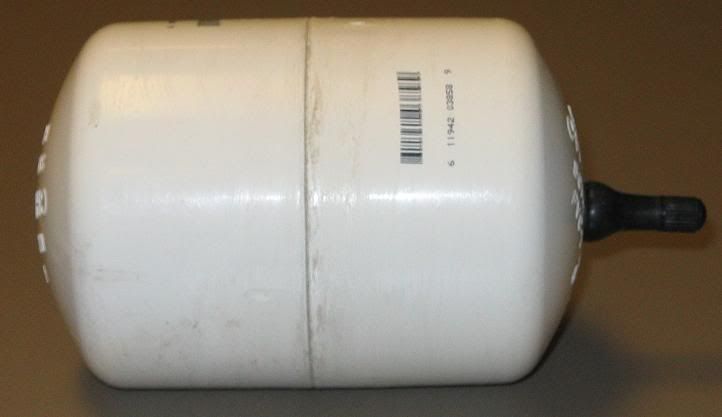
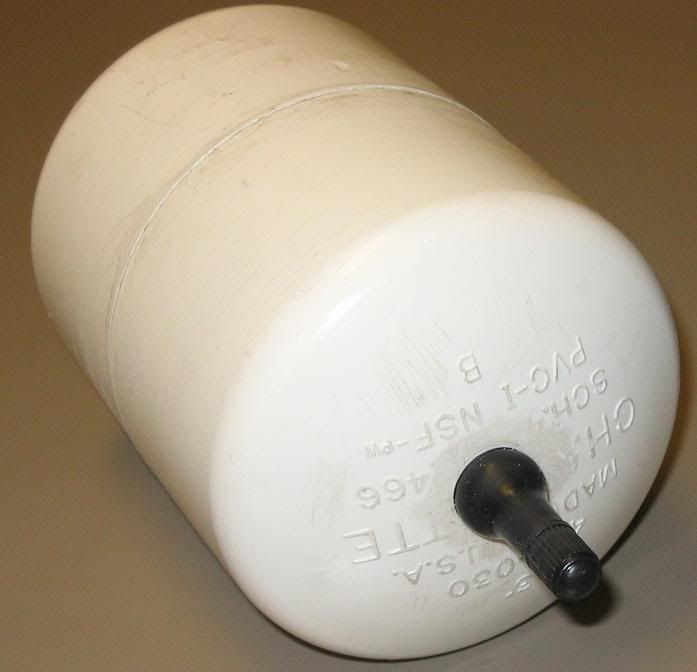
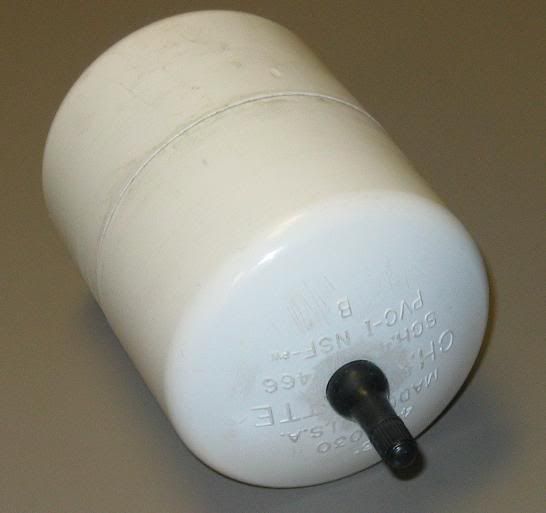
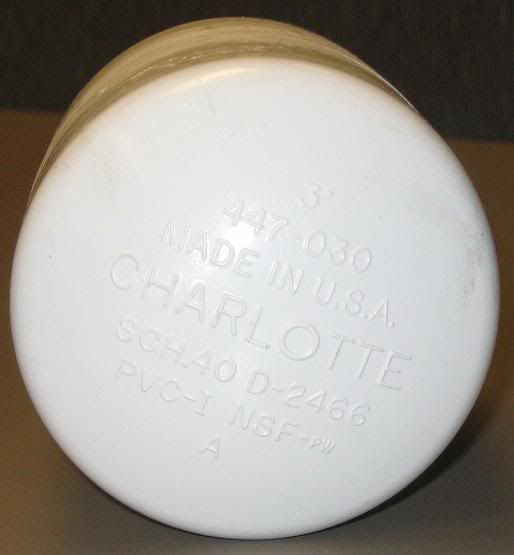
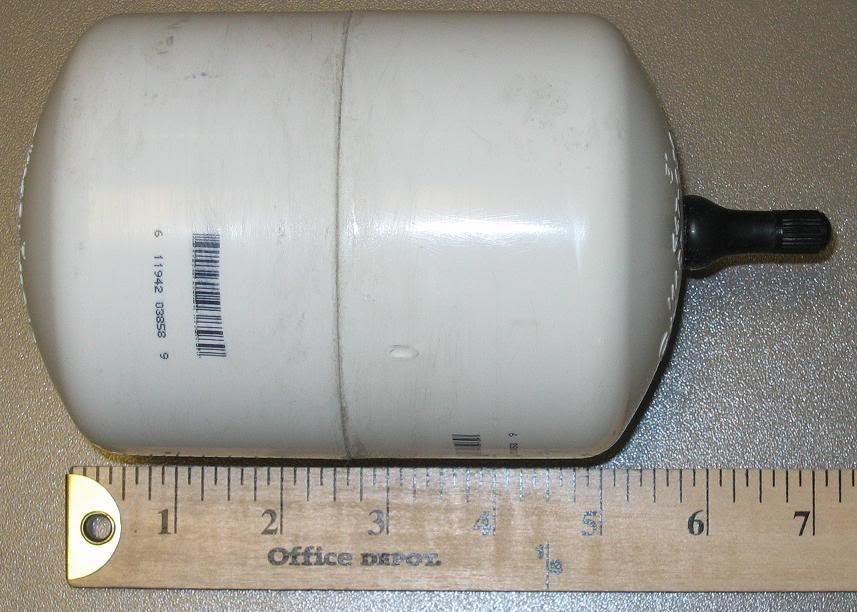
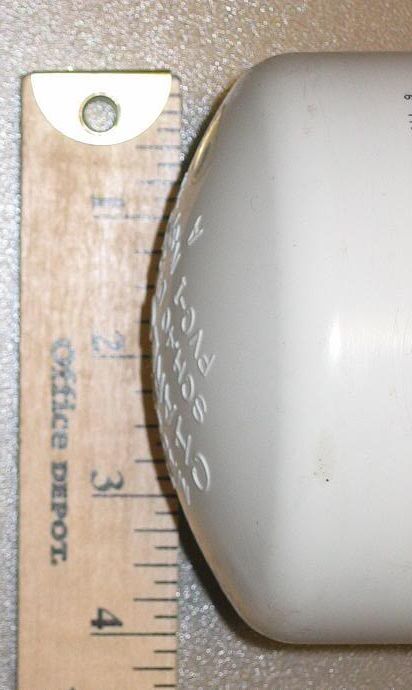
Well, the alloy wheels are on, so now I have the TPMS sensor light shining on my dash......but not any more. I created a PVC pipe small enough to put behind the seat, under the truck inside the frame, or pretty much anywhere. Pictures at bottom of post.

Total expense: $12.00.

Here's what I did:

Grocery List:
  • 3" PVC SCH.40 Pipe (about 4 to 4 1/2" in length)
  • Two (2) 3" PVC SCH.40 End Caps
  • One (1) Can Heavy Duty PVC Cement (glue) (green label - to contain pressure in tube)
  • One (1) Small Valve Stem (yes, like for a tire)
  • Optional: Bubble Wrap (to keep the sensors for clanging together)
Tools Needed:
  • Fine Sand Paper
  • Drill
  • Drill Bit (size can vary depending on Valve Stem width)
  • Jigsaw
--------------------------------------------------------------------------------
Steps:
  1. Take the jigsaw and cut the 3" pipe down to about 4 to 4 1/2" in length. It can be longer if you would like.
  2. Sand down the ends where you cut the pipe so they are smooth to allow for a good bond to the end caps.
  3. Take the cement (glue) applicator and rub it around one end of the pipe and the inside wall of the end cap.
  4. Quickly put the end cap on, pushing it as far as you can onto the pipe. The cement sets quickly, so work fast.
While the cement sets, get the sensors ready to be inserted into the pipe.
  1. Cut the bubble wrap into strips long enough and wide enough to wrap around each sensor like a diaper. (around the plastic part)
  2. Wrap the bubble wrap around the plastic part, then tape it so that it stays around the sensor.
  3. Repeat this for each sensor. Set them to the side.
Now let's do some drillin'!
  1. Take the valve stem, and hold it up to a drill bit to find the right size. What you want is a bit that will allow the valve stem to be pushed through the end cap from the inside out, but small enough to stop it from passing all the way through. (You may want it a little snug when passing through so it will be a little tight on the valve stem.)
  2. Drill the hole in the end cap.
  3. Take the sand paper and smooth down the inside and outside of the end cap where you drilled the hole. On my end caps, there was writing. I sanded that down also to give a smooth surface. (see picture)
  4. Push the valve stem through from the inside out with the smaller end facing up, away from the end cap.
  5. Once in, make sure you are unable to pull it through with a reasonable amount of force.
Now back to the pipe.
  1. Slide each sensor into the pipe with the stem pointing up. Once all four are in, you may have to jiggle it to get them to settle better.
  2. Optional: If you would like, you may put extra bubble wrap at the end to make them fit snug.
  3. Take the cement (glue) applicator and rub it around the end of the pipe and the inside wall of the last end cap.
  4. Quickly put the end cap on, pushing it as far as you can onto the pipe. The cement sets quickly, so work fast.
Your TPMS Sensor pressure pipe is now complete.
  1. ATTENTION!!! Allow the cement (glue) to set and dry over night before filling with air. ATTENTION!!!
  2. Fill the pipe with air. It should take one to three seconds to reach +-30 psi.
  3. Check the pressure with a tire gage. You should be able to "trick" the system with anywhere from 25 to 30 psi.
Congratulations, you're finished!!!

Warning: I am not responsible for any damage done to the sensors, your tools, your hands, or your brain (glue smell). I performed this modification for my own enjoyment and sanity.

Here are some pictures of the completed pipe. Enjoy!

Image


Image


Image


Image


Image


Image


Image


Image
 
#113 ·
As many of you know, my truck came with steel wheels, so I was anxiously awaiting the day to have my alloys put on. I new the '06 Tacoma came with TPMS sensors, but I had no idea there were two models; one for steel wheels (40*) and one for alloy (20*).

Well, the alloy wheels are on, so now I have the TPMS sensor light shining on my dash......but not any more. I created a PVC pipe small enough to put behind the seat, under the truck inside the frame, or pretty much anywhere. Pictures at bottom of post.

Total expense: $12.00.

Here's what I did:

Grocery List:
  • 3" PVC SCH.40 Pipe (about 4 to 4 1/2" in length)
  • Two (2) 3" PVC SCH.40 End Caps
  • One (1) Can Heavy Duty PVC Cement (glue) (green label - to contain pressure in tube)
  • One (1) Small Valve Stem (yes, like for a tire)
  • Optional: Bubble Wrap (to keep the sensors for clanging together)
Tools Needed:
  • Fine Sand Paper
  • Drill
  • Drill Bit (size can vary depending on Valve Stem width)
  • Jigsaw
--------------------------------------------------------------------------------
Steps:
  1. Take the jigsaw and cut the 3" pipe down to about 4 to 4 1/2" in length. It can be longer if you would like.
  2. Sand down the ends where you cut the pipe so they are smooth to allow for a good bond to the end caps.
  3. Take the cement (glue) applicator and rub it around one end of the pipe and the inside wall of the end cap.
  4. Quickly put the end cap on, pushing it as far as you can onto the pipe. The cement sets quickly, so work fast.
While the cement sets, get the sensors ready to be inserted into the pipe.
  1. Cut the bubble wrap into strips long enough and wide enough to wrap around each sensor like a diaper. (around the plastic part)
  2. Wrap the bubble wrap around the plastic part, then tape it so that it stays around the sensor.
  3. Repeat this for each sensor. Set them to the side.
Now let's do some drillin'!
  1. Take the valve stem, and hold it up to a drill bit to find the right size. What you want is a bit that will allow the valve stem to be pushed through the end cap from the inside out, but small enough to stop it from passing all the way through. (You may want it a little snug when passing through so it will be a little tight on the valve stem.)
  2. Drill the hole in the end cap.
  3. Take the sand paper and smooth down the inside and outside of the end cap where you drilled the hole. On my end caps, there was writing. I sanded that down also to give a smooth surface. (see picture)
  4. Push the valve stem through from the inside out with the smaller end facing up, away from the end cap.
  5. Once in, make sure you are unable to pull it through with a reasonable amount of force.
Now back to the pipe.
  1. Slide each sensor into the pipe with the stem pointing up. Once all four are in, you may have to jiggle it to get them to settle better.
  2. Optional: If you would like, you may put extra bubble wrap at the end to make them fit snug.
  3. Take the cement (glue) applicator and rub it around the end of the pipe and the inside wall of the last end cap.
  4. Quickly put the end cap on, pushing it as far as you can onto the pipe. The cement sets quickly, so work fast.
Your TPMS Sensor pressure pipe is now complete.
  1. ATTENTION!!! Allow the cement (glue) to set and dry over night before filling with air. ATTENTION!!!
  2. Fill the pipe with air. It should take one to three seconds to reach +-30 psi.
  3. Check the pressure with a tire gage. You should be able to "trick" the system with anywhere from 25 to 30 psi.
Congratulations, you're finished!!!

Warning: I am not responsible for any damage done to the sensors, your tools, your hands, or your brain (glue smell). I performed this modification for my own enjoyment and sanity.

Here are some pictures of the completed pipe. Enjoy!

Image


Image


Image


Image


Image


Image


Image


Image

:thumbsup: found my solution to that problem. thanks!
 
#25 ·
new cal shooter said:
Well I did the ground out version of this, but my 07 taco light is still on! Now i wonder what i grounded out? possible it dont work on all trucks??

Intresting. Maybe the 07's are dofferent. DOuble check the colors ect.. If it is the right wire and the light is still on. You might iant to do the pressureized mod instead.
 
#26 ·
Same color wire, same looking plug, same position, but light still on, put my stock tires / wheels on my 96 isuzu rodeo, perfect fit! guess i have to do some swaping of valve stems! If anyone with an 07 tacoma has the grounding mod work, let me know! thanks!:)