

When I started replacing my Toyota Camry 2002 car audio system, I had no clue about anything. If I could give my clueless self advice, the most important thing would be to read about and prepare for the entire process first, don't just read the first step thinking you'll wing it from there. Winging this tends to end up scratching or breaking parts of your car. Luckily I didn't do too much damage.
• 3-way, 4-way speakers are a marketing gimmick. Either get a quality 2 way coaxial speaker or
preferably component speakers. Components will be much harder to install but they sound
better because they come with separate woofers, tweeters, external crossovers, all three of
which will have to be mounted separately.
• Toyota Camry uses 6"x9" speakers in front and back. 6"x9" component sets are generally not
made since round component woofer cones offer superior sound quality. An adapter plate
(baffle) will therefore have to be made.
• A separate amplifier drives quality speakers, increasing their volume without distortion. In my
case, an amp was a must because I wanted to also install quality rear speakers for my kid in the
back, so I ended up having the head unit powering the rear speakers and an amp powering the
front components.
I was told it was not a good idea to install components in both front & back. It's better to install
components in front and 2-way coaxials in the rear. Try to fade the rear speakers whenever
there are no passengers in the rear to get the optimal sound out of the front component
speakers.
When looking at speaker sensitivity, high sensitivity is better for a low-powered factory radio.
Lower sensitivity may be a better for a higher powered replacement you buy.
To summarize: The quickest and easiest thing to do is to just replace the front speakers with
2-way coaxial speakers. (Coaxial means tweeter and woofer come in one unified enclosure.)
Doing more means entering a world of pain (j/k for some, true for me ).
).
Here's the professional way various types of screws are removed but I mostly used a screwdriver covered with tape:
![Image]()
To get to Front Speakers, there are 6 screws to remove.
1. Remove screw #1 and #2 located on the bottom of the door.
2. Use a small screwdriver covered with tape (so as to not scratch anything) or use a plastic
knife to pop out this round hole plug to reveal screw #3 :
![Image]()
3. Carefully pop out this little plate inside the door handle to reveal screw #4 :
![Image]()
4. Remove this black rubber bottom to reveal screw #5 :
![Image]()
5. Removing screw #5 will allow you to pop out the entire Power Window Master Switch
Assembly to reveal screw #6 .
Screw #6 is not pictured above. It is only visible after you pop out the entire Power Window Master Switch.
6. Disconnect the power window and door lock harnesses.
7. Remove this black sail panel triangle, it pops right off:
![Image]()
8. Pry the bottom of the door Panel away and pop out these 7 clips one by one:
![Image]()
Done.
To get to Rear Speakers:
1. You're supposed to "hold up the seat and disengage the clips to pull out the cushion
assembly forward to remove it, being careful to hold the clips around the roots."
There are two of these, one on the left side, one on the right, use your hands to feel these,
then pull up with some force:
![Image]()
2. Lift this on both corners to reveal a 12mm metric bolt.
[I also used this bolt (but on the rear driver's side) to ground my amplifier.]
![Image]()
3. Once you remove the screw, lift this up to remove it:
![Image]()
4. Lift this up to be able to pull the back rest toward you.
[When you put it back, push it in so it clicks.]
![Image]()
5. Use a screwdriver covered with tape (so as to not scratch anything) or use a plastic knife to
pop out this roof side garnish on both left and right sides:
![Image]()
6. Pop out these 9 clips to remove this Room partition Board Assembly:
![Image]()
7. Before removing this Package Tray Trim Panel assembly:
![Image]()
8. Stick your hand under it to disconnect this Brake Light assembly connector:
![Image]()
Done.
[I don't have the XLE version with Rear Window Shade but they say there are 2 extra clips that
are bolted down from the top, under the rear window shade. Apparently, you're supposed to
pull hard up and out on the Package Tray (Rear Deck) until it pops out.]
Pop the dashboard cover to disconnect the small 2 1/2" speakers (they only have 2 5/8"
clearance in the mounting bracket). They may ruin the sound of your new side speakers.
To get the factory radio out:
Use a screwdriver covered with tape (so as to not scratch anything) or use a plastic knife to
pop out the Air Conditioner Control Assembly. (Apply some downward force)
[THERE'S NO NEED TO UNSCREW THE TWO SCREWS AT THE BOTTOM OF THE AIR CONDITIONING ASSEMBLY]:
![Image]()
Disconnect the connections then remove the assembly above it:
![Image]()
There are four metric bolts inside. 11mm.
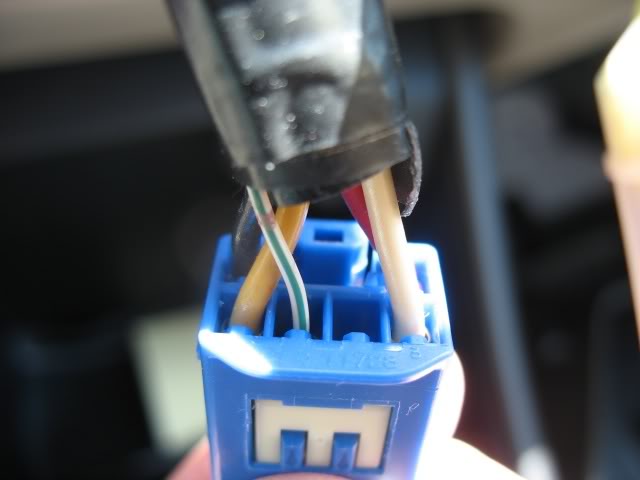
These are the three connectors. The blue connector on the right is for the antenna.
![Image]()
Get a radio harness like this:
![Image]()
Then avoid soldering by using something like this to connect the wires:
![Image]()
Also get a speaker harness to connect to your car's existing wiring by simply connecting to this:
![Image]()
Disconnect the Negative (-) battery cable to be safe. Remember to ground the amp first if you install one.
This is the wiring diagram for Toyota Camry 2002:
![Image]()
![Image]()
![Image]()
• Yellow: Left Rear -
• Black: Left Rear +
• White: Right Rear -
• Red: Right Rear +
These are the actual colors on the other one:
![Image]()
![Image]()
• Purple: Left Front -
• Orange (next to green): Left Front +
• Blue: Right Front -
• Green: Right Front +
• Gray: Radio Ignition
• Yellow/blue stripes: Radio 12V
• Brown: Radio Ground
• Small green wire: Radio Illumination
Notes specific to my installation:
1. Rear speakers did not fit in the factory holes. I drilled the screws right into the thin metal.
Some people use adaptors, look at clearance between the cover and the speakers if you use an
adaptor plate.
2. Thick baffle is an excellent idea. But mine was too thick so I had to chop off the right corner
on the passengers side and the left corner on the driver's side.
![Image]()
3. I would have liked to have had a baffle that would have fit both the woofer and the tweeter
nicely close to each other like this:
![Image]()
But I didn't have a baffle that would fit both the woofer and the tweeter so I had to resort to a
third-rate solution like this:
![Image]()
People say that it may be better to have the tweeter higher up on the door, but I would be
concerned about too much sound separation if the tweeter was too far away from the woofer...
So I would go for an adaptor plate that houses both woofer and tweeter.
3. I installed the speaker component crossovers inside the doors. This is not a good idea as the weather will almost certainly ruin them one day.
![Image]()
![Image]()
4. Sub enclosures take a lot of trunk space plus I listen to classic rock so I decided not to install a sub.
This is where I mounted the amp since I decided to use the corner seat bolt to ground it:
![Image]()
5. I connected the Amplifier to component speaker crossovers by
a. connecting the amp speaker out to factory radio harness
b. connecting the crossover to the existing front speaker wiring using a speaker harness.
By doing this I avoided having to fish the wire through...
And since I did it that way, I cut the front speaker harness to be able to use these red
connectors on the component speakers:
![Image]()
6. Regarding Amp battery connector cable, a hole can be punched through rubber behind the
break pedal to pass it through to the battery. Scuff plates on the side of the door under which
cables run pop right off.
7. People use deadening to isolate their doors so they don't rattle. Dynamat is one of the most prevalent brands but it's not the best. I bought a small piece of deadening material just to cover the area around the speakers but I was told that the real difference would be noticeable if I do the entire door. So that's what I would do, if I needed to reduce door rattling.
• 3-way, 4-way speakers are a marketing gimmick. Either get a quality 2 way coaxial speaker or
preferably component speakers. Components will be much harder to install but they sound
better because they come with separate woofers, tweeters, external crossovers, all three of
which will have to be mounted separately.
• Toyota Camry uses 6"x9" speakers in front and back. 6"x9" component sets are generally not
made since round component woofer cones offer superior sound quality. An adapter plate
(baffle) will therefore have to be made.
• A separate amplifier drives quality speakers, increasing their volume without distortion. In my
case, an amp was a must because I wanted to also install quality rear speakers for my kid in the
back, so I ended up having the head unit powering the rear speakers and an amp powering the
front components.
I was told it was not a good idea to install components in both front & back. It's better to install
components in front and 2-way coaxials in the rear. Try to fade the rear speakers whenever
there are no passengers in the rear to get the optimal sound out of the front component
speakers.
When looking at speaker sensitivity, high sensitivity is better for a low-powered factory radio.
Lower sensitivity may be a better for a higher powered replacement you buy.
To summarize: The quickest and easiest thing to do is to just replace the front speakers with
2-way coaxial speakers. (Coaxial means tweeter and woofer come in one unified enclosure.)
Doing more means entering a world of pain (j/k for some, true for me
).Here's the professional way various types of screws are removed but I mostly used a screwdriver covered with tape:

To get to Front Speakers, there are 6 screws to remove.
1. Remove screw #1 and #2 located on the bottom of the door.
2. Use a small screwdriver covered with tape (so as to not scratch anything) or use a plastic
knife to pop out this round hole plug to reveal screw #3 :

3. Carefully pop out this little plate inside the door handle to reveal screw #4 :

4. Remove this black rubber bottom to reveal screw #5 :

5. Removing screw #5 will allow you to pop out the entire Power Window Master Switch
Assembly to reveal screw #6 .
Screw #6 is not pictured above. It is only visible after you pop out the entire Power Window Master Switch.
6. Disconnect the power window and door lock harnesses.
7. Remove this black sail panel triangle, it pops right off:

8. Pry the bottom of the door Panel away and pop out these 7 clips one by one:

Done.
To get to Rear Speakers:
1. You're supposed to "hold up the seat and disengage the clips to pull out the cushion
assembly forward to remove it, being careful to hold the clips around the roots."
There are two of these, one on the left side, one on the right, use your hands to feel these,
then pull up with some force:

2. Lift this on both corners to reveal a 12mm metric bolt.
[I also used this bolt (but on the rear driver's side) to ground my amplifier.]

3. Once you remove the screw, lift this up to remove it:

4. Lift this up to be able to pull the back rest toward you.
[When you put it back, push it in so it clicks.]

5. Use a screwdriver covered with tape (so as to not scratch anything) or use a plastic knife to
pop out this roof side garnish on both left and right sides:

6. Pop out these 9 clips to remove this Room partition Board Assembly:

7. Before removing this Package Tray Trim Panel assembly:

8. Stick your hand under it to disconnect this Brake Light assembly connector:

Done.
[I don't have the XLE version with Rear Window Shade but they say there are 2 extra clips that
are bolted down from the top, under the rear window shade. Apparently, you're supposed to
pull hard up and out on the Package Tray (Rear Deck) until it pops out.]
Pop the dashboard cover to disconnect the small 2 1/2" speakers (they only have 2 5/8"
clearance in the mounting bracket). They may ruin the sound of your new side speakers.
To get the factory radio out:
Use a screwdriver covered with tape (so as to not scratch anything) or use a plastic knife to
pop out the Air Conditioner Control Assembly. (Apply some downward force)
[THERE'S NO NEED TO UNSCREW THE TWO SCREWS AT THE BOTTOM OF THE AIR CONDITIONING ASSEMBLY]:

Disconnect the connections then remove the assembly above it:

There are four metric bolts inside. 11mm.
These are the three connectors. The blue connector on the right is for the antenna.

Get a radio harness like this:

Then avoid soldering by using something like this to connect the wires:

Also get a speaker harness to connect to your car's existing wiring by simply connecting to this:

Disconnect the Negative (-) battery cable to be safe. Remember to ground the amp first if you install one.
This is the wiring diagram for Toyota Camry 2002:


• Yellow: Left Rear -
• Black: Left Rear +
• White: Right Rear -
• Red: Right Rear +
These are the actual colors on the other one:


• Purple: Left Front -
• Orange (next to green): Left Front +
• Blue: Right Front -
• Green: Right Front +
• Gray: Radio Ignition
• Yellow/blue stripes: Radio 12V
• Brown: Radio Ground
• Small green wire: Radio Illumination
Notes specific to my installation:
1. Rear speakers did not fit in the factory holes. I drilled the screws right into the thin metal.
Some people use adaptors, look at clearance between the cover and the speakers if you use an
adaptor plate.
2. Thick baffle is an excellent idea. But mine was too thick so I had to chop off the right corner
on the passengers side and the left corner on the driver's side.

3. I would have liked to have had a baffle that would have fit both the woofer and the tweeter
nicely close to each other like this:

But I didn't have a baffle that would fit both the woofer and the tweeter so I had to resort to a
third-rate solution like this:

People say that it may be better to have the tweeter higher up on the door, but I would be
concerned about too much sound separation if the tweeter was too far away from the woofer...
So I would go for an adaptor plate that houses both woofer and tweeter.
3. I installed the speaker component crossovers inside the doors. This is not a good idea as the weather will almost certainly ruin them one day.


4. Sub enclosures take a lot of trunk space plus I listen to classic rock so I decided not to install a sub.
This is where I mounted the amp since I decided to use the corner seat bolt to ground it:

5. I connected the Amplifier to component speaker crossovers by
a. connecting the amp speaker out to factory radio harness
b. connecting the crossover to the existing front speaker wiring using a speaker harness.
By doing this I avoided having to fish the wire through...
And since I did it that way, I cut the front speaker harness to be able to use these red
connectors on the component speakers:

6. Regarding Amp battery connector cable, a hole can be punched through rubber behind the
break pedal to pass it through to the battery. Scuff plates on the side of the door under which
cables run pop right off.
7. People use deadening to isolate their doors so they don't rattle. Dynamat is one of the most prevalent brands but it's not the best. I bought a small piece of deadening material just to cover the area around the speakers but I was told that the real difference would be noticeable if I do the entire door. So that's what I would do, if I needed to reduce door rattling.


