Hey all, I just recently completed my Satoshi Grill and thought I'd share so you don't run into the same mistakes I did. This is just my personal experience. No, I have not had any prior body or paint work experience, nor did I have any help other than what I'd research online. Do this mod at your own risk.
Here are the list of parts/equipment I used for the mod:
Dremel/cutting disks/drum sander
Philip/Flathead Screwdriver
Drill with 7/32" drill bit
Putty Knife
Bondo Fiberglass Repair Kit
Bondo Body Filler
4 mixing cups
2 cheap brushes
Latex gloves
Duplicolor Grease and Wax Remover
Duplicolor Black Sandable Primer
3M Masking Tape
3M Masking Paper
3M Scotchbrite Pads
60/220/400 Grit Sandpaper
Sanding block
Respirator or protective masks
Safety glasses
#8-32 x 36" Threaded Rod (coarse) - cut into six 3" lengths
#8-32 Machine Screw Nuts (coarse) - 6 pcs
#12 Bonded Sealing Washers - 6pcs
8" zip ties - 2 pcs
Loctite Epoxy Gel
Black Sharpie
Grillcraft Grill
Step 1 - Remove Grill
Open the hood and look at the top of the grill. There are two philips head screws and two retaining clips holding the grill in place. There are also two clips halfway down the back of the grill where the grill slips in and out of. Once you've removed screws and retaining clips, pull the grill straight up, then out and it should come right out.
Step 2 - Cut the Crossmember (middle part of the grill)
Use safety glasses/respirator or protective mask. Use the Dremel w/cutting disk to cut the crossmember from outside of the grill. I also found a hacksaw blade to be useful at this as well for cutting. You'll then use the Dremel's drum sander to sand down any plastic sticking up from the grill.
![Image]()
Step 3 - Fiberglass and Bondo
As you know there are now gaps where you've done your cuts. There are also dips on the inside upper part of the grill. VIEW MY MISTAKE AT THE END OF THIS WRITE-UP BEFORE PROCEEDING!
(considering the strong smell of resin, wear a respirator)
Use masking tape on the outside part of the grill to cover up the gaps. This will act as a guide when applying fiberglass. This is the part that differs from the way I’ve seen others do it. I actually had to redo mine once I test fitted the grill. You’ll want the “guide” to protrude about 1” past the edge of the plastic on the grill. You can see in my pictures of when I redid the fiberglass how much further I went out with the fiberglass as compared to the others. The curve of the Grillcraft is made to fit the front of the grill perfectly, rather than behind it so you want to account for that curve.
![Image]()
![Image]()
Fiberglass Application
Cut 4 strips of fiberglass cloth so that it covers approximately 1” past all edges of the gaps. Put on latex gloves. Follow the directions on the back of the Fiberglass Repair box. Mix the resin and hardener in a mixing cup. You only have about 12-15 minutes before the mix hardens, so be patient and do this only one side at a time. I used about 2 ounces of resin and 25 drops of hardener for each side. Soak 1 fiberglass strip. Lay that strip of cloth over the gaps and the masking tape guide. Using the brush, smooth out the fiberglass resin and remove any trapped air bubbles. Lay another dry fiberglass strip over that one, dip the brush in the resin and brush enough to cover that piece. Repeat this procedure for the gaps on the other side of the grill. Wait 90 minutes for this to dry completely. Use the Dremel with cutting disk to cut the fiberglass straight from top to bottom, getting the fiberglass as flush as possible with the top and bottom plastic edges. I just eyeballed it, but you can use masking tape as a straight guide if you need to.
![Image]()
![Image]()
Bondo Application
Use 60 grit sandpaper to sand the fiberglass showing through the gaps and surrounding area about 1”-2” beyond the gaps. Wipe this area clean with Duplicolor Grease and Wax Remover. Use a mixing cup (or paper plate) and mix a golf ball size amount of Bondo with 1 1/4” strip of hardener (make sure to knead the tube of hardener before use). Use a putty knife and spread a layer of Bondo over the gaps using firm pressure (I actually used a plastic applicator included with the Fiberglass Repair kit). It’ll be alright if it is messy or thick since you’ll be sanding it down later. You’ll have about 3-4 minutes before your mix hardens, so be patient and do only one side at a time. You should have enough leftover in your first mix to apply to the dips on the upper part of the grill as well. Repeat this procedure for the other side. Allow to dry 30 minutes.
Step 4 - Sand, sanding, and more sanding
Use protective mask or respirator. Sand by hand, sanding block or electric sander even. Sand everywhere you’ve applied Bondo to be even with the plastic part of the grill using 60 grit sandpaper. You may sand close enough to see the fiberglass, this is ok. Once you have your surface evened out with where you’ve applied bondo, then sand the entire piece with 220 grit sandpaper. Then use the 400 grit to finish up the surface.
![Image]()
![Image]()
Step 5 - Paint Prep
Wash your grill with dish soap and water and allow to dry completely. Wipe surface to be painted with Duplicolor Grease and Wax Remover. Mask off factory paint or chrome with masking tape and paper. Use protective mask or respirator. Spray 3 coats of Duplicolor Black Sandable Primer using an even, sweeping motion. I waited 15 minutes and scuffed the surface using a 3M Scotchbrite pad between coats.
I took my grill to a local body shop to color match the paint. I’ve read others Duplicolor wheel paint, Krylon Fusion, or color matched spray paint from companies such as www.paintscratch.com. It’s really personal preference, but I imagine your looking at $50-$100 to have this professionally done.
![Image]()
![Image]()
![Image]()
![Image]()
Step 6 - Grillcraft Mount
Cut the 36” #8-32 threaded rod into six 3” long pieces. Place the grill upside down on a flat surface. Set the Grillcraft behind the grill and look it over. There should be approximately 1/4”-1/2” overhanging over the edge of the plastic. Use the placement of the Grillcraft as a guide in knowing where to epoxy the 3” rods. Place the rods through the Grillcraft and use a black sharpie to mark the spot where it’ll be epoxied. I marked spots in the four corners top and bottom and in the center top and bottom. Remove the Grillcraft. Sand the marked area using 60 grit sand paper. Squeeze about a quarter size amount of Loctite Epoxy Gel onto a paper plate and mix. Apply the epoxy to about 2” of the rod and press onto the sanded area, be as precise with your original mark as possible. Repeat this with the other 5 rods. Allow 1 hour for epoxy to dry completely; trust me and wait on this, otherwise it’ll come loose when tightening the bolts. Now place the Grillcraft back onto the grill over the threaded rods. Use #12 Bonded Sealing Washers, they have both a rubber backing and metal washer, rubber side against the Grillcraft. Screw the washer on the threaded rod using #8-32 Machine Screw Nuts. As you tighten, the Grillcraft will become more flush with the grill. There is also a plastic piece behind the grill itself I drilled a 7/32” hole and used an 8” zip tie to pull the Grillcraft in even more. Turn your Satoshi Grill over and there it is.
![Image]()
![Image]()
![Image]()
![Image]()
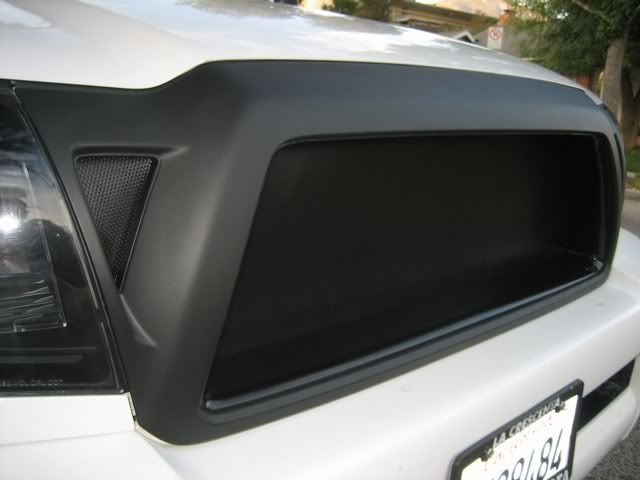
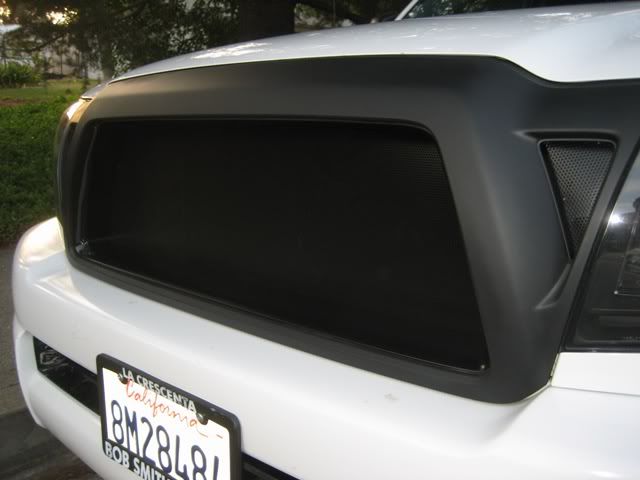
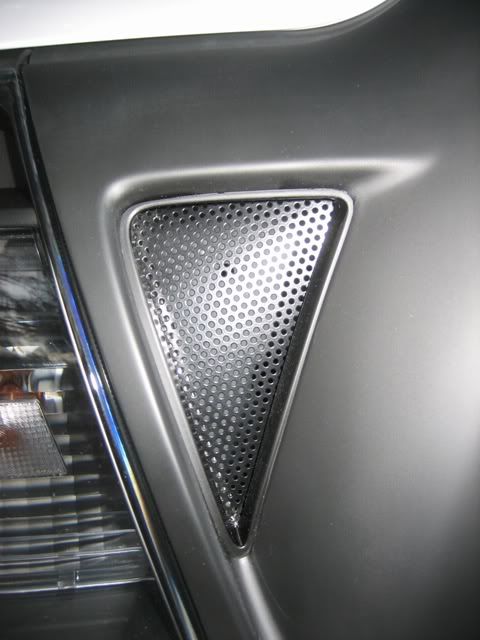
Place it back on your truck, replace the 2 retaining clips and 2 screws on top and you’re done.
Oh, and here is after I had Step 1-5 done (before paint) when I decided I needed more filler to make it more flush. You can see the difference in curve.
![Image]()
![Image]()
Good luck!
-lwyattl
Here are the list of parts/equipment I used for the mod:
Dremel/cutting disks/drum sander
Philip/Flathead Screwdriver
Drill with 7/32" drill bit
Putty Knife
Bondo Fiberglass Repair Kit
Bondo Body Filler
4 mixing cups
2 cheap brushes
Latex gloves
Duplicolor Grease and Wax Remover
Duplicolor Black Sandable Primer
3M Masking Tape
3M Masking Paper
3M Scotchbrite Pads
60/220/400 Grit Sandpaper
Sanding block
Respirator or protective masks
Safety glasses
#8-32 x 36" Threaded Rod (coarse) - cut into six 3" lengths
#8-32 Machine Screw Nuts (coarse) - 6 pcs
#12 Bonded Sealing Washers - 6pcs
8" zip ties - 2 pcs
Loctite Epoxy Gel
Black Sharpie
Grillcraft Grill
Step 1 - Remove Grill
Open the hood and look at the top of the grill. There are two philips head screws and two retaining clips holding the grill in place. There are also two clips halfway down the back of the grill where the grill slips in and out of. Once you've removed screws and retaining clips, pull the grill straight up, then out and it should come right out.
Step 2 - Cut the Crossmember (middle part of the grill)
Use safety glasses/respirator or protective mask. Use the Dremel w/cutting disk to cut the crossmember from outside of the grill. I also found a hacksaw blade to be useful at this as well for cutting. You'll then use the Dremel's drum sander to sand down any plastic sticking up from the grill.

Step 3 - Fiberglass and Bondo
As you know there are now gaps where you've done your cuts. There are also dips on the inside upper part of the grill. VIEW MY MISTAKE AT THE END OF THIS WRITE-UP BEFORE PROCEEDING!
(considering the strong smell of resin, wear a respirator)
Use masking tape on the outside part of the grill to cover up the gaps. This will act as a guide when applying fiberglass. This is the part that differs from the way I’ve seen others do it. I actually had to redo mine once I test fitted the grill. You’ll want the “guide” to protrude about 1” past the edge of the plastic on the grill. You can see in my pictures of when I redid the fiberglass how much further I went out with the fiberglass as compared to the others. The curve of the Grillcraft is made to fit the front of the grill perfectly, rather than behind it so you want to account for that curve.


Fiberglass Application
Cut 4 strips of fiberglass cloth so that it covers approximately 1” past all edges of the gaps. Put on latex gloves. Follow the directions on the back of the Fiberglass Repair box. Mix the resin and hardener in a mixing cup. You only have about 12-15 minutes before the mix hardens, so be patient and do this only one side at a time. I used about 2 ounces of resin and 25 drops of hardener for each side. Soak 1 fiberglass strip. Lay that strip of cloth over the gaps and the masking tape guide. Using the brush, smooth out the fiberglass resin and remove any trapped air bubbles. Lay another dry fiberglass strip over that one, dip the brush in the resin and brush enough to cover that piece. Repeat this procedure for the gaps on the other side of the grill. Wait 90 minutes for this to dry completely. Use the Dremel with cutting disk to cut the fiberglass straight from top to bottom, getting the fiberglass as flush as possible with the top and bottom plastic edges. I just eyeballed it, but you can use masking tape as a straight guide if you need to.


Bondo Application
Use 60 grit sandpaper to sand the fiberglass showing through the gaps and surrounding area about 1”-2” beyond the gaps. Wipe this area clean with Duplicolor Grease and Wax Remover. Use a mixing cup (or paper plate) and mix a golf ball size amount of Bondo with 1 1/4” strip of hardener (make sure to knead the tube of hardener before use). Use a putty knife and spread a layer of Bondo over the gaps using firm pressure (I actually used a plastic applicator included with the Fiberglass Repair kit). It’ll be alright if it is messy or thick since you’ll be sanding it down later. You’ll have about 3-4 minutes before your mix hardens, so be patient and do only one side at a time. You should have enough leftover in your first mix to apply to the dips on the upper part of the grill as well. Repeat this procedure for the other side. Allow to dry 30 minutes.
Step 4 - Sand, sanding, and more sanding
Use protective mask or respirator. Sand by hand, sanding block or electric sander even. Sand everywhere you’ve applied Bondo to be even with the plastic part of the grill using 60 grit sandpaper. You may sand close enough to see the fiberglass, this is ok. Once you have your surface evened out with where you’ve applied bondo, then sand the entire piece with 220 grit sandpaper. Then use the 400 grit to finish up the surface.


Step 5 - Paint Prep
Wash your grill with dish soap and water and allow to dry completely. Wipe surface to be painted with Duplicolor Grease and Wax Remover. Mask off factory paint or chrome with masking tape and paper. Use protective mask or respirator. Spray 3 coats of Duplicolor Black Sandable Primer using an even, sweeping motion. I waited 15 minutes and scuffed the surface using a 3M Scotchbrite pad between coats.
I took my grill to a local body shop to color match the paint. I’ve read others Duplicolor wheel paint, Krylon Fusion, or color matched spray paint from companies such as www.paintscratch.com. It’s really personal preference, but I imagine your looking at $50-$100 to have this professionally done.


Step 6 - Grillcraft Mount
Cut the 36” #8-32 threaded rod into six 3” long pieces. Place the grill upside down on a flat surface. Set the Grillcraft behind the grill and look it over. There should be approximately 1/4”-1/2” overhanging over the edge of the plastic. Use the placement of the Grillcraft as a guide in knowing where to epoxy the 3” rods. Place the rods through the Grillcraft and use a black sharpie to mark the spot where it’ll be epoxied. I marked spots in the four corners top and bottom and in the center top and bottom. Remove the Grillcraft. Sand the marked area using 60 grit sand paper. Squeeze about a quarter size amount of Loctite Epoxy Gel onto a paper plate and mix. Apply the epoxy to about 2” of the rod and press onto the sanded area, be as precise with your original mark as possible. Repeat this with the other 5 rods. Allow 1 hour for epoxy to dry completely; trust me and wait on this, otherwise it’ll come loose when tightening the bolts. Now place the Grillcraft back onto the grill over the threaded rods. Use #12 Bonded Sealing Washers, they have both a rubber backing and metal washer, rubber side against the Grillcraft. Screw the washer on the threaded rod using #8-32 Machine Screw Nuts. As you tighten, the Grillcraft will become more flush with the grill. There is also a plastic piece behind the grill itself I drilled a 7/32” hole and used an 8” zip tie to pull the Grillcraft in even more. Turn your Satoshi Grill over and there it is.


Place it back on your truck, replace the 2 retaining clips and 2 screws on top and you’re done.
Oh, and here is after I had Step 1-5 done (before paint) when I decided I needed more filler to make it more flush. You can see the difference in curve.


Good luck!
-lwyattl