

The power antenna on my 1996 Camry was no longer extending or retracting fully. I originally removed the unit with the view to clean it out, however, in the process I accidentally broke the antenna cord. I was also unable to remove the mast from the housing due to corrosion over the years.
In addition, I made the mistake of removing the two bolts that secure the motor in place. Once the motor is removed, it is next to impossible to re-insert the end of the motor armature shaft into the bronze bushing at the end of the motor casing. The stator magnets pull the armature off center when trying to install it. I am usually pretty good at taking things apart and putting them back together, but have to admit that this one got the best of me.
As a result, I decided to order a whole new antenna. This procedure explains how to remove an original equipment antenna and replace it with a universal power antenna. It is a fairly simple procedure requiring no special tools.
Disclaimer
Use this guide at your own risk! I assume no responsibility for any damage to your vehicle or personal injury as a result of following this guide. Any comments to improve the procedure will be gratefully received.
Time Required
It took me 3 hours, from start to finish, including time take notes and photos. If I had to do it again, I could probably complete this in about 1 ½ hours.
![Image]()
Parts Required:
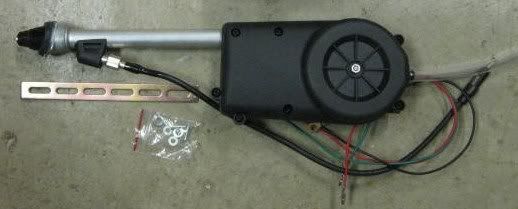
After pricing out a new power antenna unit from Toyota ($180 CDN) and also checking the price of a used one at the wreckers ($60 CDN), I decided to go with a universal power antenna from Bridgewood Motorsports, Manitowoc WI, USA. You can call them in person or order it on-line at www.AntennaMastsRus.com. The cost of the universal antenna was $34.95 US + $8.00 US for shipping to Canada. In addition to this, I also had to pay $1.79 Goods & Services Tax + $2.86 Provincial Sales Tax + a $5.00 handling fee when the unit was delivered.
As a result, my total cost for this repair = $51.32 CDN.
Let’s Get Started!
![Image]()
![Image]()
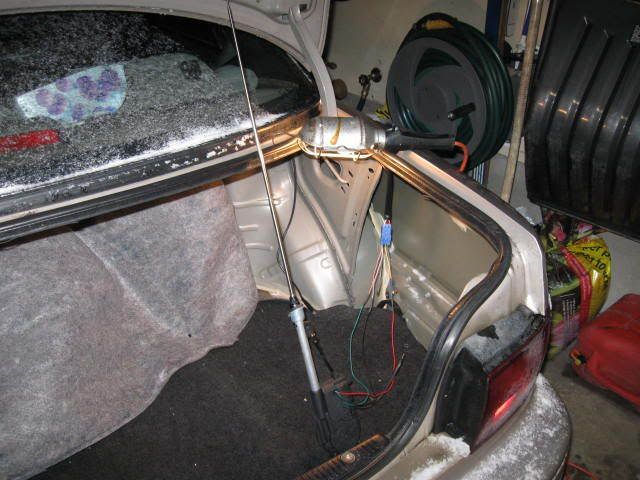
1. The first step is to unscrew the cargo net hook (green arrow) and then pull out four plastic plugs securing the luggage compartment trim. The clips are tough to pull out. I found it easiest to gently pry them out with a pair of side cutter pliers as shown in the photo above. Be careful not to snip them off.
![Image]()
![Image]()
2. Unscrew the antenna mast nut using a pair of needle nose pliers. Place the tips of the needle hose pliers in the slots that are in the nut. Remove the rubber adaptor.
![Image]()
![Image]()
3. Remove the two antenna mounting nuts (red circles) 10mm. Disconnect the electrical connector (green arrow) and the antenna wire (red arrow).
![Image]()
![Image]()
4. In order not to disturb the connector on the Camry power antenna wiring harness, I decided to utilize the old connector. Cut/remove the blue connector from the old antenna motor and strip the wires back for testing.
![Image]()
![Image]()
5. The new universal antenna only comes with three wires, red, green, and black. By comparison, the factory Toyota antenna has 6 wires. I have no idea why Toyota used 6 wires to control the antenna, however, this is OK. We only need to connect to three wires in order to make it work.
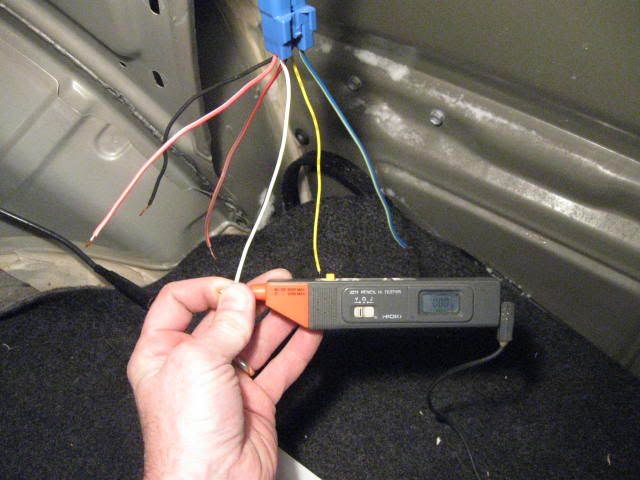
Plug in the above connector into the vehicle taking care, not to let any of the stripped wire ends touch each other. Use a voltmeter determine which wire has +12V power when the key is on and the radio is off. This wire gets connected to the red wire on the new antenna.
Next, determine which wire has +12V power when the key is on and the radio is on. This wire gets connected to the green wire on the new antenna.
Finally, determine which wire is connected to ground. This wire gets connected to the black wire on the new antenna. A summary of my findings is listed below:
With key on and radio off:
1) blue/yellow = 12V
2) yellow = 12V
3) white/black = ---
4) red/green = 12V
5) red/white = ---
6) black = ---
With key on and radio on:
1) blue/yellow = 12V
2) yellow = 12V
3) white/black = ---
4) red/green = 12V
5) red/white = 12V
6) black = 12V
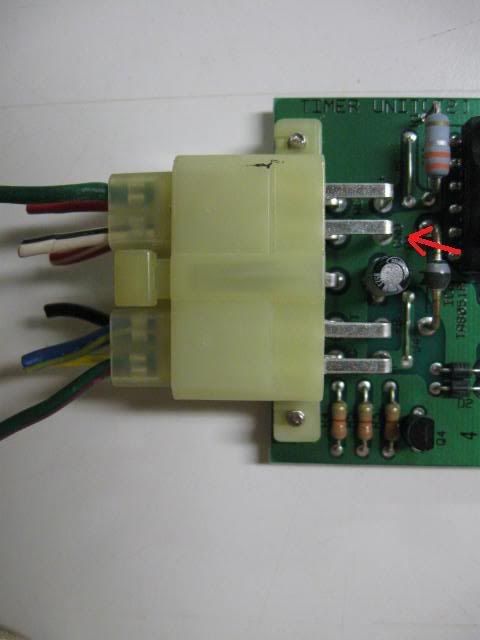
I determined which wire was ground by looking for the terminal labelled GND (red arrow) on the printed circuit board inside the Toyota antenna relay circuit board. There were a few different power wires to choose from and only one ground wire. I chose the wires with the heaviest gage conductors as follows:
a) blue/yellow (on Camry) => red (on antenna)
b) red/white (on Camry) => green (on antenna)
c) white/black (on Camry) => black (on antenna)
![Image]()
6. Bench test the new antenna with a 12 VDC power supply. Connect +12VDC to both the red and green wire and the ground to the black wire. The antenna should extend fully. Mine did. Connect +12VDC to the red wire and the ground to the black wire. The antenna should retract fully. Mine did.
![Image]()
7. Solder the old connector to the new antenna and protect the solder joints with heat shrink tubing. Tie back any wires that are not being used and heat shrink them to ensure that they do not short out.
![Image]()
8. Plug the new antenna into the power antenna connector in the vehicle. Turn on the radio. The antenna should extend. Shut off the radio. The antenna should retract. Mine did both. So far, so good.
![Image]()
9. Compare the new antenna with the old antenna in order to determine how to modify the mounting bracket in order to mount the new antenna. I found that the new antenna was shorter than the old one and that the two bolt holes on the bottom of the new antenna where spaced about 4mm further apart. Also the bracket that held the circuit board interfered with the new power antenna body.
![Image]()
![Image]()
10. Modify the old bracket to fit the new antenna. I cut part of the bracket off (red arrow), slotted the two mounting holes (green arrows) about 3mm sideways with my drill and notched out the bottom (blue arrow) so that the drain tube on the new antenna would not interfere. Original and modified bracket shown above.
![Image]()
11. Bolt the new antenna to the modified bracket. I had to use a few flat washers as the screws provided with the new antenna were a bit too long for the threaded inserts in the power antenna base.
![Image]()
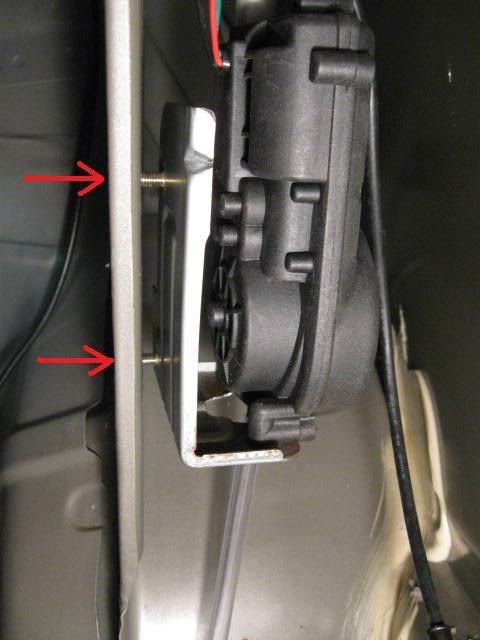
12. Install the new antenna into the trunk of the vehicle. Orient the metal and rubber trim piece in a manner which complements the angle of the sheet metal of the trunk. Center the rubber and metal trim pieces in the hole. Tighten the nut. Do not tighten too tight or the rubber will squeeze out. Since the new antenna is shorter than the original one, it will be necessary drill new holes to mount the bracket to the sheet metal frame inside the trunk compartment. Turn on the radio to raise the antenna and choose a pleasing angle for the antenna prior to marking the holes. I simply marked the holes by visually aligning a pencil (red arrows) opposite the two studs.
![Image]()
13. Remove power antenna. Center punch the two pencil marks and drill holes. Use an oversize drill bit to allow for some clearance on the studs. You will notice that the two mounting holes are significantly higher than before. The original studs bolted through the two slots as can be seen in this photo. Mount power antenna. Apply a thin layer of anti seize compound to the threads on the locking nut prior to tightening for the last time. Tighten the two nuts (10mm). Make the electrical and antenna connections.
14. Test the antenna one last time to ensure that it extends and retracts properly.
15. Re-install the luggage compartment trim with the four plugs and the threaded cargo net holder. Voila – you now have a functioning power antenna at a fraction of the price of a new OEM antenna!
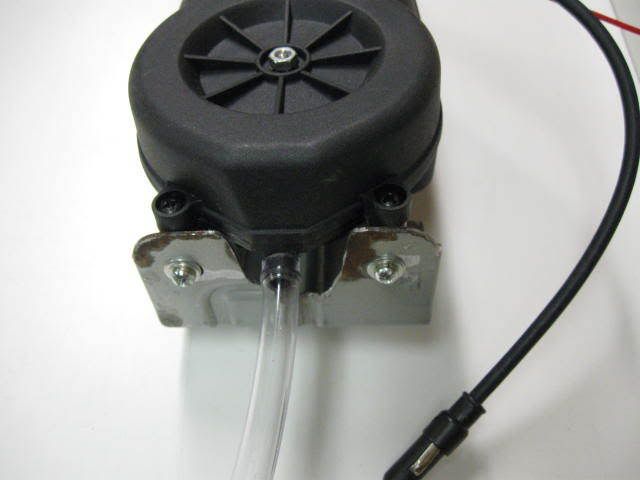
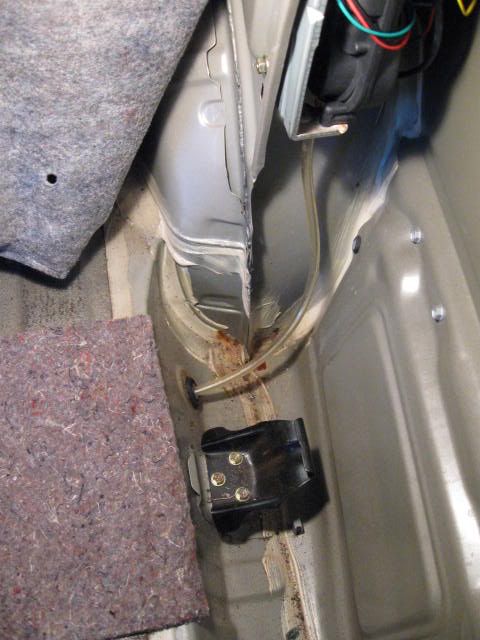
UPDATE Mar 20, 2009 - After a few days, the new power antenna was not retracting fully. I tried cleaning the antenna mast with alcohol and lubricating with silicone, but this did not solve the problem. Chuck at Bridgewood MotorSports (AntennaMastsRus) was very helpful and sent out a new unit for free under warranty I installed the new unit and it works fine. When I installed the new unit, I put a longer drain hose on it and routed the hose through the grommet. See photo below.
![Image]()
In addition, I made the mistake of removing the two bolts that secure the motor in place. Once the motor is removed, it is next to impossible to re-insert the end of the motor armature shaft into the bronze bushing at the end of the motor casing. The stator magnets pull the armature off center when trying to install it. I am usually pretty good at taking things apart and putting them back together, but have to admit that this one got the best of me.
As a result, I decided to order a whole new antenna. This procedure explains how to remove an original equipment antenna and replace it with a universal power antenna. It is a fairly simple procedure requiring no special tools.
Disclaimer
Use this guide at your own risk! I assume no responsibility for any damage to your vehicle or personal injury as a result of following this guide. Any comments to improve the procedure will be gratefully received.
Time Required
It took me 3 hours, from start to finish, including time take notes and photos. If I had to do it again, I could probably complete this in about 1 ½ hours.
Parts Required:
After pricing out a new power antenna unit from Toyota ($180 CDN) and also checking the price of a used one at the wreckers ($60 CDN), I decided to go with a universal power antenna from Bridgewood Motorsports, Manitowoc WI, USA. You can call them in person or order it on-line at www.AntennaMastsRus.com. The cost of the universal antenna was $34.95 US + $8.00 US for shipping to Canada. In addition to this, I also had to pay $1.79 Goods & Services Tax + $2.86 Provincial Sales Tax + a $5.00 handling fee when the unit was delivered.
As a result, my total cost for this repair = $51.32 CDN.
Let’s Get Started!

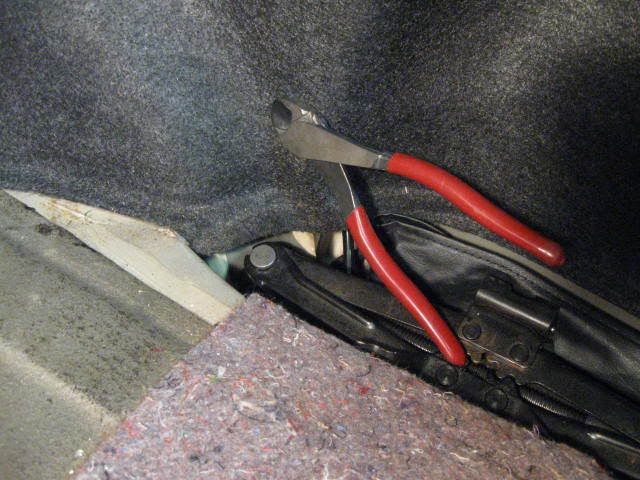
1. The first step is to unscrew the cargo net hook (green arrow) and then pull out four plastic plugs securing the luggage compartment trim. The clips are tough to pull out. I found it easiest to gently pry them out with a pair of side cutter pliers as shown in the photo above. Be careful not to snip them off.

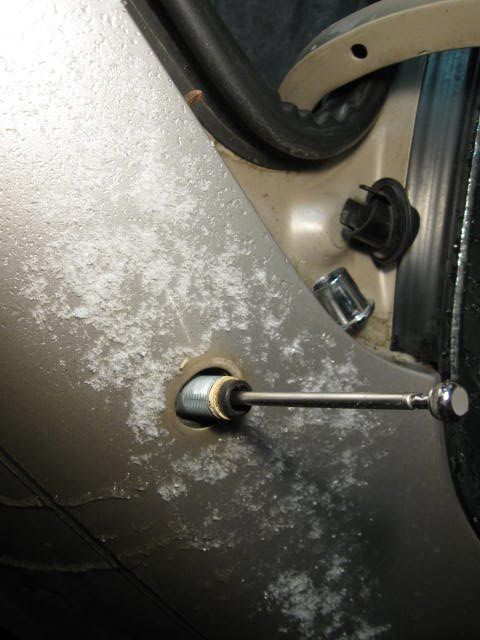
2. Unscrew the antenna mast nut using a pair of needle nose pliers. Place the tips of the needle hose pliers in the slots that are in the nut. Remove the rubber adaptor.
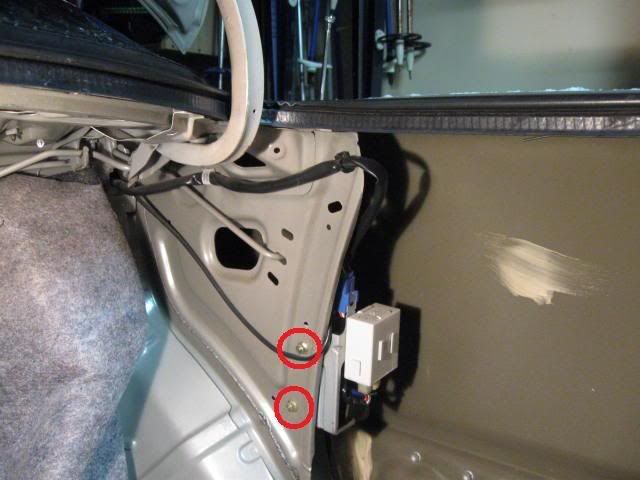
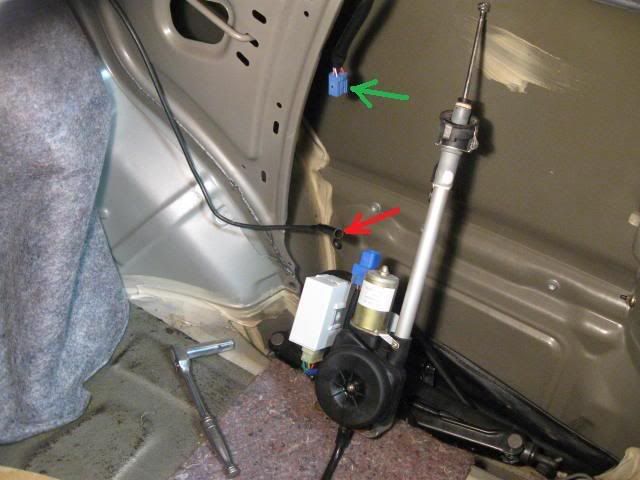
3. Remove the two antenna mounting nuts (red circles) 10mm. Disconnect the electrical connector (green arrow) and the antenna wire (red arrow).
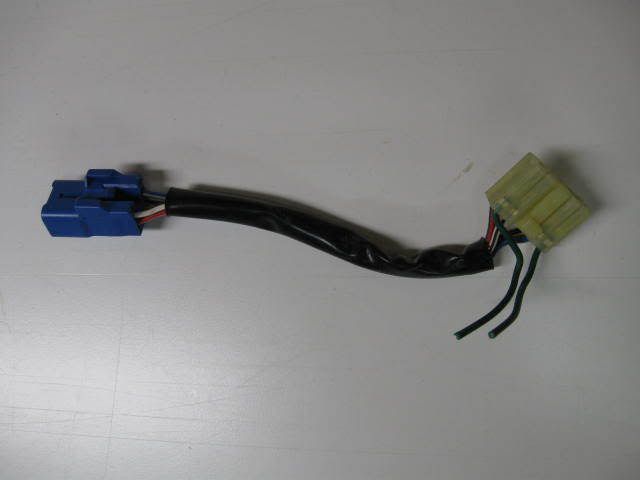

4. In order not to disturb the connector on the Camry power antenna wiring harness, I decided to utilize the old connector. Cut/remove the blue connector from the old antenna motor and strip the wires back for testing.
5. The new universal antenna only comes with three wires, red, green, and black. By comparison, the factory Toyota antenna has 6 wires. I have no idea why Toyota used 6 wires to control the antenna, however, this is OK. We only need to connect to three wires in order to make it work.
Plug in the above connector into the vehicle taking care, not to let any of the stripped wire ends touch each other. Use a voltmeter determine which wire has +12V power when the key is on and the radio is off. This wire gets connected to the red wire on the new antenna.
Next, determine which wire has +12V power when the key is on and the radio is on. This wire gets connected to the green wire on the new antenna.
Finally, determine which wire is connected to ground. This wire gets connected to the black wire on the new antenna. A summary of my findings is listed below:
With key on and radio off:
1) blue/yellow = 12V
2) yellow = 12V
3) white/black = ---
4) red/green = 12V
5) red/white = ---
6) black = ---
With key on and radio on:
1) blue/yellow = 12V
2) yellow = 12V
3) white/black = ---
4) red/green = 12V
5) red/white = 12V
6) black = 12V
I determined which wire was ground by looking for the terminal labelled GND (red arrow) on the printed circuit board inside the Toyota antenna relay circuit board. There were a few different power wires to choose from and only one ground wire. I chose the wires with the heaviest gage conductors as follows:
a) blue/yellow (on Camry) => red (on antenna)
b) red/white (on Camry) => green (on antenna)
c) white/black (on Camry) => black (on antenna)

6. Bench test the new antenna with a 12 VDC power supply. Connect +12VDC to both the red and green wire and the ground to the black wire. The antenna should extend fully. Mine did. Connect +12VDC to the red wire and the ground to the black wire. The antenna should retract fully. Mine did.

7. Solder the old connector to the new antenna and protect the solder joints with heat shrink tubing. Tie back any wires that are not being used and heat shrink them to ensure that they do not short out.
8. Plug the new antenna into the power antenna connector in the vehicle. Turn on the radio. The antenna should extend. Shut off the radio. The antenna should retract. Mine did both. So far, so good.
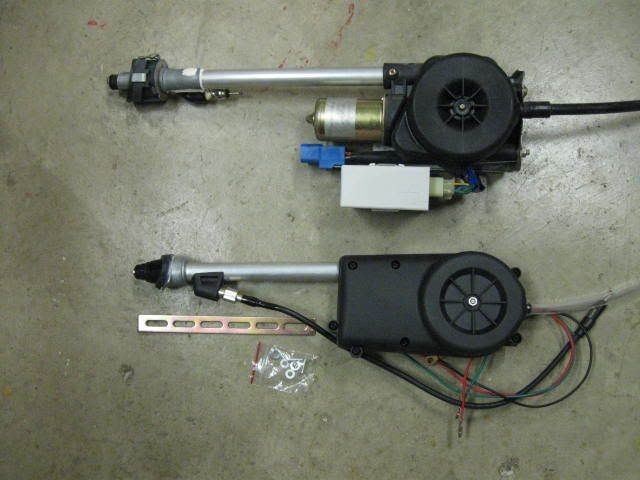
9. Compare the new antenna with the old antenna in order to determine how to modify the mounting bracket in order to mount the new antenna. I found that the new antenna was shorter than the old one and that the two bolt holes on the bottom of the new antenna where spaced about 4mm further apart. Also the bracket that held the circuit board interfered with the new power antenna body.
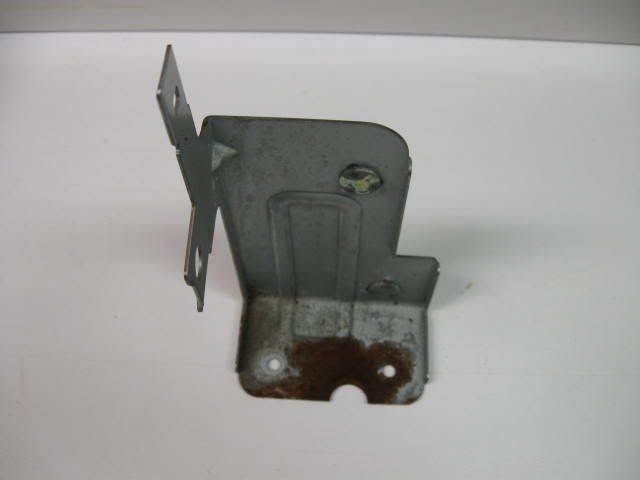

10. Modify the old bracket to fit the new antenna. I cut part of the bracket off (red arrow), slotted the two mounting holes (green arrows) about 3mm sideways with my drill and notched out the bottom (blue arrow) so that the drain tube on the new antenna would not interfere. Original and modified bracket shown above.
11. Bolt the new antenna to the modified bracket. I had to use a few flat washers as the screws provided with the new antenna were a bit too long for the threaded inserts in the power antenna base.
12. Install the new antenna into the trunk of the vehicle. Orient the metal and rubber trim piece in a manner which complements the angle of the sheet metal of the trunk. Center the rubber and metal trim pieces in the hole. Tighten the nut. Do not tighten too tight or the rubber will squeeze out. Since the new antenna is shorter than the original one, it will be necessary drill new holes to mount the bracket to the sheet metal frame inside the trunk compartment. Turn on the radio to raise the antenna and choose a pleasing angle for the antenna prior to marking the holes. I simply marked the holes by visually aligning a pencil (red arrows) opposite the two studs.

13. Remove power antenna. Center punch the two pencil marks and drill holes. Use an oversize drill bit to allow for some clearance on the studs. You will notice that the two mounting holes are significantly higher than before. The original studs bolted through the two slots as can be seen in this photo. Mount power antenna. Apply a thin layer of anti seize compound to the threads on the locking nut prior to tightening for the last time. Tighten the two nuts (10mm). Make the electrical and antenna connections.
14. Test the antenna one last time to ensure that it extends and retracts properly.
15. Re-install the luggage compartment trim with the four plugs and the threaded cargo net holder. Voila – you now have a functioning power antenna at a fraction of the price of a new OEM antenna!
UPDATE Mar 20, 2009 - After a few days, the new power antenna was not retracting fully. I tried cleaning the antenna mast with alcohol and lubricating with silicone, but this did not solve the problem. Chuck at Bridgewood MotorSports (AntennaMastsRus) was very helpful and sent out a new unit for free under warranty I installed the new unit and it works fine. When I installed the new unit, I put a longer drain hose on it and routed the hose through the grommet. See photo below.
") You may also have to disassemble other bits, but START there.
You may also have to disassemble other bits, but START there.


