Toyota Forum banner

01 Chevy Prizm Build/Fix

23K views 99 replies 15 participants last post by  nthorn  
#1 ·
I’m not seeing any area for builds but have seen a couple other in this area so figured its best place to go. I feel a bit weird posting a Chevy in a Toyota forum but this car is a Toyota with a GM badge on it so I guess its ok.:grin:

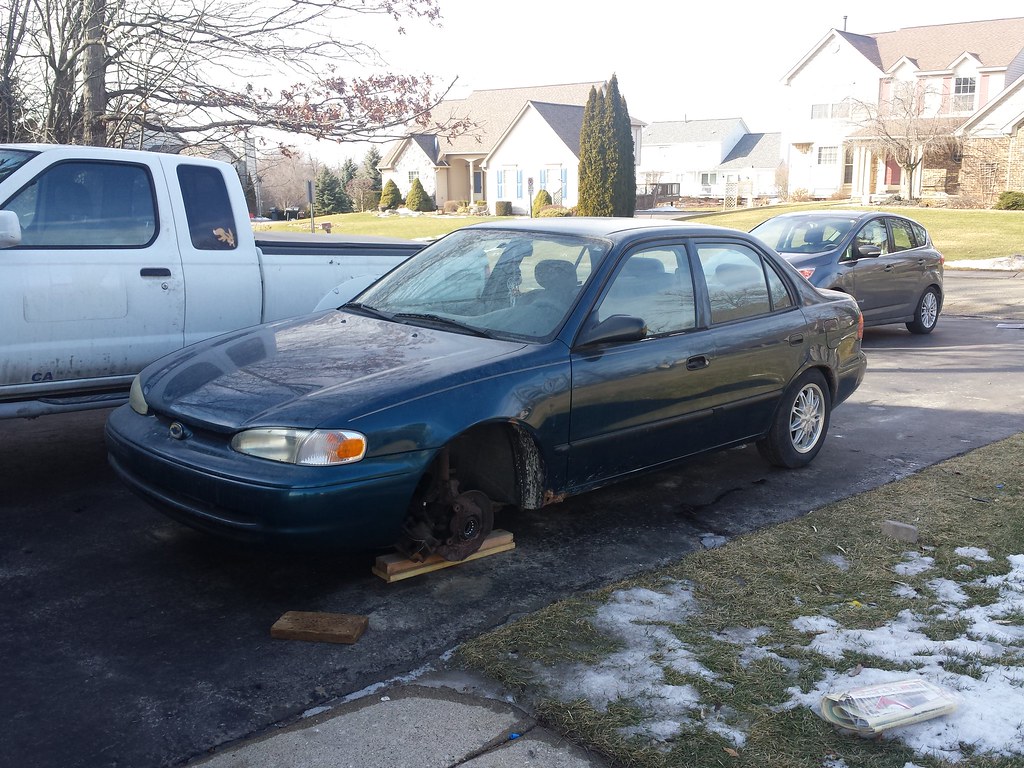
So quick background I wanted something that was small cheap, would get good gas mileage and needed a bit of work to give me something to work on. I ended up buying this Prizm for $350 not really sure what I was getting into because it had no battery so I had no idea if it ran. The person I got if from was having clutch problems so she gave it to her brother with a new clutch to replace. The brother started on the clutch replacement and got hung up getting some bolts off and took some shortcuts removing cotter pins that involved a cutoff wheel. Realizing that he could not finish the job he put it somewhat back together and tried to move it to somewhere that could fix it. His put back together was just putting the wheels on without the CV shafts and when he went to move it the driver side tire barring got spit and the back of the barring got spun off the hub and the tire came off. The passenger side barring also was damaged but did not come out like the driver side. The car was then towed to a Midas to have them fix it but when quoted $1,200 just to replace the clutch plus an unknown amount to fix everything else damaged she gave up on it and decided to sell it.

Image

Image

Image

Image

Image

Image

Image

Image


Knowing this is really a Toyota Corolla and knowing the reliability and that there relatively easy to work on I bought it knowing it would be a bit of work to get it going again but hey I wanted a new project so jumped on it. After buying it I had to have it towed on a flatbed truck to my house where I started going through everything on it, go through the hardware that it had and taking it apart to figure out what was going to need to be replaced to get it driving again. I also got a battery and was able to get the electrical working so I could get the actual milage off the car. When I got it the kid said it was 95k something but was about 10k more

Image

Image

Image

Image


The first thing I did on it was pull the sub frame off and replace the two motor mounts that were cut off during the first clutch replacement attempt. I had to cut a small hole in the frame behind the driver side tire and cut off the most forward bolt because the weld nut on the inside of the frame broke off.

Image

Image

Image


After the motor mounts were replaced I pulled the wheel assembly’s apart and replaced the barring in them as well as the lower ball joints that were damaged when the nuts were cut off.

Image


Both wheel assemblies are back on the car now with the CV axles in. Both the CV shafts look new so I’m not going to replace them. The steering tie rod end also has damaged threads on it and I should have the new part on it sometime after it comes in on Wednesday. I also have new brake calipers coming as well, there brake pads and rotors look like they were replaced not that long ago however the rubber boot around the cylinder pistons are missing on the driver side and completely dry rotted and falling apart on the passenger side. I did have to go to the Toyota dealer yesterday to order a second cv axle nut because one was missing.
 
#3 ·
A couple more pictures of what the car looks like right now because everyone like before and after pictures right? Front wheels are somewhat back together, I got a call from the Toyota dealer this morning letting me know the axle nut that was lost came in. Also the new tie rod ends and brake calipers were deliverer this morning according to FedEx so I'm going to try and get the tie rod ends replaced tonight.

Image

Image


Both the driver and passenger door handles were broken off, the car had new handles in bags in it when I got it so the driver side is replaced but still need to do the passenger side. Im going to have to spend some time trying to get the door to close correctly, it like to pop back open and needs to be slammed shut really hard for it to stay closed.

Image


Everything under the hood has been put back on and the new battery is in and hooked up so I could start to go through basic electrical to make sure everything else worked.

Image


All of the exterior lights work but inside the little dome lite was burned out. I had some extra LED lights from my truck and stuck one in and now I can see inside. Also the dash lights are out so I had to take everything out to get to the dash gauge cluster to replace them. I put some white led bulbs that im going to use on my trucks side marker lights in just to test and the new bulbs work so now I have to wait for the ice blue led bulbs that I ordered to come in on Friday. I also picked up some new floor mats and put them in.

Image

Image

Image

Image


Last thing I did last night was spend a half hour trying to get the rusted falling apart screws out to remove the old license plate and found more Toyota labeling underneath

Image


Im going to have to do something soon with the headliner, probably going to just take the board out and then refinish it after I rebuild the suspension on my truck.
 
#4 ·
That headliner would drive me insane. I would cut it off if I couldn't fix it haha.

Quite a project you have there. I would love to do something like this if I had the time/money. You could probably find little cars like this, fix them and sell them for a bit of profit lol
 
#7 ·
I got a box of parts yesterday and they are now on the car! New tie rod ends, both front calipers replaced and bled out. The fluid was a bit yellow but nothing compared to the sludge that was in the clutch line. The tires are now back on the car as well, I need to still do a quick drain and refill on all the fluids.

Image

Image

Image

Image

Image


There is still a couple things that need to be done to it before I can drive it, big one being getting it out of the driveway. My moms car is frozen to the ground with a dead battery behind it right now.
 
#8 ·
Thats some good work your doing there keep the updates coming.

Just noticed in the one picture your center console looks different where the radio goes. Any chance you can snap a pic of that area when you have a chance?
 
#9 ·
So got all the fluids changed out on it and went to test it and... The clutch is bad. Every gear it starts to move but will barley go anywhere and never stalls the motor. I'm going to pull it apart tonight and replace it tomorrow, when I bought the car there was a brand new clutch kit in a box with it but decided to fix everything else it needed first. At least this time I can get it apart and keep track of all the bolts, it took forever to figure out where each bolt went when I got it, all the bags were labeled but the bolts in the bag did not go to what they said they go to.


The Prizm does have a different center console then the Corrola does, it also has the wonderful GM radio that was used in almost every gm car as well.

Image

Image


My plan after I get this thing running and driving good is to change out the head unit to an android unit like what I have in my truck.

Image
 
#10 ·
You read my mind the android unit with a elm obd2 reader synced will give so many nice features i dont currently have mainly a quality size gps. Love the build thread so far keep up the good work i enjoy following the results.
 
#11 ·
Exactly what I already have set up in my Truck, I can read everything it can put out when Im driving and its really nice. I already got a 2nd obd2 to Bluetooth reader for the car that im going to get set up with my phone in the meantime. Also not sure if you have ever used the map app called waze but that is what I have the head unit set up to run every time the truck it turned on. Every morning when I turn my truck on it will give me live traffic and reroute to avoid stuff if there is traffic. I have had times will it will pop up and tell me to change rout and get off the highway immediately and take a back road next to the highway and as soon as I get off I can see around the bend that all lanes on the highway were shut down because of an accident.

Image

Image
 
#14 ·
Lets see whats easier...
- source a scrapped prism
- remove its dash and center console
- remove corolla dash and console
- mygyver prism dash into corolla
- wire everything up correctly
- install double din of choice
- enjoy

Or!

- buy this http://m.ebay.ca/itm/Android4-0-3G-...-1-Din-7-HD-Car-CD-DVD-Player-Stereo-GPS-SAT-NAV-Radio-/272138857100?nav=SEARCH
- install in 10 min
- enjoy.

I agree the prism dash is better but thats a ton of work vs aftermarket plus the screen is so close to the cup holders im sure id wreck a tablet...
 
#15 ·
That could work, I just have personally broken two flip up units joints (not the android ones) so I tend to do whatever to avoid them. The air vents also being right behind the screen would drive me mad just knowing there block. I work for a HVAC contractor and spend lots of time drawing up duct and making sure the ducts are not blocked.
 
#16 ·
Ok so I pulled the car apart again and did a clutch replacement this weekend. I spent three weeks putting it back together from the peaces it was in when I got it yet was able to take the transmission out and back in one day. The blue led bulbs for the dash came in as well and got them installed, I still need to put all the dash trim back on this week. Now that it is finally running I was driving it around on yesterday and it has a problem with stalling when sitting in neutral. It has an error code P0171 that im reading on my phone scanner but the check engine light is not on. It had a 1/4 tank of gas that was sitting in it for I have no idea how long so I did drive it down to 1/8 tank then refill it at Costco with premium and added a bottle of injector cleaner into it. It did seem to drive a bit better about two hours later when I drove home from dinner at a friends house. I also changed out the spark plugs yesterday and did a coolant flush. Im going to try cleaning out the mass air flow sensor next and see if it gets better.

Image

Image

Image

Image

Image

Image

Image

Old Clutch
Image

New Clutch
Image

Image
 
#18 ·
Nice work! Thanks for sharing and posting these pics.

Great mod on the gauges. Those blue LEDs came out surprisingly sharp, looks a lot better than I would have first imagined.

Just curious, which clutch make did you end up getting?
 
#19 ·
Nice work! I've enjoyed following your progress. You've done great. Its harder to put right someone else's mistakes and you got a great deal because you took on a tough job. You should definitely be proud of yourself. I like the blue paint and the blue dash LEDs.
 
#20 · (Edited)
Im kinda surprised that there is not more people here doing builds like this. like im still less then $1000 total into the cost of this car and I already have it running and driving! I have no idea what another $1000 would do with this car but I think im going to eventually find out. Even a semi good used car that in my area go for around $1,500-3,000 and even then they need a little work so to me starting with something simple like this and just replacing everything, ya it takes more time but by the end of it its kinda like a new car.

Im happy with how the led bulbs turned out in it and it was super easy to do. This is a link to a video that shows how to get the the lights and change the bulbs. This guy has a lot of good videos on fixing the corolla/prizm that I would suggest looking at if you have problems.


And the bulbs that I used were the ice blue color and they came in a 20 pack for $8 {Link}. I still don't know what im doing to do with the extra 17 bulbs lol.

The clutch that came with the car in a box was a M-PACT 16080 8-3/8" X 15/16" X 21T. To me it works, I have never owned or even driven a manual transition car until yesterday. It really was not hard to figure out, I have been driving motorcycles for 8 years so it was just flipping controls with your hands and feet.

After work today I got the rest of the dash put back on and checked for codes with my scanner on the phone and im still getting a P0171 code. I drove the car up to the auto-zone and got a couple more bottles of fuel stabilizer-injector cleaner and a can of mass air flow sensor cleaner and then came home and cleaned out the mass air flow sensor on the car and my truck. Ill have to take the car out again tomorrow and see if it gets any better. It is definitely running a a lot better then when I started.

Image
 
#21 ·
It was still a little bit light when I got home from work so I was able to get a couple of picture of the car.
Image

Image

Image

Image

Image

Image

Image

Bluetooth OBD2 reader that I keep in in and can pull whatever data on my phone until I get a new head unit.
Image


It runs but still needs work. The front A-arms need to be replaced because the rubber bushing in it are falling apart. The new arms should be in beginning of next week to fix that problem. It also still has a problem when its idling that it will start to idle really rough and stall itself, Im going to test next for a vacuum leak because on the reader every time it starts to act up its not reading anything on vacuum pressure then will start reading it again if I give it gas. Below are screenshots for when the car just sits idle, stalling itself and when I was running it at 2,700 rpm to keep it from stalling out.

Image

Image

Image

Image

Image

Image

Image


Another thing I noticed when replacing the clutch is that the motor mounts are not looking so good and should be replaced. Im going to try and fix them with 3M window weld because there not ripped out just cracked and the rubber is to soft.

I drive a lot would like to have an armrest on the center console so im going to try and make one up and 3d print it because my printer is just big enough to make something that would fit over the hole that is already there.
Image

Image
 
#23 ·
#24 ·
I have seen that and though about that but at the same time I can just make one on CAD and print it. I'm probably going to make one that has a small side hinge compartment on the top as well. The real problem that im going to have is getting it to fit on the bottom right other then that my pay job is a CAD designer so it only takes a couple minutes to make up and filament for the 3d printer is cheep. Like a spool costs $18 and I could probably print 4 of them with a spool.
 
#26 ·
Another small update. It has been cold and snowing out and I have been working inside on other projects but did spend a little time on CAD playing around making something up for a center council lid. I now have the right size ring for the flip up part but keep changing my mind on the latch and way it flips up. I have a file printing tonight that im going to try tomorrow and if I like it I will build more onto it and round some of the edges off.

Image

Image

Image

Image
 
#27 ·
Yay car parts! My new control arms showed up yesterday to replace the ones on it now, the bushing in it now are shot, the control arms now are hitting the frame every time I go over a bump in the road. Im not sure when im going to get to doing it, there was a snowstorm last night and im planing on dropping the whole subframe again when I do the control arms so that I can fix the rear motor mount that is also bad.
Image

Image

Image

Image
 
#28 ·
Im getting into the not as easy a swapping parts stage on the car. I have not driven it much because the bad bushing in the control arms and now that I have them in its starting to be a problem getting the swapped out because of age and rust but im not going to give up that easily! I was a bit antsy to get something done on the car on Thursday so I pulled the sub-frame off the car yet again during a pretty bad snow storm but having done it three times already it came off in about 15 minutes.

I also pulled the rear motor mount off and filled it with window weld so that it can set up for a couple days and dry before I put it back in the car. Before I could do anything with it I had to clean the rust off it with a wire wheel and brush.

Image

Image


I did a small amount in the center let it set up for a day and then Friday night I filled the other two sides.

Image

Image

Image


Now for the sub-frame, the for 12mm nuts with the bolt that is welded to the back was giving me a hard time, two of them snapped and the other two the bolt head rounded off, yay rust.

Image


To get the bolts out so I can replace them I had to center drill the bolt from the back to the same size as the threads then take my dremel and cut between the head of the bolt and frame to cut the welds off. I then took a chisel and hammer and split the rest top of the bolt off and then was able to pull the nut and bolt out from the other side.

Image

Image


The other bolts that snapped off I was able to cut the weld off with the dremel and then punch them through with a big center punch.

Image

Image


Now I need to get new hardware to replace the bolts and put it all back together again.

Image
 
#29 ·
I got the car put all back together on Sunday and its now driving much better with the new control arms. When I had everything apart I cleaned up the rust that was on it the best I could with a wire brush and then sprayed it with two coats of rust inhibitor and then the entire thing with two coats of under-body paint to seal it up and slow down the rust. It came out looking a bit better then I though it would. It warmed up on Monday and had some time to clean the filth out of the driver seat and seat belt, it is much better but still needs to be done again.

Its a bit dirty in the pictures, I was playing around on the dirt roads coming home from work on Monday
Image

Image

Image


Right now I have more parts that I ordered Monday coming in tomorrow. The struts are still original so I have a set of new Monroe struts and springs coming for all four sides and a new radio head unit.
 
#31 ·
  • Like
Reactions: bsmiley
#32 ·
This is the unit that I got for the car

http://www.amazon.com/gp/product/B00YE7SN9K?psc=1&redirect=true&ref_=oh_aui_detailpage_o00_s01

Its about the same as what I already have in my truck

http://www.amazon.com/gp/product/B0151KNXJ8?psc=1&redirect=true&ref_=oh_aui_detailpage_o00_s00

The only different I can see from looking on them online is OS interface and the hookups on the back are a little different but other then that it looks the same to the one I already have. It should be an easy hookup like my other one if I ordered the right wiring harness for it. I will post pictures of it after I get it installed. The only thing I see being a problem are the cup holders, Im going to have to think of something to put some somewhere else.
 
#33 ·
I got more parts yesterday, the new radio is kinda hooked up but i need to clean up the installation a bit still. the bracket does not match up with the holes on the new unit so right now there is only two screws holding it down. also one of the four screws that hold the bracket to the dash fell so now I need to dig that out somehow as well as well as wire the mic for the hands free phone. The new unit fits in but I still need to trim the top corners because the radius on the dash is larger then the radio but all the sides line up fine. I still need to go in and set up all the programming on the apps and get the obd2 reader unpaired from my phone and moved to the car. I did get my waze maps and Pandora set up on it and it worked good when I was driving into work today.

The old radio before I started
Image

Image

The new unit
Image

Always use the new screws
Image

Image

It works!
Image

Image

Image


The new struts also showed up so this weekend I can get them put on and then get an alignment on Monday.

Image