Toyota Forum banner

Low beam height adjustment

118K views 48 replies 23 participants last post by  fcgadgethighlander  
#1 ·
I recently went on a trip with my hitch mounted cargo basket (and a rear end full of cargo). Headlights were pointed way up.

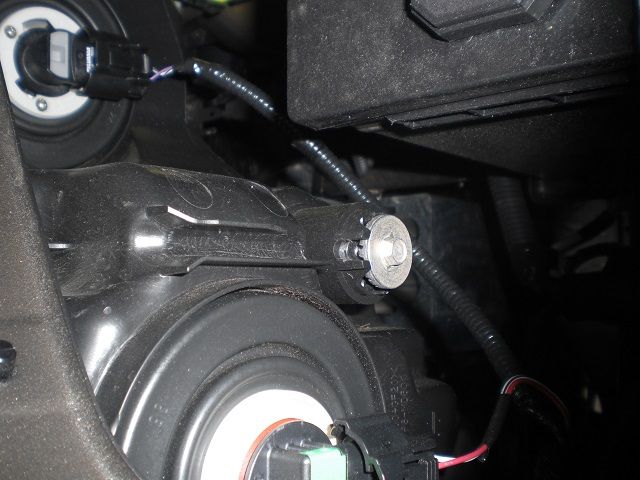
Where is the adjustment screw for aiming the low beams lower? Is it the metal screw below the low beam? CW to lower?

I looked in the manual, but it was no help.
 
#4 ·
The two pics below should provide the info you need. The first pic shows the adjuster locations for the (US) driver's side headlamp assembly. Notice the heavy black "U" channel at ~10 o'clock from the "U D" adjuster label:

Image


This next pic shows how the U-channel leads to the crown head for the adjuster screw. You just need to slide a #2 Phillips screwdriver down the U-channel, engage the crown, and twirl away.

Image


This approach is the "fine" adjustment method. You can also use a socket directly on the adjuster screw for "coarse" adjustments.

HTH,
Jim / crewzer
 
#7 ·
For those that have made adjustments, how many turns did you make to lower the beam. I marked the adjustment screw, and did two full turns in the downward direction, and I am still on the high side.

This morning, I pulled up to a wall (on level ground), and as I pulled back, the cutoff actually got higher. This is after two full downward turns on the adjustment screw.

No wonder I had an issue when carrying a cargo basket. The headlights are already pointing upwards.
 
#8 ·
...as I pulled back, the cutoff actually got higher.
That's NOT a good thing...

I don't remember how many turns of the screwdriver my lights needed, but it was quite a few. What I do remember is that it took me three tries to get 'em right.

Best of luck!
Jim / crewzer
 
#10 ·
I don't remember how many turns of the screwdriver my lights needed, but it was quite a few.
You're not the only one. Mine were aimed ridiculously high from the factory. Had to sit there cranking on them for a while to get them aimed down to an acceptable level. :)
 
#38 ·
I'll guess that since the assembly line is so close in tolerance in body welding and parts fit that Toyota has the vendor that manufactures the head lamp assembly just preset the adjustment before they are shipped to the assembly line, so no adjustment is needed or done on the assembly line.
 
#15 ·
Hi Jim / Crewzer,

Thanks much for the photos and the helpful hints. I got flashed a couple of times as I was driving to the coast last night... Had earlier changed to the XenonDepot Philips HIDs and suspected they needed to be aimed correctly. Sure enough, it took a few turns to get them lowered to the proper height.

Thanks again... Your post is very helpful and should probably be marked as sticky.
 
#39 ·
Hey, what did you use to lower them? and which screw? I saw the hole that says the letters for up and down but didn't see the screw properly. Is there any guide you have available?

I definitely could not see a screw to turn it Left or Right but saw one for Up or Down but couldn't figure out a easy way to get it as the Hybrid model has virtually no room in the light housing area.
 
#24 ·
My headlamps were aimed too high when I took delivery. I had people "flash" their brake lights when I was behind them, and one fellow slowed, let me pass, and then politely flashed his headlamps at me.

When I subsequently checked the headlamps at home, the "hot spots" and the low beam upper cut-offs would drop as I approached the garage door, indicating they were aimed too high. The problem got worse when I loaded up the car with people and cargo.

I would prefer separate aiming screws for the high- and low-beams, but I now have the lamps assemblies set at what appears to be an effective attitude.

HTH,
Jim / crewzer
 
#19 ·
While this is surely helpful to know where the adjustments can be made from.....
What is this "acceptable" level/height?
How far from the wall do you have to be parked, and how high off the level ground does it need to be aimed at?
Or is there another method of adjusting.
This info would be needed to sum this up, and surely a sticky.
 
#22 · (Edited)
So height from 25 feet should be below the height of a passenger car's side view mirrors. (Is the HL considered a "passenger car"). Hmmm. More questions.
But SweeneyP did mention to....
From the ground, measure the height of the center of projectors. Right that number down.
Then take the car 25feet back from a wall, and aim/adjust the cutoff about 1.5inches below your measured number for the projector height.

FYI, "Rule of thumb" is not a good way to base anything on....Even in the video, AND SweeneyP's post mention this "rule"! lol!
Considering it was the court accepted thickness of the stick you were allowed to whip and beat your wife with if she misbehaved...The outcome/results you get have little to do with the rule...which makes it very wishy-washy.
 
#27 ·
I may have to adjust mine after I put the Xenon Depot H11 kit in, I know you park 25 ft from a wall on level surface, was the desired drop 3" below lens???
I parked ~25ft from my garage door and referenced off the OEM halogen bulbs; I didn't really have to change the aim height based on the light cut-offs; but, to avoid any possible glare to incoming drivers, I did lower the aim by 4-teeth only (Not turns) on each side. I adjusted the aim via an 8mm socket instead of a Philip screw driver.

Wondering if it is absent from some models. I couldn't find it in mine HL either (2015 LE). up/down was there though.
Should all the same for the 3rd gen HLs... See pictures on Page-1 in this thread, the 4th post by "Crewzer" on 04/02/2015.
 
#28 ·
I can engage the UP/DOWN adjustment screw because it is in the open and I can see what I am doing. For the LEFT/RIGHT adjustment, I can't see or feel when my screwdriver engages the wheel to turn it.

Does the screwdriver go straight in or at an angle? About how far down before the screwdriver should engage the adjustment wheel? The black trim molding which has an opening for the screwdriver is angled on one side at the hole, making me think maybe the screwdriver should go in at an angle?

Thanks in advance.
 
#32 ·
Duffin, the 2nd picture in the Post #4 is the headlight aim adjustment screw. You can either use a long philips screw driver going from top through the adjustment hole "molding" to adjust the headlight aim or use an 8mm socket to turn the adjustment screw (e.g. the 2nd picture in Post #4). One advise before you start adjusting/turning the adjustment screw, make a reference mark on the screw so you know where it started and how much has been turned and etc. Personally, I marked one of the teeth then adjusted using an 8mm socket (the wrong size/too small of screw driver can mess-up the teeth on the screw). Lastly, I don't believe there is Left or Right aim adjustment for headlight.
 
#33 ·
Thanks for the info, but I wasn't asking about vertical adjustment. Only horizontal adjustment (L/R).

I used this video below for the procedure to adjust vertical adjustment. I used a screw driver, and since I installed HID kit, I went lower than standard height by 2 inches.

Hence, I discovered during this aiming procedure that my right headlight is spraying wide by a foot at 25 ft from a wall. Frustrated I can't find a way to correct.

 
#37 ·
Since my driveway was not level, I did mine at my work basement parking structure. My partner was wondering what the hell I was doing marking the wall and floor with tape. I had to lower my low beams approximately 4 inches with the socket. I think a basement parking structure is a good place to measure your low beams.
 
#40 ·
Since my driveway was not le
I can engage the UP/DOWN adjustment screw because it is in the open and I can see what I am doing. For the LEFT/RIGHT adjustment, I can't see or feel when my screwdriver engages the wheel to turn it.

Does the screwdriver go straight in or at an angle? About how far down before the screwdriver should engage the adjustment wheel? The black trim molding which has an opening for the screwdriver is angled on one side at the hole, making me think maybe the screwdriver should go in at an angle?

Thanks in advance.
After driving in front of my wife as she was driving the HL, I noticed I too need to lower the lights...and thats with no cargo!
Ram, you need this too!
Duffin, the 2nd picture in the Post #4 is the headlight aim adjustment screw. You can either use a long philips screw driver going from top through the adjustment hole "molding" to adjust the headlight aim or use an 8mm socket to turn the adjustment screw (e.g. the 2nd picture in Post #4). One advise before you start adjusting/turning the adjustment screw, make a reference mark on the screw so you know where it started and how much has been turned and etc. Personally, I marked one of the teeth then adjusted using an 8mm socket (the wrong size/too small of screw driver can mess-up the teeth on the screw). Lastly, I don't believe there is Left or Right aim adjustment for headlight.
Thanks for the info, but I wasn't asking about vertical adjustment. Only horizontal adjustment (L/R).

I used this video below for the procedure to adjust vertical adjustment. I used a screw driver, and since I installed HID kit, I went lower than standard height by 2 inches.

Hence, I discovered during this aiming procedure that my right headlight is spraying wide by a foot at 25 ft from a wall. Frustrated I can't find a way to correct.

I have read many of the posts on this topic and wonder if anyone has any real facts. Mazda rates its CX9 engine at 227 HP with 87 octane and 250HP with 93 octane. OK so what's different about that engine and a Highlander's? A turbo...Higher Octane can take higher compression, producing more power....so that's half the story...the timing has to be retarded for the lower octane gas so it doesn't pre-ignite. That is done with a knock sensor that automatically retards timing when it senses knocking.
I did a little research and found or Highlanders also have a knock sensor...It's about 165 bucks. Interesting..why do we need that if we're all going to use the 87 Octane gas???? Is it possible that when we run 93 octane that the ignition timing changes allowing us to make more power? I haven't tried this on a Highlander, but I did try it on an old Celica that I put 165,000 miles on years ago. The car certainly had more spunk and about 2 more miles per gallon when I ran premium in her....She definitely had a knock sensor, and premium definitely made things better.
So believe what you want....I may try a test on my Highlander and will let you know the results.
Difference between 2GR-FE on 93 octane and 87 octane, should be about 10 horsepower, if you go by the 2005 Avalon ratings of 280 crank horsepower. In 2006, Toyota was forced to rate the 2GR-FE at 268 crank horsepower due to SAE rating changes, but actual horsepower output of the engine did not change.

I have personally ran 93 octane on my 2016, and you can feel a bit of better pickup and about 1-2 better mpg. Whether that's worth it, up to you.
I have been observing increased mpg as well, so that makes us 2, well 3 including BuffaloBark. I also drive the car fairly aggressively, so I'm good with 93 octane for peace of mind.
el, I did mine at my work basement parking structure. My partner was wondering what the hell I was doing marking the wall and floor with tape. I had to lower my low beams approximately 4 inches with the socket. I think a basement parking structure is a good place to measure your low beams.
hey guys, not to reserect an old thread but i neeed you guys opinion.

i got these wicked lasfit LEDs specifically designed for the highlander. there great, bright as hell but ran into one problem.

i notice during one half hour night drive, i ha FIVE vehicles flash there high beams at me. A clear indication my head lights were to bright or thought my high beams were on but they weren't.

so last night i decided to aligned the low beams downward a bit which it now looks like this.

i did the 25 feet test etc but it showe me the factory alignment was perfect but i still angle it down a bit more.

does this look acceptable?
301134
 
#41 ·
Based on my personal experience and having read a few other owner's sharing, factory low beam adjustment (also sets the high beam aim as a unit) is fine for Helogen bulbs (if OEM equipped), but, need significantly lowered to not only find a good lighting for the driver also to lower far enough to minimize the glare from (aftermarket LED bulbs) shining at the incoming drivers from a few hundred feet away... Amount of adjustment lowering vary per different brands of LED bulbs... A side from looking at your own head lights from a few hundred feet away, you can also sort of tell from looking at the road sign (especially highway over head signs) light reflections...

You may want to use a solid back ground (instead of an open road as in your picture) to compare the glare between LED and Halogen bulbs to tweak the adjustment accordingly. Before adjusting too far and lost track of the original position/aim, I would mark the adjustment screw on each side to be able to revert back as needed.
 
#42 ·
Based on my personal experience and having read a few other owner's sharing, factory low beam adjustment (also sets the high beam aim as a unit) is fine for Helogen bulbs (if OEM equipped), but, need significantly lowered to not only find a good lighting for the driver also to lower far enough to minimize the glare from (aftermarket LED bulbs) shining at the incoming drivers from a few hundred feet away... Amount of adjustment lowering vary per different brands of LED bulbs... A side from looking at your own head lights from a few hundred feet away, you can also sort of tell from looking at the road sign (especially highway over head signs) light reflections...

You may want to use a solid back ground (instead of an open road as in your picture) to compare the glare between LED and Halogen bulbs to tweak the adjustment accordingly. Before adjusting too far and lost track of the original position/aim, I would mark the adjustment screw on each side to be able to revert back as needed.
Thanks.

yeah i did do the 25 feet test towards a wall. the oriignal position of the healights was actually perfect. but i assumed there still just to bright at that factory height. so i lowered them both. i int mark the screws since u had to do mmultiple rotations anyway.

since u have experience, how do the lights look to you in your opinion in my picture?