DIY: 1996 Camry Timing Belt + Waterpump + Oil Seal Change 5S-FE (GEN3) - Part 2
Part 2......Click on the link below to go to Part 1 of this procedure.......
http://www.toyotanation.com/forum/showthread.php?t=264425
![Image]()
¸
![Image]()
40. Clamp the oil pump pulley in a vice. Remove the nut, then the pulley and drive rotor.
![Image]()
![Image]()
41. Cover the tip of a flat screwdriver with electrical tape and pry out the oil seal. Note how far the seal is pressed into the housing before removing it. Apply a light coat of clean engine oil to the seal ID and OD press the seal into the bore. I used a vice to press the seal in flush with the outside of the housing. Do not press the new seal all of the way down to the bottom of the bore, or it will block the drain port (circled in red). I poked a small pin punch through this drain port to ensure that it was not blocked. Mine was not blocked.
![Image]()
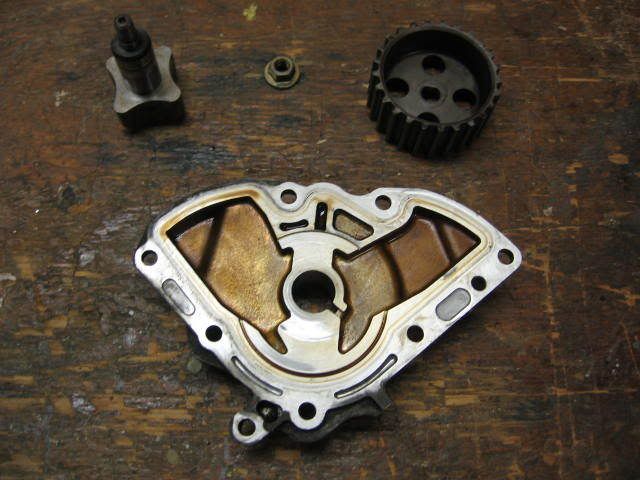
42. Apply a light coat of clean engine oil to the shaft, drive rotor and driven rotor. Reassemble the pump and install on the engine with the 7 bolts (10mm). I dabbed some clean wheel bearing grease in the o-ring gasket groove in the pump in several locations to hold o-ring gasket in place during assembly. Ensure that correct length bolts are installed in the previously noted locations. When re-installing the oil pump, ensure that the triangular indentation on the driven rotor faces out as shown in the photo above. The angular orientation of the drive rotor with respect to the driven rotor is not important as one has four lobes and the other has five lobes, so the relative angular position between the rotors constantly changes as the oil pump operates.
![Image]()
43. Use the same sheet metal screw trick to remove the crankshaft seal. This time, I did not bother to cut the rubber seal lip away. The seal came out easily. Note how far the seal is pressed into the housing before removing it. Clean the shaft and bore with a Q-tip and paint thinner. Apply a light coat of engine oil to the new seal ID and OD. Press the new seal into the bore to the same depth as noted above. Remove the crank position sensor (see green arrow) by removing the crank position sensor bolt (red circle) (10mm) to clean and degrease this area.
![Image]()
44. Slide crankshaft timing pulley onto the crankshaft. It should slide on easily. Install the camshaft timing pulley and tighten the bolt (14mm). I did not want to mess with removing the valve cover to hold the camshaft from turning, so I used a Bessey woodworking clamp to hold the pulley while I tightened the camshaft pulley bolt.
![Image]()
45. Install the new idler pulley (14mm), tensioner pulley (14mm) and tension spring. Use a pinch bar to move the tension pulley to the `slack` position. Install the new timing belt with the match marks in the correct location on the camshaft timing pulley and crankshaft timing pulley. Loosen the tensioner bolt in order to tension the belt. Lock the tensioner in this position. Slide the round cupped washer (aka. the belt guide) on to the crankshaft. Install the lower timing belt cover. Ensure that the correct length of the bolts are installed in the proper location as previously recorded.
![Image]()
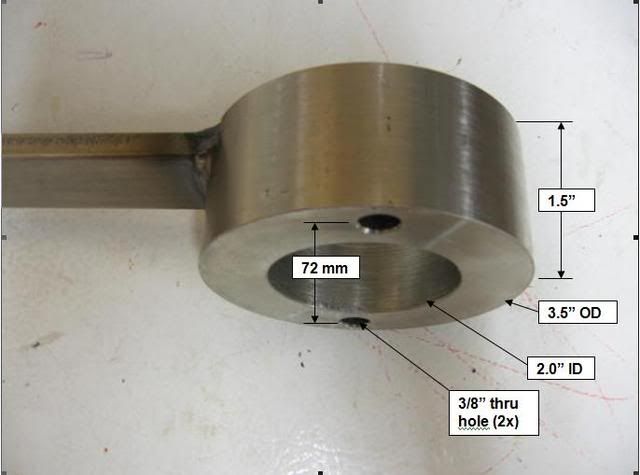
46. Lightly clean the bore of the crankshaft harmonic balancer drive pulley with some emery paper and wipe clean the crankshaft with paint thinner. Slide the crankshaft harmonic balancer drive pulley onto the crankshaft. Mine went on about 3/4 way by hand and the crankshaft bolt took care of the rest. Tighen the crankshaft bolt (19mm) to 80 ft.lbs. using a torque wrench and the special tool.
![Image]()
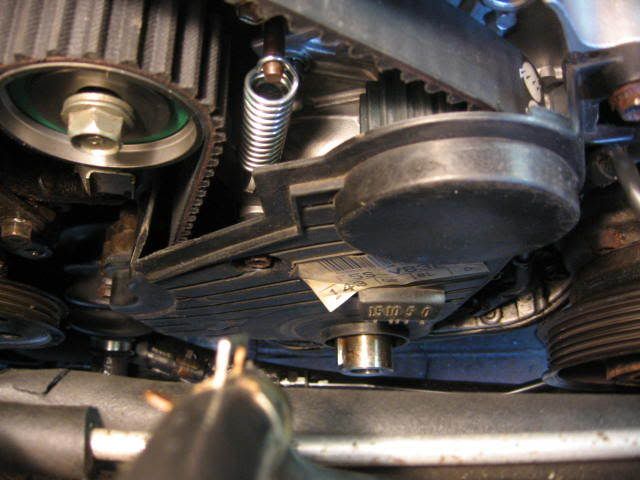
47. Rotate crankshaft bolt (19mm) clockwise to align “V” notch on the pulley with “0” position timing belt lower cover.
![Image]()
48. With moderate tension in the timing belt between the camshaft and the water pump, align “V” notch in camshaft seal housing with hole in camshaft pulley. If you look at the right hand side of the mirror, near the edge, in the above photo, you will see a round indentation. That is NOT the mark you want. The one you want is the "V" shaped notch.
[Edit Apr. 4, 2010] This information was provided by TN member Rattlin_Steele: Since there seems to be a lot of confusion about the V-notch vs the circle/dot on the camshaft alignment, I'd point out to novices like me that the the proper mark (V-Notch) is at the 12:00 position with respect to the vertical axis of the engine.
[Edit April 4, 2010] TN forum member fenixus also reported that there was no round indentation on his '00 Camry 5SFE. It is possible that Toyota may have ditched the round indentation in later model years to avoid confusion.
In my case, I was off by one tooth, so I had to back off the timing belt tension and rotate the camshaft by one tooth. A small mirror and small flashlight is helpful for this step. It took me a few tries to get this step right as the timing belt tended to skip a tooth each time I restored tension to the timing belt. I finally got an assistant to push down on the timing belt between the camshaft and water pump to prevent the belt from skipping as I loosened the tensioner bolt to tension the belt. This did the trick for me.
With the timing belt tight on the water pump side and the marks aligned, LOCK THE TENSIONER (this is important - many forget to lock the tensioner at this point and the belt skips during this step causing the timing to be off and the engine run rough or it will not run at all!!!!!) and rotate the crankshaft clockwise 720 degrees. Ensure that the “V” notches are aligned. Mine did. Ensure that the timing belt is tight between the camshaft and the water pump pulley. Mine was. Note that the crankshaft rotates 2 revolutions for each revolution of the camshaft. That is why it is necessary to rotate the crankshaft 720 degrees to get the camshaft to rotate 360 degrees.
Next, I rotated the crankshaft another 720 degrees, just to be sure. Everything was still in alignment, and the timing belt was tight between the camshaft and water pump. Everything looked good.
49. Before going any further, I installed the spark plugs (with a light coat of anti-seize on the spark plug threads) and turned on the engine for 15 seconds to ensure that the timing was OK. This step can be done with the car still on the stands and the alternator and power steering pump disconnected. The engine started (transmission in was in Park position) and ran well at low and moderate speeds. So I knew that the timing was good!
50. Clean, dry and wire brush all of the multigroove drive pulleys. Install the power steering pump belt using a pinch bar to tension the belt. Install the upper timing belt cover. Note the tip in step 16 & 17. Install the alternator. Install the air conditioner / alternator belt. Install the aluminum engine mount and the new torque rod mount. Snap the coolant reservoir back into place. Re-connect the two ground connectors.
51. Flush the radiator with clean tap water until it runs clear. Close the drain port and fill with 50-50 mix of distilled water and coolant. Fill the overflow tank with 100% coolant. With radiator cap open, run the engine with heater in the “hot” position and watch for coolant flow in upper radiator tank. When the level will drops add a bit more coolant. Close radiator cap and allow engine to cool. Add additional coolant if needed when engine is cool. Add a timing maintenance sticker to timing belt cover indicating date and mileage of timing belt change.
EDIT...After about a week, I noticed a high pitched squeal when the steering wheel was cranked fully right or left. Also occasionally noticed a squeal when the AC was on. I tightened the power steering belt and AC/alternator belt and that took care of the problem. Either I didn't tension the belts tight enough originally or the belts stretched a small amount after installation.
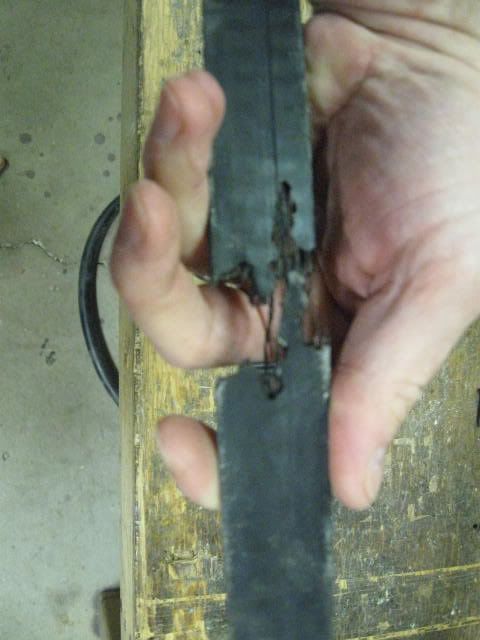
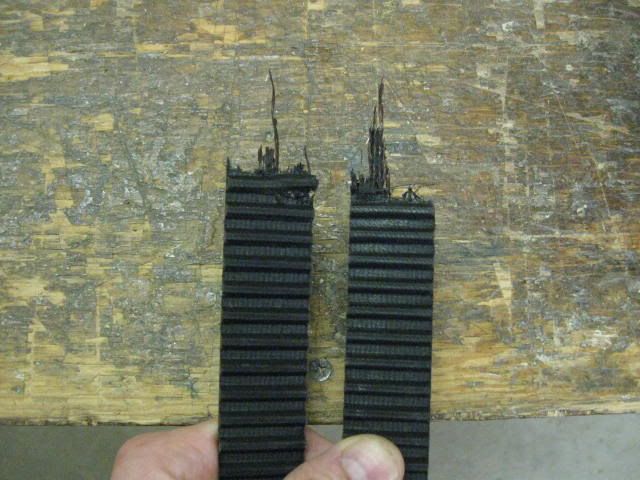
UPDATE: March 25, 2010: After about 1.5 years and 20K Kms, I could hear some rattling under the timing belt cover when the engine was cold. The noise went away when the engine was warm. It sounded like the timing belt was getting loose and hitting the cover. I was planning to tear it all down and tighten the belt when the weather got a bit warmer, but the belt broke before I got it apart. I am not sure if the original belt was defective or if I installed it too loose to begin with. Bottom line is if you hear some rattling, it is a good idea to take the timing belt cover off and check the belt tension. I used a Contitech belt (more expensive) this time. Hoping that this one will perform better.
![Image]()
![Image]()
Part 2......Click on the link below to go to Part 1 of this procedure.......
http://www.toyotanation.com/forum/showthread.php?t=264425
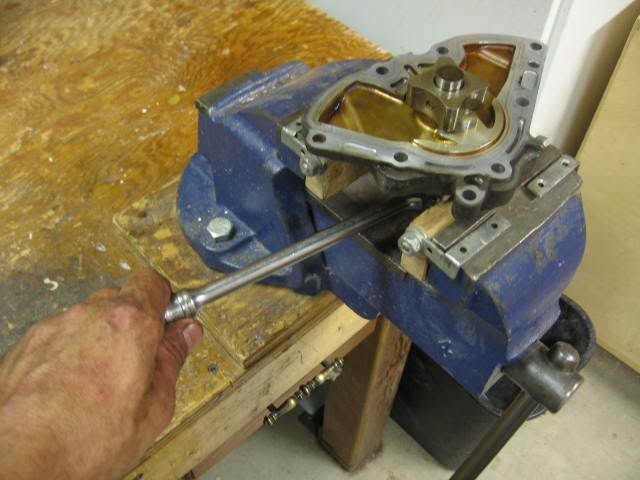
40. Clamp the oil pump pulley in a vice. Remove the nut, then the pulley and drive rotor.

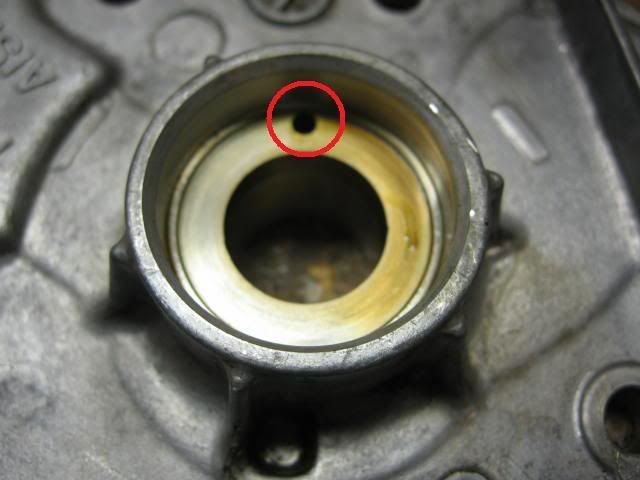
41. Cover the tip of a flat screwdriver with electrical tape and pry out the oil seal. Note how far the seal is pressed into the housing before removing it. Apply a light coat of clean engine oil to the seal ID and OD press the seal into the bore. I used a vice to press the seal in flush with the outside of the housing. Do not press the new seal all of the way down to the bottom of the bore, or it will block the drain port (circled in red). I poked a small pin punch through this drain port to ensure that it was not blocked. Mine was not blocked.
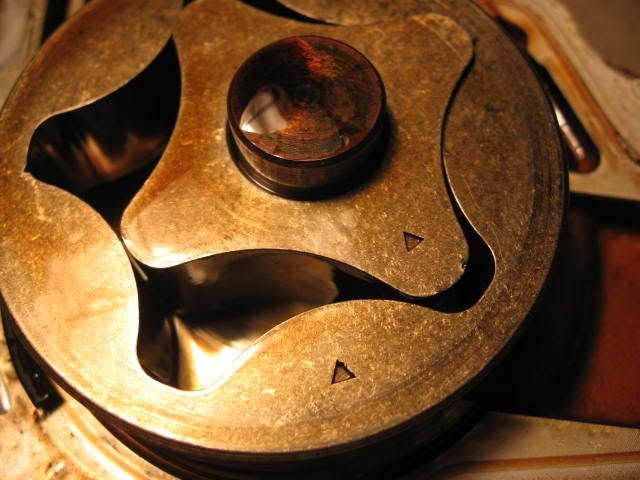
42. Apply a light coat of clean engine oil to the shaft, drive rotor and driven rotor. Reassemble the pump and install on the engine with the 7 bolts (10mm). I dabbed some clean wheel bearing grease in the o-ring gasket groove in the pump in several locations to hold o-ring gasket in place during assembly. Ensure that correct length bolts are installed in the previously noted locations. When re-installing the oil pump, ensure that the triangular indentation on the driven rotor faces out as shown in the photo above. The angular orientation of the drive rotor with respect to the driven rotor is not important as one has four lobes and the other has five lobes, so the relative angular position between the rotors constantly changes as the oil pump operates.
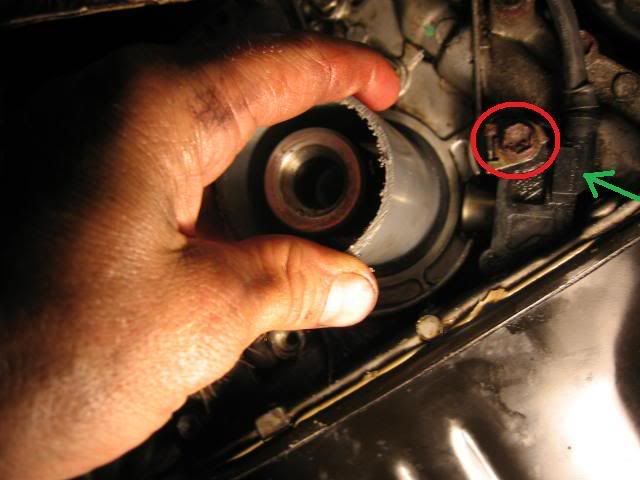
43. Use the same sheet metal screw trick to remove the crankshaft seal. This time, I did not bother to cut the rubber seal lip away. The seal came out easily. Note how far the seal is pressed into the housing before removing it. Clean the shaft and bore with a Q-tip and paint thinner. Apply a light coat of engine oil to the new seal ID and OD. Press the new seal into the bore to the same depth as noted above. Remove the crank position sensor (see green arrow) by removing the crank position sensor bolt (red circle) (10mm) to clean and degrease this area.
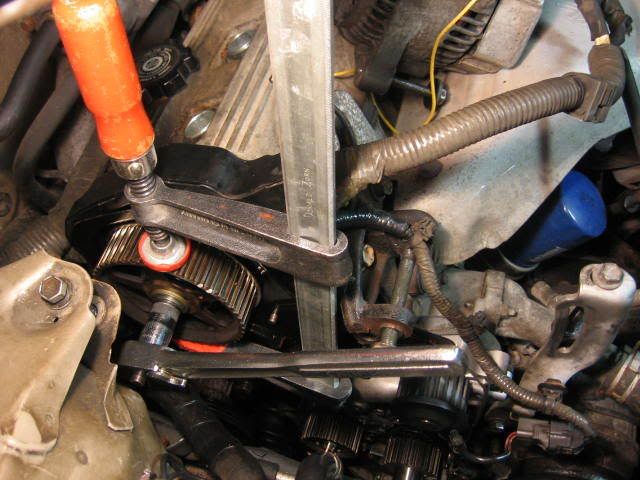
44. Slide crankshaft timing pulley onto the crankshaft. It should slide on easily. Install the camshaft timing pulley and tighten the bolt (14mm). I did not want to mess with removing the valve cover to hold the camshaft from turning, so I used a Bessey woodworking clamp to hold the pulley while I tightened the camshaft pulley bolt.
45. Install the new idler pulley (14mm), tensioner pulley (14mm) and tension spring. Use a pinch bar to move the tension pulley to the `slack` position. Install the new timing belt with the match marks in the correct location on the camshaft timing pulley and crankshaft timing pulley. Loosen the tensioner bolt in order to tension the belt. Lock the tensioner in this position. Slide the round cupped washer (aka. the belt guide) on to the crankshaft. Install the lower timing belt cover. Ensure that the correct length of the bolts are installed in the proper location as previously recorded.
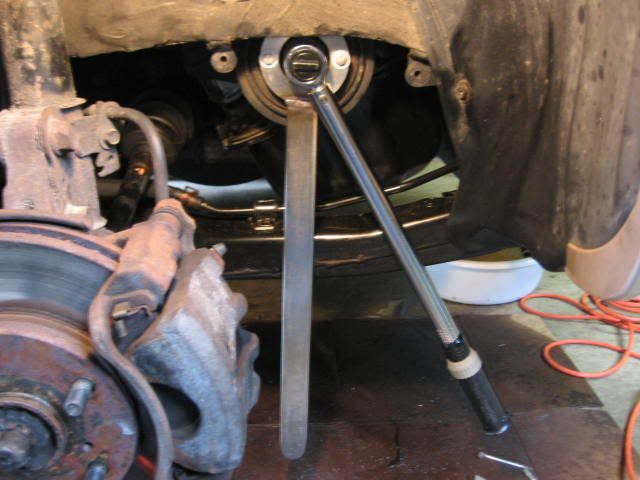
46. Lightly clean the bore of the crankshaft harmonic balancer drive pulley with some emery paper and wipe clean the crankshaft with paint thinner. Slide the crankshaft harmonic balancer drive pulley onto the crankshaft. Mine went on about 3/4 way by hand and the crankshaft bolt took care of the rest. Tighen the crankshaft bolt (19mm) to 80 ft.lbs. using a torque wrench and the special tool.
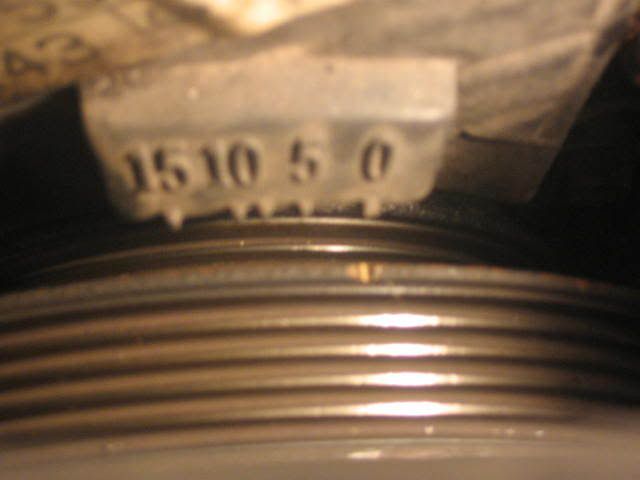
47. Rotate crankshaft bolt (19mm) clockwise to align “V” notch on the pulley with “0” position timing belt lower cover.

48. With moderate tension in the timing belt between the camshaft and the water pump, align “V” notch in camshaft seal housing with hole in camshaft pulley. If you look at the right hand side of the mirror, near the edge, in the above photo, you will see a round indentation. That is NOT the mark you want. The one you want is the "V" shaped notch.
[Edit Apr. 4, 2010] This information was provided by TN member Rattlin_Steele: Since there seems to be a lot of confusion about the V-notch vs the circle/dot on the camshaft alignment, I'd point out to novices like me that the the proper mark (V-Notch) is at the 12:00 position with respect to the vertical axis of the engine.
[Edit April 4, 2010] TN forum member fenixus also reported that there was no round indentation on his '00 Camry 5SFE. It is possible that Toyota may have ditched the round indentation in later model years to avoid confusion.
In my case, I was off by one tooth, so I had to back off the timing belt tension and rotate the camshaft by one tooth. A small mirror and small flashlight is helpful for this step. It took me a few tries to get this step right as the timing belt tended to skip a tooth each time I restored tension to the timing belt. I finally got an assistant to push down on the timing belt between the camshaft and water pump to prevent the belt from skipping as I loosened the tensioner bolt to tension the belt. This did the trick for me.
With the timing belt tight on the water pump side and the marks aligned, LOCK THE TENSIONER (this is important - many forget to lock the tensioner at this point and the belt skips during this step causing the timing to be off and the engine run rough or it will not run at all!!!!!) and rotate the crankshaft clockwise 720 degrees. Ensure that the “V” notches are aligned. Mine did. Ensure that the timing belt is tight between the camshaft and the water pump pulley. Mine was. Note that the crankshaft rotates 2 revolutions for each revolution of the camshaft. That is why it is necessary to rotate the crankshaft 720 degrees to get the camshaft to rotate 360 degrees.
Next, I rotated the crankshaft another 720 degrees, just to be sure. Everything was still in alignment, and the timing belt was tight between the camshaft and water pump. Everything looked good.
49. Before going any further, I installed the spark plugs (with a light coat of anti-seize on the spark plug threads) and turned on the engine for 15 seconds to ensure that the timing was OK. This step can be done with the car still on the stands and the alternator and power steering pump disconnected. The engine started (transmission in was in Park position) and ran well at low and moderate speeds. So I knew that the timing was good!
50. Clean, dry and wire brush all of the multigroove drive pulleys. Install the power steering pump belt using a pinch bar to tension the belt. Install the upper timing belt cover. Note the tip in step 16 & 17. Install the alternator. Install the air conditioner / alternator belt. Install the aluminum engine mount and the new torque rod mount. Snap the coolant reservoir back into place. Re-connect the two ground connectors.
51. Flush the radiator with clean tap water until it runs clear. Close the drain port and fill with 50-50 mix of distilled water and coolant. Fill the overflow tank with 100% coolant. With radiator cap open, run the engine with heater in the “hot” position and watch for coolant flow in upper radiator tank. When the level will drops add a bit more coolant. Close radiator cap and allow engine to cool. Add additional coolant if needed when engine is cool. Add a timing maintenance sticker to timing belt cover indicating date and mileage of timing belt change.
EDIT...After about a week, I noticed a high pitched squeal when the steering wheel was cranked fully right or left. Also occasionally noticed a squeal when the AC was on. I tightened the power steering belt and AC/alternator belt and that took care of the problem. Either I didn't tension the belts tight enough originally or the belts stretched a small amount after installation.
UPDATE: March 25, 2010: After about 1.5 years and 20K Kms, I could hear some rattling under the timing belt cover when the engine was cold. The noise went away when the engine was warm. It sounded like the timing belt was getting loose and hitting the cover. I was planning to tear it all down and tighten the belt when the weather got a bit warmer, but the belt broke before I got it apart. I am not sure if the original belt was defective or if I installed it too loose to begin with. Bottom line is if you hear some rattling, it is a good idea to take the timing belt cover off and check the belt tension. I used a Contitech belt (more expensive) this time. Hoping that this one will perform better.
")