Toyota Forum banner

Do Not Buy This CV Boot Repair Kit!

1 reading
19K views 32 replies 13 participants last post by  norm356  
#1 ·
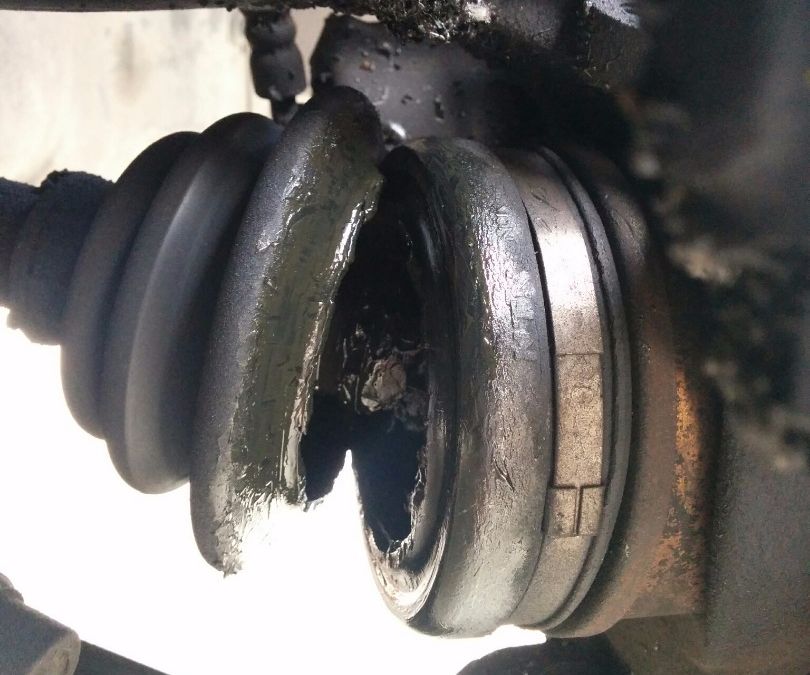
Discovered both my outer CV boots were split. CV joints are fine with no noises, so on research I discovered these on Rock Auto. They are Dorman part # 03608 and RA sells for about $26 each, but Advance Auto sells for about $19 each with no shipping and in stock.

I liked the single split design with tiny nuts and bolts holding the seam together. Kit came with metal compression bands. I did not want to remove my CV axle to install new boots, so this surely would be the answer - NOT!

First problem was trying to verify small and large end ID before I purchased. RA info from Dorman is different depending on where you look. On the product page it states at the top:

Speedi-Boot; Large End ID: 3.62" (92mm); Large End Circ.; 11.37" (289mm); Small End ID: 1.18" (30mm); Small End Circ: 3.71" (94mm); Length: 4.09"

But at the bottom it reads:

Shaft End Inside Diameter1.21 in
Joint End Inside Diameter3.58 IN

My vernier measurement of actual was smaller. Both Auto Zone and RA give contradictory measurements from Dorman.

But surely there's an allowance for compressing the boots with the compression rings - I thought, and it matched my year and model. So I ordered from Advance and got next day pick up.

I won't go into too much detail (and swear words) on my 3 hour for one boot installation, but this product is a classic example of engineering stupidity on paper with no actual engineer testing their design on installation.

The large and small boot end diameter difference ended up being a big deal because it was impossible to tighten the metal bands properly as designed. Snap ties would have been better. The metal bands need to be trimmed but no side cutter in the world will do it. I had to bend back and forth to break off excess. The small band tabs that were supposed to hold the overlap were too small to grab the extra band thickness, so I ended up using small snap ties to hold the overlap.

This was so frustrating I elected not to do the other side and will return the unused kit. I will wait until the CV joint starts making noise and get a complete rebuild - with CV boots installed.

 
#2 ·
This is what happens when you either cheap out or lazy out a job. Do it right the first time and you won't have to deal with these kinds of things.
 
#3 ·
I tried to get the joint off the axle to do a normal (not split) boot. After considerable time I just ordered the axle and I don't give up easily. Now I have complete used suspension assemblies with good boots (control arms, knuckles, axle shaft, bearing and hub). That way I can just swap out the whole thing. I had the same issue when I tried split boots a very long time ago, even if you succeeded in the replacement they did not last long. When Subaru first came to the USA (1972?) the axles were $375, each and the whole damn car was $2375. Get a Cardone replacement from Rock Auto and a new axle seal for the side you are replacing. Put some good penetrating oil on the axle nut a few times before trying to remove it.
 
#30 ·
Cardone quality control is horrible. You're better off with NEW Carquest from Advance. If you can boot the OEM, do it. In many cases you need to remove the inner joint to do the outer so buy the double boot kit from the dealer if available. Stay away from the aftermarket especially rock auto.
 
  • Helpful
Reactions: yotayotaYotaS!
#4 ·
It is frustrating because removing the axles is such a big project, if the RH side has become stuck in the rear engine mount, and then re-booting them is such a messy job (because the old moly-CV grease gets all over everything).

But is so worth it when a sub-$100 kit can revive a set of multi-hundred dollar axles. And aftermarket axles won't hold up as long as the OE ones will.
 
#6 ·
But is so worth it when a sub-$100 kit can revive a set of multi-hundred dollar axles.
The frustration is with companies and engineers who sell a defectively designed product to first time, unsuspecting DIYrs' who put their faith in that it's been designed from testing. I could have put up with the difficulty of the micro nuts and bolts assembly, but the clamp design was the last straw.

I thought about this last night and have decided to investigate using SS hose clamps to replace the Dorman clamps. I have reservations about the weight imbalance possibility of the worm gear, but I think for the small shaft it may not have much of an effect. Of course if the boots had better diameter specs it would be easier.
 
#7 ·
I put a Cardone (new, not rebuilt) on my granddaughters. Echo and it was fine 30k miles later. As I stated I got two used ones for my Echo, Basically for free by buying my own personal junk yard (car hit in the rear end, sold parts to cover cost).
Ever replace a dash light bulb in a 1965 Lincoln Continental (like the one Kennedy was killed in). Service manual says ""remove dash panel". I did it blindfolded, makes your other senses more acute. Never removed any part but the bulb, fought serious hand cramps for an hour.
307437
307438
307439

I stand behind my advice, it' s worth what you paid for it which was $65 an hour two decades ago.
 
#8 ·
Remove axle. Remove old CV boot. Clean out grease to remove any potential contaminants. Apply new grease. Install new boot. Install axle. Here is a guide if you need pictures.


Or you can replace the axle itself if you fear damages done.

Both of those jobs will take maybe an hour or two of your time, unless of course you get stuck bolts. It is messy. Many think it's a daunting task when in reality it isn't. Can be done entirely with basic hand tools. Depending on which boot is torn, you may not need to remove the axle completely.
 
#10 ·
Here is a guide if you need pictures.
Have you tried this method? I have reservations on the funnel method for the small end of the boot which would need extreme stretching. The boot straps are also the same ones I used and are not well suited to just hand tightening.

Of course you'd need a front wheel alignment after all is put back together.

I think for the cost, new axels from Rock Auto is the way I'd go.
 
#9 ·
I guess the joke's on me. I just looked at complete axles on Rock Auto. Front right is $45 and the front left is $34.

I never thought I'd get them for that - not even a core charge. If I'd looked at this before this job I would have just left it until the CV failed.

Now these aren't Toyo quality, but they say limited lifetime warranty. On a car with close to 300k and 25 years what "lifetime" do I need.
 
#11 ·
Yes, I have. I have replaced a few boots. An alignment is highly encouraged after installing new boots or new axles. This would also be a good time to check ball joints and end links for cracks and wear. If they have grease points, it would be a good idea to regrease them. If they do not, unless they are still sealed and have a plumpness to them, I would suggest replacing them. At nearly 300k miles you will see a HUGE difference in ride comfort as well.
 
#13 ·
when replacing a CV boot, using that funnel method might work, particularly if a cheap, universal fit boot is used like in that DIY (maybe heat it first in boiling water to add more flex), but it would be better to remove the CV joint from the end of the axle and slide the new boot on from the small end

I don't know if my own experience was unusually bad, but I had 2 aftermarket driveshafts fail on my Camry, one due to an internal spline that failed (after about 30~40k miles), the other because the inner CV came apart (after ~80k miles). Both times the tow truck cost, missed time and purchase of yet another "cheap" aftermarket axle, I would have saved money if I'd bought OEM in the first place. I would have saved even MORE money if I'd just re-booted my originals when they needed it. The second failure caused more damage, cracking the transmission housing in the 5 seconds it took to stop the car after it happened.

Now, my rule is: keep OEM, replace boot when needed (use OEM boot kit, since it seems in the Toyota universe little else lasts as long as OEM). Inspect the boots every 6 months when rotating tires to catch cracking before it opens up, for maximum CV life (they mostly wear when a torn boot allows dirt in).

Norm
 
#14 ·
Now, my rule is: keep OEM, replace boot when needed (use OEM boot kit, since it seems in the Toyota universe little else lasts as long as OEM). Inspect the boots every 6 months when rotating tires to catch cracking before it opens up, for maximum CV life (they mostly wear when a torn boot allows dirt in).

Norm
Seems like a good rule; Toyota parts seem to outlast everything.

As far as CV life goes my understanding is they should last basically forever under normal driving if the bearings and splines were machined with appropriate tolerances and the grease seals aren't penetrated.

My originals in the gen 4 v6 auto trans lasted close to 300k until I plowed and wheel hopped around a traffic circle a few too many times destroying the ball bearings.

Current ones are aftermarket cardone remans and they are still holding up after 30k or so miles of hard driving - if the drivers one goes out I don't care - amazon sells them for $30 and they can be swapped in an hour lol, the passenger one will suck to replace though because it joined the carrier bearing mount permanently during installation.
 
#15 ·
What to buy for a 25 year old car is always a risk/benefit decision. As it gets older, higher miles, I don't want to give a junk yard really good, almost new, OEM parts.

We have two more back up cars and the newest 2017 is our trusted long haul trip car.
 
#16 ·
Is this a part that I will hate replacing or a part that is expected to generally last a long time?

:Yes - Buy/Pull OEM or a high quality aftermarket.
:No - Buy the cheapest aftermarket part that isn't chinesium.
 
#17 ·
Don't forget that my original complaint was poor design. This boot repair would have been fine IF it was engineered to work. I had no way to determine before trying that it would not work. If engineering had it's smarts turned on this would be a very viable method.

As I said, I will see if hose clamps will improve the boot attachment. If so then I'll just use the other one and see how long they will last. The boot itself seems well built material.
 
#18 ·
Yeah, I heard that split boot design is awful to work on. Many say to stay away from it. The pull-over stretch boots I heard works. OEM boots mostly come with Oetiker clamps now (old stocks still have the cheap thin-gauge wrap-around-twice bands).

Diagonal cutters don't really cut it, so to speak. ;) I use CV band cutter meant for today's thicker gauge, hardy stainless steel bands:

With the miles the car's got, Cardone Select (new aftermarket) would have been my choice as well. It's cheap, it's fast, and it's good enough for an older car.

If the car was younger like between 100-200K miles (or less), I'd re-boot using OEM boots. Actually, if the axle is still good, I'd reboot even when close to 300K miles, if you enjoy that kind of thing. Sometimes it's the fun of it.
 
#19 ·
Also keep the suspension tidy, IME if struts are sagging it accelerates wear on the boots. I was wearing a groove between folds on my outer boots with original, sagging, 200K-mile suspension. Changed out struts and it stopped getting worse.
 
  • Like
Reactions: JohnGD
#21 ·
That 73 Subaru had $750 for two axles and $1750 for two knuckles. The whole damn car was $2395 brand new. The price you quoted for a current NEW Cardone with a lifetime guarantee is a game changer. Rock Auto first for prices works fine for me. Doesn't mean it will be my first choice in a year or two. You have to keep them of their toes.Unitl they screw up my car they are my #1 choice.
 
#22 ·
According to this, at least at some point Subaru's reman axles were Cardone. So Subaru just slapped on a fat profit margin on there, granted there may be more QC from the problems we've heard about from A1 Cardone reman axles in the aftermarket.

 
#23 ·
So today I purchased 2 sets of SS hose clamps from Home Depot. One was 1 1/2" - 1 3/4" D and the other 3"- 4" D

I removed the installed boot clamps from the kit and replaced with the hose clamps. It made a huge difference in getting the boots on easily and properly. I then did the other side the same way, of course that went faster overall on the second try. The hose clamps take up the oversize of the boots without scrunching the boot up. No need to cut the excess off the 4" clamp but you'll need to cut the extra off the 1 1/2" - use side cutters.

I did have concerns about vibration from the extra weight of the worm gear, but a test drive experienced no detectable vibration or off balance. The worm gear does come very close to the castle nut on the lower ball joint but does not touch it. Several bumps and tight turns but no contact.

If anyone wishes to tackle this then I'd recommend needle nose vise grips to install the tiny bolts and to maneuver them so that you can get the tiny nuts on. As well if you want to really use proper boot clamps I'd purchase the ones needing a tool to tighten. Install all the bolts first, then install the boot and secure the bolts and nuts. Then clamp last.

Now I'll see how long they last and will report back - hopefully after a bunch of miles.
 
#27 ·
I fixed a crack in an inner CV boot with Permatex Gasket Maker (Maximum Oil Resistance version). Still intact after about 1 year and 5k miles. Not sure if it would hold up on an outer CV boot that moves around a lot more than the inner boot.
 
#33 ·
Car Care Nut shows how to reboot axles and shows how the Toyota SST makes the work go super easily, but he does agree the much lower cost, "lever arm" CV boot crimpers can and do work, but are harder to use - especially when the space is tight.

 
This post has been deleted