Toyota Forum banner

Two Image Dynamics 12" OEM/Overstock Box

3.8K views 23 replies 13 participants last post by  Rice Toy  
#1 ·
Completed new sub box with two Image Dynamics 12's powered by an Orion HCCA 250G4 (800x1@1ohm). Next is the Morel USA SR-8.3 3-way components in the front doors powered with a Phoenix Gold MQ430 to the tweets and mids, and another Phoenix Gold MS275 to the mid-bass drivers. All this is going through an Audio Control 4XS crossover. So far I have the Orion and subs hooked, and with the factory speaker crossed above 225Hz - it plays very loud. Can't say too much for the SQ up front though. The Morels should take that up a notch. Although I don't necessarily recommend trying to squeeze 12's behind the rear seats of the double cab - it can be done. See some of the sub box construction and drivers here:

http://www.imagebucket.net/bucket/pf.php?fid=443
 
#2 ·
lets get a picture of that beast in there! lookn good man.... thats alot of fab... id love that but i think im satisfied with my 1 10w6 enough to not spend that much time on it.... thats just my opinion though... make me one if you can... thatd be greeeaaaaatttttt yeeaaaahhhh (office space) good job tho lookn good
 
#3 ·
This is great news!!!! I have 2 IDQ12's sitting in a closet that I yanked out of my 4Runner when I sold it for the Tacoma. I was going to sell them but if they will fit in the DC, I will keep them and start planning the stereo mod!!! :clap: :clap: :clap:
 
#10 ·
Yea that looks awefully close to the seats
 
#11 ·
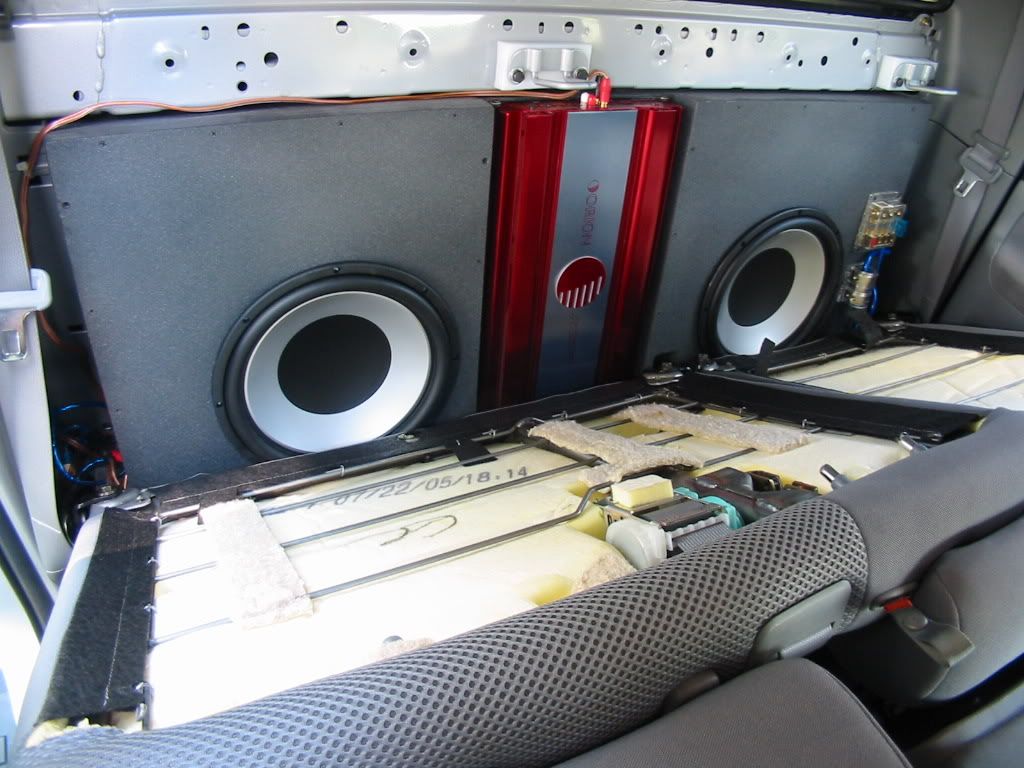
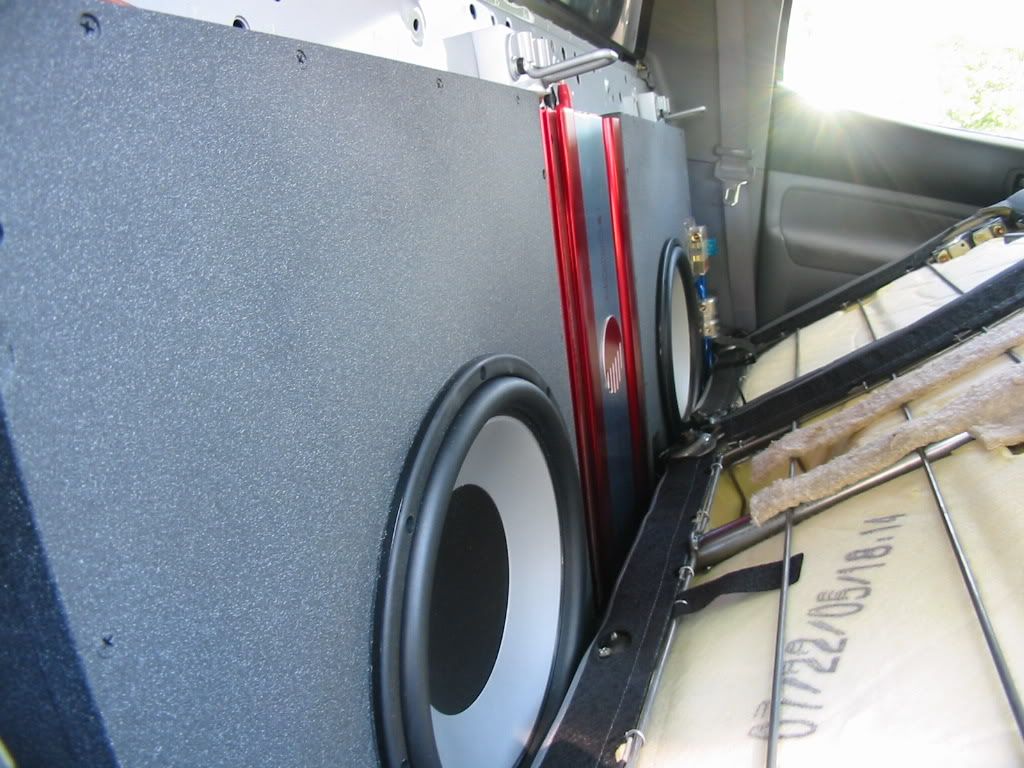
There's actually more than enough room there. Notice the AudioPipe distribution block (used for the ground back to the battery) in the first picture. That thing sticks out 1-1/2" and doesn't hit the seat. These ID12's have a 13.5mm(0.53") one-way Xmax. So even at full pop, they have at least 1/2" of clearance - even at the top where it's the tightest.

You bring up a terrific point though, as this was a critical consideration when designing the box. I could have brought the face of the box forward if it weren't for the way the rear seat-backs hinge. As you lay them down, the leading edge gets closer to the back wall. It is very tight when the seats are laid down, and that's the only reason I had to remove the plastic covers from the seats. With the seats upright and locked, the driver still has plenty of clearance - even with the plastic panels installed. But the plastic hits the driver surround when the seat is laid down.

You will also notice that I have spaced-out the seat lock tabs with 1" thick UHMW and longer bolts. This also serves to improve excursion clearance, but is not the reason for the spacers. I needed the spacers to get the proper box volume while allowing for that clearance. Again, the clearance issue is with the lower section of the box when the seat backs are folded down. That is the limiting factor for depth at the bottom. The spacers allow the top of the box to be deeper - providing necessary box volume that you can't get anywhere else. Building out, into the side pockets and up in front of the upper support beam don't provide any volume once you factor-in the 3/4" MDF board thickness, so there's no help there. If you’re going to get it, you have to get it from the upper section of the box.

Great question!
 
#13 ·
The paint finish looks great.
 
#14 ·
i was wondering what kind of depth you have in the box for mounting the speaker im currently building a box in my dbl cab for one ten and was a little worried on the mounting depth available. the speaker im going to use calls for 5 3/4" debth. im sure it'll be cutting it close
 
#15 ·
The Image Dynamics 12" 4 ohmDVC OEM Overstock drivers I used ($120 for both delivered directly from ID off eBay) are 5-3/4" deep, but that depth is measured to the very end of the magnet - which has a 1/2" protrusion with approximately 2" diameter. By controlling the angle, I was able to 'gain' front/back clearance. Also I used a Dremmel to rout-out a 1/4" depression in the back wall of the box so the magnet would clear.

Here's what I did... I laid-out the driver - transferring the profile to a piece of cardboard. Then with the cardboard cutout (representing a side view of the driver) I started playing with angles and locations. Eventually, I realized the driver would have to be mounted as far toward the bottom of the box as possible (where it is the deepest), and angled in a way that provided the most clearance. When I realized the magnet would need to go into the back wall by less than 1/2", I knew I had a winner! As it turned-out, I only had to carve 1/4" depression for the magnet. Warning! I also used 1" UHMW spacers on the seatback anchors to bring the top of the box out beyond where the seats would normally lock. I would have been into the back wall of the box the 1/2" (mentioned above) had I not done that. But the purpose for the seat spacers was to get more air volume - not for speaker clearance.

If you ask me if a 5-3/4" deep driver can fit... I'd ask you, "What's the diameter of the magnet?" If its small (<2"), or even just small at the spot where it would hit the back wall of the box... then "Probably". If the magnet is 6" full depth... "Probably not". Then again, a 10" driver has some other possibilities. You may be able to get more creative up higher in the box than I could - possibly angling the driver so it fires up at 45deg to gain more depth.

Good luck!
 
#17 ·
NorCal, Sorry I didn't see your question earlier. They have no branding because they are Image Dynamics OEM Overstock drivers Image was selling on eBay. It is suspected that they were made for... here it is:

"Those subs were suppose to go to Elemental Designs but apparently there was a problem between ID and Ben so they went to ebay instead. They are basically ED Ov.2's"

They were sold like this http://cgi.ebay.com/ws/eBayISAPI.dll...MESE%3AIT&rd=1 but these are the 12" (max 500W) version.

If you want more info on them, you can look here:

http://www.customtacos.com/forum/showthread.php?t=59007&page=1

Call them Image Dynamics 12"DVC OEM's or Elemental Designs 130v.2's, either way a pair of them with 800 Watts is slam'n! Hope that answers your Q.

BTW, I had intended to use my IDQ8 DVC, but couldn't pass-up the $120 price for two 12's and the challenge of fitting them in that space. I think I'll use the IDQ for a home theater sub, wired to 8ohms - nothing wasted.
 
#18 ·
Bunsojr,

I'll go look to refresh the memory...

There are two plastic panels held on with three bolts each. Remove the bolts with 10mm socket. You should have 6 bolts removed total. Remaining, are a number of plastic 'push-clips' like the ones that hold door panels on. Starting with the driver's side, work your fingers under the plastic panel and give'r a yank. Then remove the passenger's side with another yank.

Good luck!
 
#19 ·
I knew I wouldn't be able to put the plastic back in so when I took them out I didn't care if I broke any of the clips. I just grabbed ahold of them and yanked. They came out without breaking a single clip. Regardless of the fact they still can't go back in as I cut all the mouting tabs off.
 
#20 ·
randybarca said:
i was wondering what kind of depth you have in the box for mounting the speaker im currently building a box in my dbl cab for one ten and was a little worried on the mounting depth available. the speaker im going to use calls for 5 3/4" debth. im sure it'll be cutting it close
Not to hijack the thread, but check out my gallery here. I've built a box to house a single 10" sub that requires 5.25" of mounting depth. On page 2 you can see pics that I took with the sub in the box and see the clearance available. This box required no modification to the truck other than removing the plastic panels. Wiring isn't complete yet so I can't say how it sounds, but it looks great (imo) and sounded great in my last truck.
 
#21 ·
Blue, I like what you're doing - it looks good! Nice dimensional drawing too, I should do that. A single 10" would be a good way to go. To be honest, now that I have been listening to my box/amp setup for a few weeks, I'm beginning to think it's a bit on the far side of overkill. I had the IDQ10 in my previous truck running off a PG MS275 and I was happy with that. I am appreciating the effortlessness of the amp/sub combo though. I used to get some clipping at high volumes. I haven’t heard any clipping yet with this setup, even when it's adrenaline-rush loud. I also like the amp/crossover rack you have going there - it looks good! The rest of my amps will have to go under the seats.:disappoin

Those are CDT crossovers right - I'm guessing your using a CDT component set up front?

You would be amazed at how good the factory speakers sound and how loud they will play when crossed over high enough - even off deck power. I f I hadn't already purchased replacements for the front, I wouldn't change them.

Someone on a tight budget could make a small sub box (like yours) with a moderate sub amp and replace the factory head unit to have a dramatic improvement for under $400, and be completely happy with it while avoiding modifications to the truck. Replacing the factory head unit made a surprising difference in sound quality and loudness - I couldn't believe it.

Good luck with your project - looks great so far!
 
#23 ·
Ramenx said:
I don't think you have enough air space...
Who? Me? Based on internal dimesions I've got .42 ft^3 of airspace inside the box after driver displacement. I built the box with 1/2" MDF instead of 3/4" to help with the lack of airspace. The sub requires .4-.6, so mine is just fine. A little on the small side, but still within spec. It's stuffed full of polyfill to help out a little bit too.

RiceToy....
Thanks man!! Yeah, CDT EF-61 comps going in the front. I had them in my old truck. Tried to leave them in place, but the buyer didn't want the stereo system. I'll be running those off the Nine.4 bridged. The 11Kv.2 sub will be run off the Nine.2x. I wanted to do the amps a different way, but I have one carseat in the truck now, and will have another one in there in another year or so (probably), so I had to keep access to two of the carseat clips on the back wall (the sub covers up the 3rd one). Wiring should be done next weekend. Can't wait!
 
#24 · (Edited)
Blue, the car seat anchors were removed to make room for my box since the boys are 20 and 11 (and the wife and I are 'fixed' :whatwhat: ) , but I drilled the spot-welds out to remove them, so they could be bolted back in if necessary (like for a grandchild) - kept everything in a zip-lock bag (like I hope my oldest son does ;) ).

On airspace... these 12's require 0.70cu. (1.0 optimum) each and displace 0.07cu., so combined they need 1.54cubes (2.14 optimum). The internal dimensions are basically 17"Hx7"bottom (2.5" top)Wx47.5"L. After adding for the angled top (see the pics) and subtracting for the amp rack, back wall bridge, seat bracket pocket and internal bracing, I get 1.828cubes. So it's somewhere between the 'minimum' and 'optimum' air space. With a (theoretical) 10% adder for abundant polyfill, I arrive at 2.011cubes - dangerously close to the optimum 2.14.

On a previous note, after some careful listening at high levels, I have decided that what's fatiguing my ears are the factory speakers... mostly the tweeters I'm guessing. I turned the sub output way up, faded fully front (as usual) and cranked it. That doesn't stress the ears nearly as much (but it's way too bass-heavy). I was also recalling how I could barely stand the crappy sound with the factory head unit. A good head unit really helps, but I think the new speakers up front with adequate power will make a considerable improvement.