Toyota Forum banner

No heat, front of van, right side '04 Sienna

52K views 23 replies 5 participants last post by  Fibber2  
#1 ·
'04 Sienna LE
I have searched this problem and I have not been able to find a solution.
The left side, front of the van will control the temperature correctly, the right side is always cold.
I removed the glove box and the kick panels on both sides of the center console.
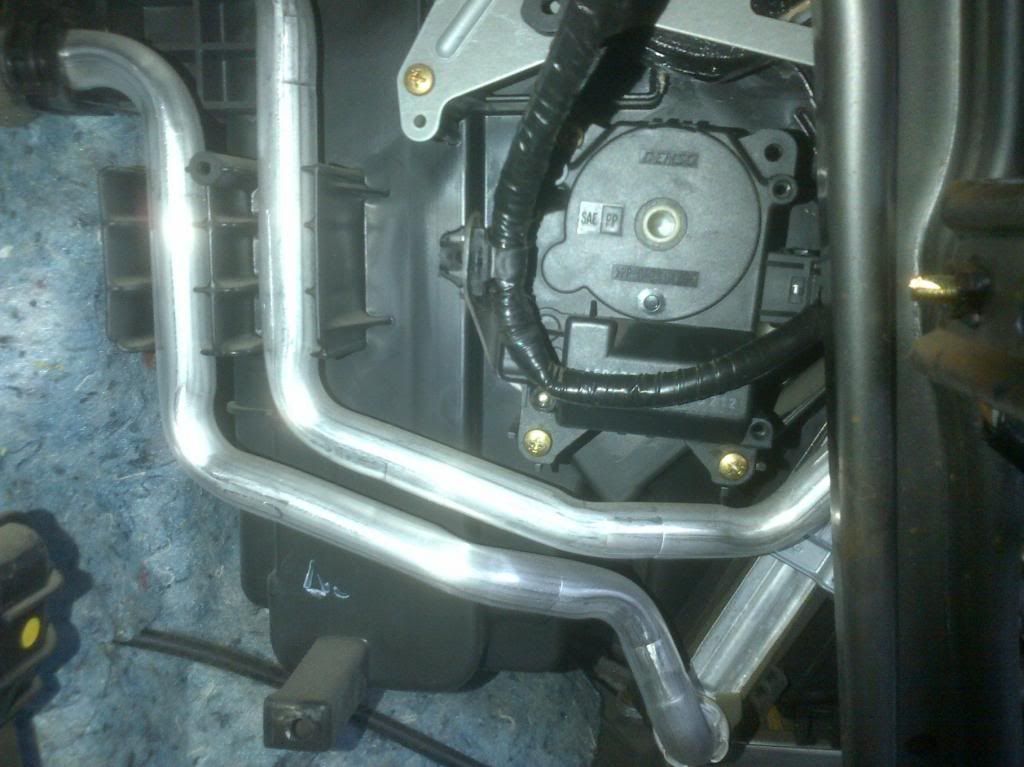
The motor that activates the blend door moves correctly when the temperature is moved from cold to hot and hot to cold. I removed the motor and activated the blend door manually and there is no change in the problem. Left side temperature is adjusted when moving the door but no change to the right side temperature.

I thought maybe there was another blend door in the left side, but there is only the motor that controls the position of the air flow (floor, vents, defrost) and that is working correctly.

Am I missing something?
Any ideas what the problem may be?
 
#2 ·
The XLE has a pair of electric solenoid actuators - on on each side, and thus has two flaps with a divider inside of the air box so that it can control left and right side separately.

The LE only has one motor located on the passengers side. Just guessing here, as there are no diagrams that I've seen with the internal workings of the box. Instead of two small doors on separate shafts, they might have two small blend doors on a single shaft so that they work in tandem. Anyhow, what if the passenger side door on this common rail somehow became disconnected and is slipping? The real question is without tearing the dash apart to see, what can you possibly do to fix it?

I know that some shops have a long reach optic scope (either a mini camera head on a flex shaft or a fiber optic setup). With the air direction set on dash vents, one could in concept look down into the box thru the vents and see the blend doors move.
 
#3 ·
Makes sense.

Thank you Fibber2. That is one possibility and it makes sense.
I have been eyeing the box for disassembly, but that would be the last option.
There are fairly inexpensive USB cameras now, I used to have one I ruined running through my pool lines looking for a leak, but it was not a big loss.

I will look into this and see if there is anything to report.
 
#4 ·
Bad news

I bought a lighted borespcope and I peeked inside the air box through the right bottom air duct, I activated the air blend door and I saw it moving properly; however, I could only see the right side, which is the one giving problems.
I then decided to remove the radio, air vents and the climate control panel from the center console and peek down the front air ducts.
This is what I found:
You can see all the way down to the evaporator.
The left and right are separated and there are two air blend doors mounted in the same shaf that is activated by the motor on the right side of the air box.
The two blend doors are solid and working perfectly; yet, I only get heat in the left side.
Motor operation and manual operation is smooth, the seal is perfect at full heat.
I tought, maybe the thermostat is open all the time and there is only enough hot coolant for one side and the other side gets colder coolant. No such thing, the return coolant line from the heater core is just as hot as the intake.

It appears that the heater core is blocked for the right side. The hot coolant enters through the left side.
The blockage is external or it could be internal for the coolant passages.
Either way, full removal of the air box is necessary.

There is a slight chance that exposing the air box (before removal) allows for the removal of a small plastic door facing down, that would allow for one final inspection of the space before the air goes through the heater core.

So...no cigar.
 
#5 ·
Hmmm. Great job so far.

Internal blockage: Can you see if the heater core is a serpentine single tube thru the fins, or a series of parallel runs? If it is a single run, it cannot be blocked if you feel heat on the output side. Parallel runs could develop more deposits and clog tubes on one side if it were to start out substantially cooler on one side initially, and flow rate is low. Preferential plating/condensing effect. You might be able to do a chemical flush of the heater core only and clear this..... maybe....

External air blockage: If you were to remove the two floor ducts and shine a light up into the bottom of the heater box, could you see thru the heater core fins from above? Maybe you'd see a light transmission difference? I've heard others say that paper towels and other things have been sucked out of the glove box and into the heating system when in recirculate mode. Could something have made it past the fan and to the heater core? But why would it end up only on one side? And I would think that the cabin air filter is between? I sure wish we could find a full airflow description of how the box works.
 
#6 ·
#7 · (Edited)
Wow!! thank you for those diagrams Fibber2

I have a better idea now.

You can only see the downstream side of the heater core from the top. From the bottom air ducts it winds up to the downstream of the heater core (after the air has passed the heater core). To see the side before the air goes through the heater core, I would need to ge through the duct from the air blower or somewhere else.

The first picture gave me a better idea on the positioning of the heater core.
If there is an external blockage, I can see where an item may be. And yes, when the recirculation flap opens, it is very close to the glove box and something may be sucked in. Granted, there is no cabin filter.

If the blockage is internal, I believe the heater core is NOT a single winding tube, but a regular radiator with tanks at the top and the bottom. Silt and calcification (maybe a new word?) would move all the way to the right side by the coolant flow and start clogging from right to left.

Picture #3 actually shows the air mix flap, not much suprise here, except that a unit with automatic air does have two motors for air mix damper (in the comment box).
Also, in this picture I see, what I thought was an inspection cover, or a cover to access the heater core for replacement, it is labeled No.1 air duct.
Either way, internal or external blockage, it will be exposed by removing the No.1 air duct and removing the heater core for inspection. No need to remove the entire air box like the old days.

In my previous attempt I did not remove the botom rear panels from the center console, only the bottom left and right and the top.
I will give it another shot next weekend.
 
#8 ·
No. 1 Air Duct connects to the two branches that bring heat to the footwells (floor heat). It might help you see something. Take a look at this on-line parts diagram:

http://www.villagetoyotaparts.com/s...ear=2004&ukey_driveLine=6129&ukey_trimLevel=14153&searchString=air+conditioning

I was looking at the heater core and wondering if it could be withdrawn from the heater box without really tearing open. Found this picture in another discussion. Must have been from an XLE/Ltd as I see the split drivers/passenger temp door servo, but close enough for this discussion. Obstructions include the metal dash brace and the way the integral tubes run up the side and thru the firewall. I suppose worse comes to worse and you cut the tubes to get it out and do a rubber hose with clamps patch when you put it (or a replacement) back in. That gets you access to the core itself for inspection, as well as access into the box for removal of whatever might be in there blocking the airflow.

Image


The core is sold separately (around $300) if it's clogged and not recoverable:

http://www.villagetoyotaparts.com/s...ear=2004&ukey_driveLine=6129&ukey_trimLevel=14153&searchString=air+conditioning

You realize that when this is all done you're going to owe me a virtual beer or two!
 
#9 ·
Tell me more about the optical scope you bought! Just curious... Harbor Freight?
 
#10 ·
Thank you again. Even more information from the diagram.

The ducts at the bottom go to the rear of the front seats. I don't remember seeing that in my van. I wonder if that is for the higher trim. I have the LE.
The front foot area air ducts connect to the center of the air box, left and right.
Master ASE me(former) didn't think of cutting the pipes and then using hoses or compression fittings (preferred). Great idea. This simplifies the job.
If the blockage is internal, I'm thinking some CLR would disolve it.

I was about to click send and I remembered that the tubes into the heater core are held in place by pinching the heater core inlet/outlet tube in four places, you can see that in the picture, I believe the pinch can be straightened and the tubes will come out.

If you are in the LA area, you can have the real beer.

By the way, the motor you see in the picture is the motor for the door that directs the air flow to the bottom, center or defrost. I found this out when I was looking at the system and operating it.
The automatic systems have one more motor around that area.
 
#11 · (Edited)
Borescope

Actually a fancy name for a USB camera.
$17.00 in eBay, including shipping and SW.

Has some limitations.
640X480 resolution, not too bad.
Effective range is 1 to 6 inches for the focusing and light in dark close spaces.
Has 4 adjustable LED lights. knob about 14" from the camera to adjust the light intensity.
I had to add a copper wire to the lead between the knob and the camera to be able to make the bends and turns. The original lead is too flexible and will not maintain the shape.
Cable is about 5' long
Software is self explanatory and allows for snapshots and video recording, a little complicated though.

You need a laptop with USB port. I have an old clunker I have used for about 10 yrs with USB digital 2 channel scope, OBDII and Arduino communication for tools I have developed for automotive use.
 
#12 ·
I wrote that early before coffee, so I left out a few words! (rear footwells)

Yes, #1 should exit the bottom, run in a channel under the carpet, and back up below the drivers & passengers seat. My '08 LE has this. Maybe it wasn't included in '04?

I just rechecked my van against the photo. Unless your year box is very different from mine, the silver steel brackets at the very top of the image cover up the motor for the "mode damper" (floor-dash-defrost). The black motor in the center of the image is the left side temperature damper, and isn't present on my van. I have 4 threaded plastic posts and a center casting mark (but not punched out) there instead.

Tubes are crimped to the core? So probably a channel with an O-ring for an internal seal. Do you think you could reseal it?

Sounds like you could teach me some stuff! I like to dabble. Development Engineer by profession, and this is just a hobby. I have an AutoEnginuity laptop setup for OBD stuff, so adding a USB camera would be a cool edition.

Haven't been to LA in a long time. My closest destination is Silicon Valley. Road trip??
 
#13 · (Edited)
Found the problem.

I removed the heater core.
You have to get past all the plastic trim of the center console, the radio, the climate controls, the metal brackets of the center console, the glove box, the plastic trim above the driver's fee and the metal brackets in the same area.

I left almost all the electrical components connected. And this is what you have left.
Image


Then, bend back the crimps holding the coolant tubes to the heater core.
Set the tubes aside and slide out the heater core.
Image


I discovered that the heater core was 2/3 full of silt, muck and silicone gasket pieces. What you see in the picture is only a portion of everything I found.
Image


Image


I flushed the heater core with high pressure water but it did not do the job, I had to disloge the muck with a screw driver and more high pressure water using an A/C flush kit I have.

Then I used condenser cleaner twice until I had a nice clean heater core.
I re-installed the heater core (replaced a couple of O-rings in the coolant tubes) and crimped back the tubes.
I started the engine and got heat at the right side right away.

This is what I learned.
I would have a replacement heater core ready. I spent too much time cleaning the old one.
Flush the cooling system with a flushing chemical before starting the job.
Flush the cooling system at least every two years to avoid this problem in the first place.
In a difficulty scale of 1 to 10, this is a 6 if you have mechanical skills and all the tools, a 7 or 8 if you are a weekend DIY mechanic.'
Now I know my rear heater core is also plugged, I get marginal heat from that one.

The system is still not perfect. There is a difference of an average of 6 degrees hotter in the left side than the right side. The 18 year old Snap-on A/C temp meter still works.
 
#15 ·
I got your PM last night, but I was waiting to see the writeup before responding. What a wild ride! So comments/questions:

1) I assumed the plastic side panels and possibly the bottom would have to come off, but it looked like the core might exit without taking off the big steel dash braces. I guess not possible? Great design...

2) Any idea what the muck is really made up of, and what the best chem flush would be to prevent it from building up in the heater core?

3) Do I still get my virtual beer?
 
#16 ·
Fibber2, in the picture you posted showing the left side, the heater core is obscured by the metal dash braces, they had to come out to allow me to pull the core straight out to the left.

Yes, all the plastic trim and metal dash braces have to come out. And to allow access to some of the bolts, the radio and the climate control, glove box and trim above the driver's feet need to come out. It sounds worse than it is.

The muck is a combination of silt and mud, I guess a by-product of chemical action between the coolant, dissimilar materials, calcification of water at high temperatures and bad karma.

The size of the heater core tubes is so small that in essence, it acts as a very good filter for all the solids in the cooling system.
I forgot to mention that the cooling system looked very clean and the coolant was nice and green.

Is to coolant supposed to be green in this engine?

Yes, the next round is on me.
 
#17 ·
As you've been in the trade, you might have access to more reliable info on coolant interaction/reaction than we have access to. I believe that most newer Toyota vehicles come stock with the low silicate or silicate-free pink or red coolant. Reading thru the available "Red vs. Green" discussions, I see comments like "it's OK to use either, but never mix them", and comments like "mixing Red and Green is reported to result in a bad case of sludge". Apparently some of the Prestone and other green coolants have a high silicon compound content.

From a Toyota statement: "Genuine Toyota Long Life Antifreeze Coolant, with its distinctive red appearance, provides maximum protection without the use of harmful silicates. This formula is extremely durable and because of its compatibility with non-metallic materials, it helps extend the life of water pump seals. Will not clog radiators from silicone "gelling." Will not corrode aluminum surfaces like coolants that contain borate."

I don't remember you saying if you were the original owner or anything about the history of the vehicle. I guess if you want to change formulations, it would be a good idea to do a complete flush first. Maybe that's the big take-home message from this whole experience - always top off with the same type/brand.
 
#18 ·
I know I'm 6 years after the OP... but...
Doing an 05' LE Sienna for NO heat passenger side and weak heat driver side. These upper posts have been a HUGE help for me...
The tear down of the interior is actually not that bad considering but could the HVAC engineers worked a bit closer with the body design engineers to make for a more serviceable heater core !!!


I have the heater core access exposed in the interior. I ordered a NEW heater core and will try for the complete (tubes attached) replacement.


I have removed the engine air intake parts AND the throttle body (cleaned it up too while I removed it).
This gives me access to the heater core firewall hoses (x2).


I will have the NEW core tomorrow (Friday) and will drain / try to remove the OLD with aluminum tubes attached later today.....
 
#19 ·
Please let us know how this goes! And pictures are always a plus. Good luck!
 
#20 ·
Picked up the NEW core ($ 65.00) today. Found that the only way to keep the pipes attached to the NEW core to install is to remove from the dash the entire AC/Heater box assembly as they do it in the factory.


So I cut the OLD pipes and cut the NEW pipes. I slid out the OLD core (pipes cut) and slid in NEW core (pipes cut) with a short gap between the firewall pipes and NEW core pipes. I used 5/8's heater hose, sealant and band clamps on the final install.


There was no need then to disassemble the air intake items but I did clean the Throttle Body while apart.
Put the car back together and heat is now HOT on both sides again....


Only issue is my RPM's are idling at 2,000. I have to somehow RE-LEARN / RESET the TB / IDLE.
I have been searching tonight and there is a wide choice of resetting but I will have to try several tomorrow AM. There appears to be no clear RESET process that I have found so far .


Any ideas for the 2005 Sienna ? Engine = 3.3 L 3MZ-FE V6
 
#21 ·
For clarification, you cut the metal pipes "inside" the cabin, so your clamps and short heater hose could all be connected without having to remove the cowl, etc.? That's a great idea!

For fun, cut that old heater core apart and tell us what's blocking the water flow?

I would think that as long as you didn't do any damage or induce a leak in the intake system, the ECU should relearn the idle setting pretty quickly and close up the throttle plate position. A few cold starts, I'd suspect.
 
#22 · (Edited)
I did the battery disconnect route for 1/2 hour +.
Driving around town took care of it.... :smile:

I had already gone ahead and remove all air intake and the throttle body (there is still an assembly BEHIND the throttle body I left). I thought I could remove the rubber heater cores hoses at the engine side of the firewall and install NEW heater core and pipes as a whole. No way that could happen without damage to the NEW core.. The rigid pipes and hole angles do not match up.


So on the OLD pipes inside the car I cut them to slide out the actual core which has several inches of pipe after cutting. On the NEW heater core I cut off the top portion of the pipes so when I slid the core into the heater box in center console I 'bridged" the OLD pipes to the NEW pipes (attached to the heater core) with short 5/8ths heater hose, gasket compound for good seal and hose clamps.


The pipe connection to the heater core could easily be designed using some form of twist-on nut that would lock in the pipes to the core vs. the "push / crimp" as they are done from the factory ...


I put the OLD core back with the van and delivered it to the in-laws ... I can still cut it open after they see it whole !
 
#23 ·
The interesting thing to me is that the 2004 Sienna, as mine is also, has this issue.. I don't understand all this info., but will check it out and look at links later.... Since my van has 245,000 and I'm prob. getting a new one, it's not a super big issue... But I've spent several winters having to drive with a blanket on since it's only the driver's side that has no heat. Years ago I went to the dealer and they said they couldn't figure it out.. they sold me a whole new radiator! and that was not a fix. It's a bummer though because I was thinking of giving the van, which is in very good shape otherwise, to my sister as a 2nd vehicle. Well, there were other quirky things about the '04!! It's been well loved though, lots of trips and memories.
 
#24 ·
I'd start by grabbing the metal pipes above the gas pedal and see if they are hot. If so, then it's not a water issue, it's a flaps or actuator issue in the HVAC box not routing air thru the heater core.