Lets call this a first draft
Please, this is a very long post, if you click reply to it, please trim the Quote section down to only the part you are asking about! Thank You!
I took some pictures this weekend to recover from the ones I lost when my sd card went to poo.
So lets call this a first draft at a how to on this install, with the hopes that we can all pitch in and make it better!
Tools needed:
- Plastic trim removal tools
- Jewelers flat-head screw driver
- A good Philips screw driver, med size
- 10mm socket wrench.
- Electrical Tape
- Scotch Loks
- Electrical wire to run from the signals to the inside of the car
- 2x inline fuses
Optional: Grommets, heat-shrink tubing and a heat gun, a wire-fishing tool to run your wires from the car door into the car.
Parts:
For your reference, the VENZA parts you are ordering that fit on the Toyota Camry 2012:
OEM Turn Signals
81730-52100
81740-52050
Mirror Covers:
The only concern you might have is if your car is a colour the venza does not come in. The camry and the 2013 venza share 6 common colours, Attitude black, barcelona red, cosmic gray, classic silver, magnetic gray and cypress pearl. So if your camry is white, beige (tan) or clearwater blue you may have to buy a black 2013 venza side mirror cover and repaint it.
- Barcelona Red
87945-0T020-D0
87915-0T020-D0
- Magnetic Grey Metallic, (1G3)
87945-0T020-B1
87915-0T020-B1
- Cosmic Grey Mica (1H2)
87945-0T020-B2
87915-0T020-B2
- Attitude Black
87945-0T020-C0
87915-0T020-C0
- Super White
Not Carried
- Blizzard White Pearl (This is a Venza color, not a Camry color)
87915-0T020-A0
87945-0T020-A0
- Other Colors:
Only colors carried in the Venza line are offered.
I will update this list more as people post more colors up
http://www.villagetoyotaparts.com/p...arts.com/products/COVER--OUTER-MIRROR--LH-GRAY-ME-1G3/8456419/879450T020B1.html Is a good site to use as a reference to find your color. When you do, please post!
*Personally* I walked into the toyota dealership near my work during lunch, had a sales rep point me to the Venza's, found one of them in my camry's color, took a picture of the vin, walked into the parts office, handed him my phone and asked him to please look up the covers for that car (i knew the color code for my car before i walked in
")
)
Wires - For OEM
4x 82998-24290
You can buy oem or get your own wires, they are just terminal points that plug into the turn signal (OEM only, aftermarkets some pre-wired)
Time needed: Leave yourself at least 2 hours min to do this install. It's not complicated just alot of things to remove, if it is your first time taking apart this particular car, expect longer
I have re-taken some pictures of the install.
Since this was the first post 1990 toyota i have taken apart, i figured i would start with everything you will need to take off (including the door) and then get into the driver side dash, and the mirror with the EWD to finish things off
Instructions:
1. Roll down your windows, trust me you'll want to know how far down that window goes and be able to reach through and grab your mirror when you remove it from the car
2. With any mod to the electrical system, I recommend doing it cold: disconnect the battery.
Now lets start from the door and work our way over, you will need to remove the doors on both sides. Here is how i remove the door, again, there might be a better way, if you know it, tell me!
3. Carefully remove the side-cowls:
4. There are 3 screws holding this door in place, the first one is behind the door handle:
Put your plastic removing tool on the inside of the lock, press in with the tool:
5. Prey the plastic away and reveal the screw inside, the door handle will have to be pulled out to get it fully out easily.
Remove the screw you see in the above picture, set it aside in a safe place.
6. Now i like to start near the back of the door control, slip your tool in gingerly to not leave any marks and start to pry it up:
7. After you have worked your way up, disconnect all of the connections you see. (2?)
8. Now lets get off that second piece, like the last one, start near the back and Gingerly work your way in and then pry up on the arm rest:
9. Now remove these two screws, and put them in a safe place as well.
10. Now the next part is up to debate, however from what i read, everyone says start from the bottom, remove as many tabs as you can find using your tool, and then PRESS UP on the door to remove the panel.
I started with the first tab i could see, bottom left of the door, you can position your tool by looking down where the arm rest used to be:
Bottom view of this starting point
11. After you have poped out all of the white tabs on the bottom and then pushed up on the panel to remove it. Disconnect the window mirror, and remove these 3 bolts:
Make sure as you remove the last one you have a hand out the window, so it doesn't drop in the ground!
12. Optional but not really: Remove and disconnect the speaker from the door.
Wire Up the OEM Signals
Thank you Rican03!
It is possible to use non-oem terminal wires, or to wire it in your self with some solder, however, if you want a plug n glue method, check this out from Rican03!
Inventory layout per side
1. Insert cable terminal in each pin, should look like this
2. Using tip of silicone rtv tube, squeeze rtv until the terminal portion is covered. I squeezed just enough to create a seal that came over the edge to prevent water from dripping on the wires and possibly going towards the light (blame the pecismist!)
3. Wait for it to cure (24 hours recommended) and enjoy!
Mirror time:
Now that you have the mirror off, lets get it apart and wire it up
1. first thing is first, lets get the mirror cover off. Now I have seen opinions on this one go all over the place, from removing the mirror it's self first to bashing the cover with an axe (dont do that)
I start with the inner tab in the back corner of the mirror.
You can press the mirror around to get to the other tabs, i personally focus on the lower tabs (2) and then press hard on the middle tab.
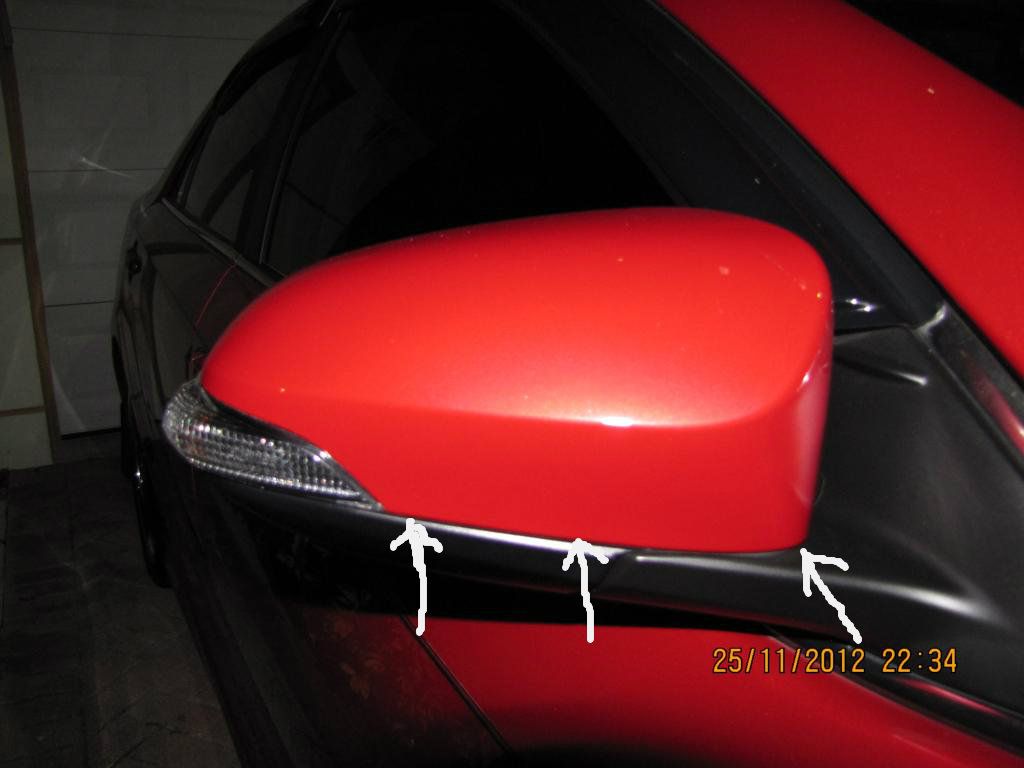
Another method after you have pressed that first tab up and away is to work your way around the outside, slowly prying the cover off:
Stick a very small flat head screw driver into any of the areas indicated with an arrow and then insert your pry tool and slide it along the edge. The cover should pop right off.
thumbsup: onequan!)
2. Now lets get that lower access port open! Get yourself a jewelers screw driver out, now you see a small tab near the inside. I put my tool in there and pried it out
3. I personally sperated the outside platic so i could run the wires better:
4. Now, mine is different than most in the fact that i have ALOT more wires than normal, but the path you take should look like this:
Go up and then down the hole.
Now go back up the hole and out following the current cables, or drilling yourself a new one. If you drill, use a grommet and fill that gap!
5. Press the light into place, you should hear it sort of click and now you will be good to go!
If you want to screw it into place, you will need to remove the front mirror.
6. Press on the new cover, starting at the bottom and then pressing in the top. Your mirror can now be re-installed and start wiring through your door.
7. Wiring through the door, Hint:
A.) Follow the existing wires. Follow them closely. That window has very little tolerance and it will rip your cables out if you are not careful.
B.) I flat out removed all of the wires and the rubber tube connecting the door to the car and ran my wires through that. You can fish into it, or not, it is easier to do it that way.
Ok, now the door is ready, lets get started on the inside,
1. Remove the lower kick cover, to start, remove the hand-twist screw shown here:
2. Now you do not have to remove the inner sill, but I do it anyways, start from inside the car and pull up
Now you can pull both the kick cover and the inner sill safely (they are attached with each other)
3. Now the covers to the right and left of the center console should get out of the way. I do it with my hands and press my fingers in the seem in the back, and pull twords myself:
4. Now lets remove that lower panel, there is a Phillips screw and a 10mm bolt to remove, they are highlighted here:
Once you have them removed, You can remove the lower cover now, but the hood release will still be attached, so pull down carefully as you feel it giveway.
5. To remove the hood release, press down on the center most white tab, and press away from yourself:
Repeat the above process for the other side of the car.
Now some people have said you should remove upper-dsah, the dash it's self, the center console, the passenger lower-side. You can, I am not going to detail those here.
When I ran my wires, i avoided any MOVING PARTS and anything that looks like it would get HOT.
Here is the general path i followed
Remember to zip-tie where you can, use heat shrinking tubes at all points where the cable may rub up against the door and become stripped over time.
The wiring cluster you are going to connect to is under the steering wheel, i used scotch-lok connectors to make my splices.
Sorry for the messy pictures, i have clean these up before i put the cover back on:
(oem installs should have only 2 connections here)
I decided to tap into the back turn signal wires:
3C-5 is the rear 'running' lights, OEM installs will not need worry about this.
Please remember to attach your fuses on your connections, zip-tie and be generous with the electrical tape!
Put everything back together, in reverse order!
Enjoy!
Thank you onequan for figuring this out! And everyone who is helping make this more complete!
I will update this more as i get more time to take more pictures and be more clear about some of these steps! Feed back is welcome to make it better! :woot: