Toyota Forum banner

95 radio install step by step

59K views 33 replies 14 participants last post by  Pikewow  
#1 · (Edited)
1995 Avalon Radio replacement step by step.

Although there are a couple of threads on TN about how to replace the Radio, I’d thought I’d document my own experience in case someone wants to do something similar.

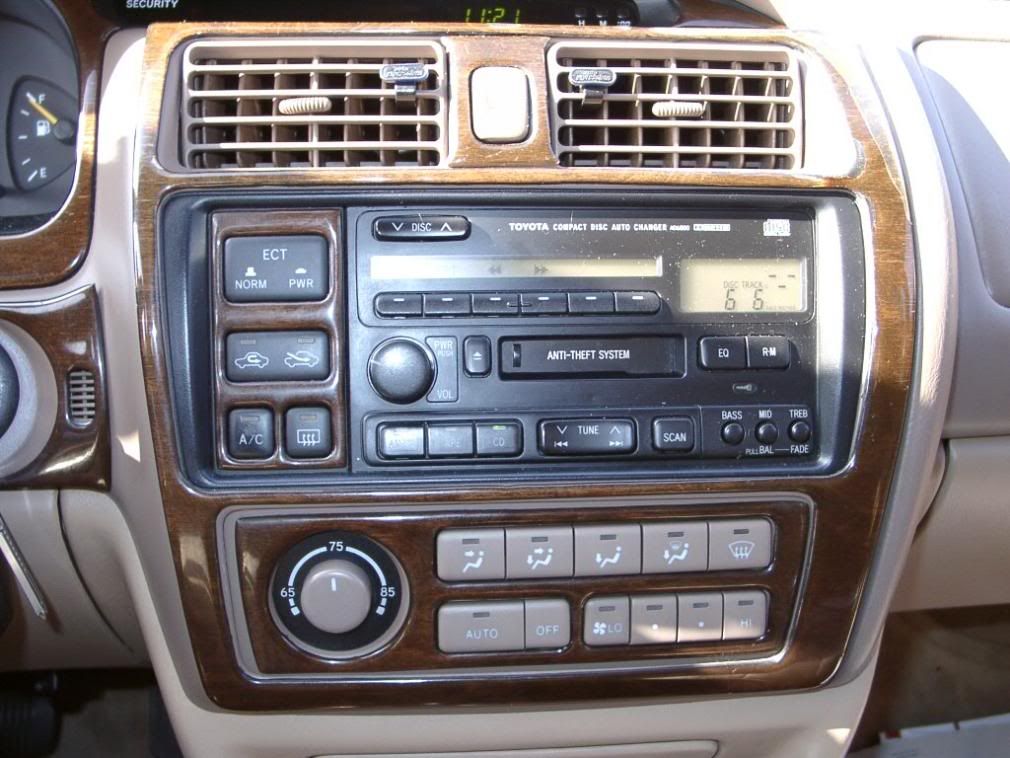
Car: 1995 Avalon XLS with the Factory Radio/Cassette/12 disc CD changer in the trunk (7 speaker system with factory amplifier and the stock subwoofer built into the hi mount brake light housing) Head unit seen here:

Image


Replacement Radio: JVC KD-AVX1 am/fm tuner/cd/dvd/mp3/wma player with built in 3.5 screen on the faceplate and input for a satellite radio or other external a/v source (can also view .jpg files on a disc),
and
Clarion TX001 analog UHF/VHF tv tuner (I know its only good for about another year, but I had it lying around unused.)

The JVC is nice in that you can burn your mp3’s to a DVD and this unit will play them – 4.7GB worth. No need for an Ipod connection with one of these JVC units, really.

If you like the smooth face factory-look (which actually I do), then stop here, this install does not look factory or preserve the smooth look by the nature of the head unit itself, which sits proud so that the faceplate can swivel to load DVD's. In this case, substance has won out over style – the unit does everything I want it to, and I spend a LOT of time sitting in this car waiting for my son who plays competitive soccer – so having entertainment options is paramount.

The goal was to do an install that could be completely undone – that is an install with no permanent mods. This install can completely go back to factory in about an hour in case I decide to sell the car later or in case I want to move the unit to another car (this radio originally started life in my Mini)
  • Make sure you copy down your radio security code prior to removing it. I wrote mine down on a piece of masking tape which I put on the back of the unit and on a slip of paper in the owner’s manual. Check your owner’s manual for the specifics on how to check or set the code, no need for me to reproduce that here.
  • Remove any CD’s that are in the changer. Since the CD changer connection will be going unused in the future install, I wasn’t sure if any power would be going to it to operate the eject button.
  • Remove your present radio. You can accomplish this easily by:
    • Removing the trim face plate. Get something thin, flat, and wide (like a narrow paint scraper or putty knife) and wedge it underneath the lower edge of the trim plate just above the ash tray. Pull up to release the bottom, then get your fingers behind it and begin pulling out along the edges working your way towards the top. Note that this one piece panel extends to around the ignition switch too.
Image

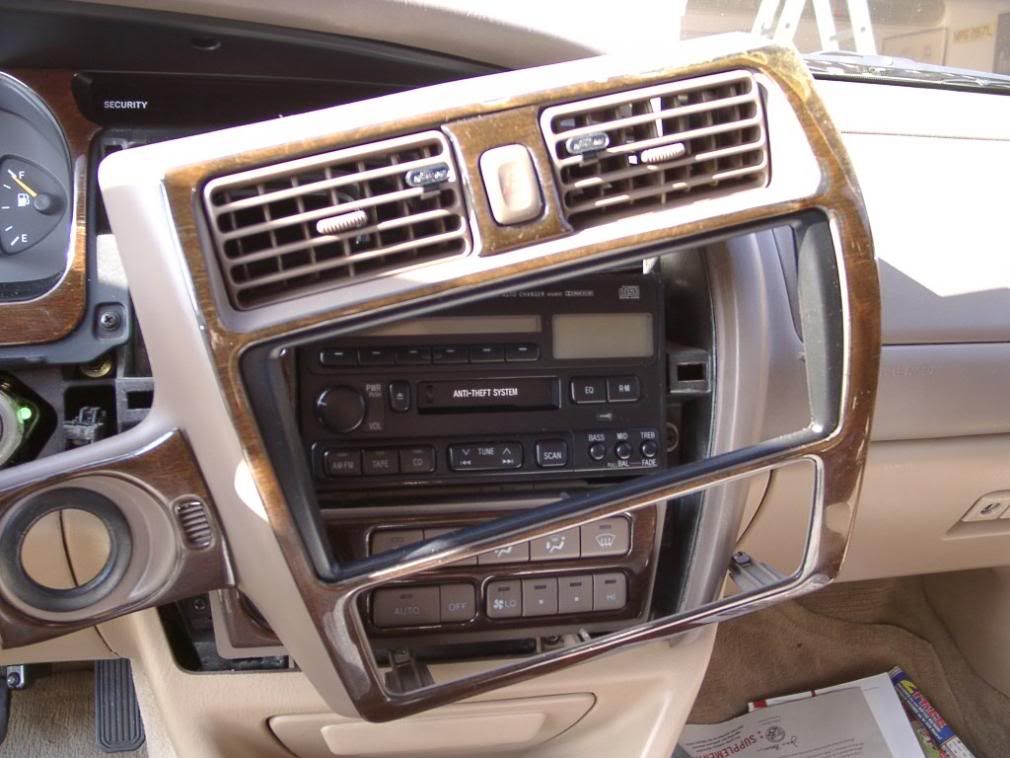
    • Unplug the hazard switch from its connector on the back of the trim panel It is the black plug close up below. Also disconnect the small sensor near the ignition switch (for the auto climate control?). Set the trim panel aside.
Image

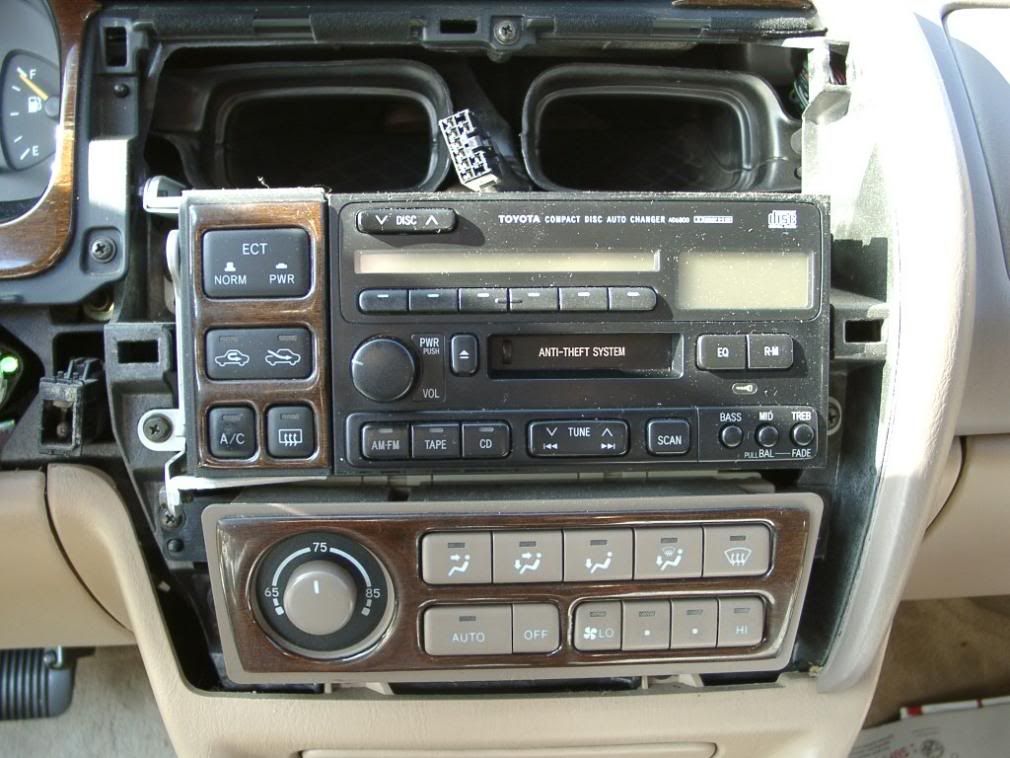
    • There are four screws that hold the radio and ECT /vent control switch module to the body. Undo them to lift out the entire unit. You will need then to unplug two white harness connectors on the back of the radio, two antenna connections (a large one and a small one) and a yellow plug to the back of the ECT/vent switch module.
Image

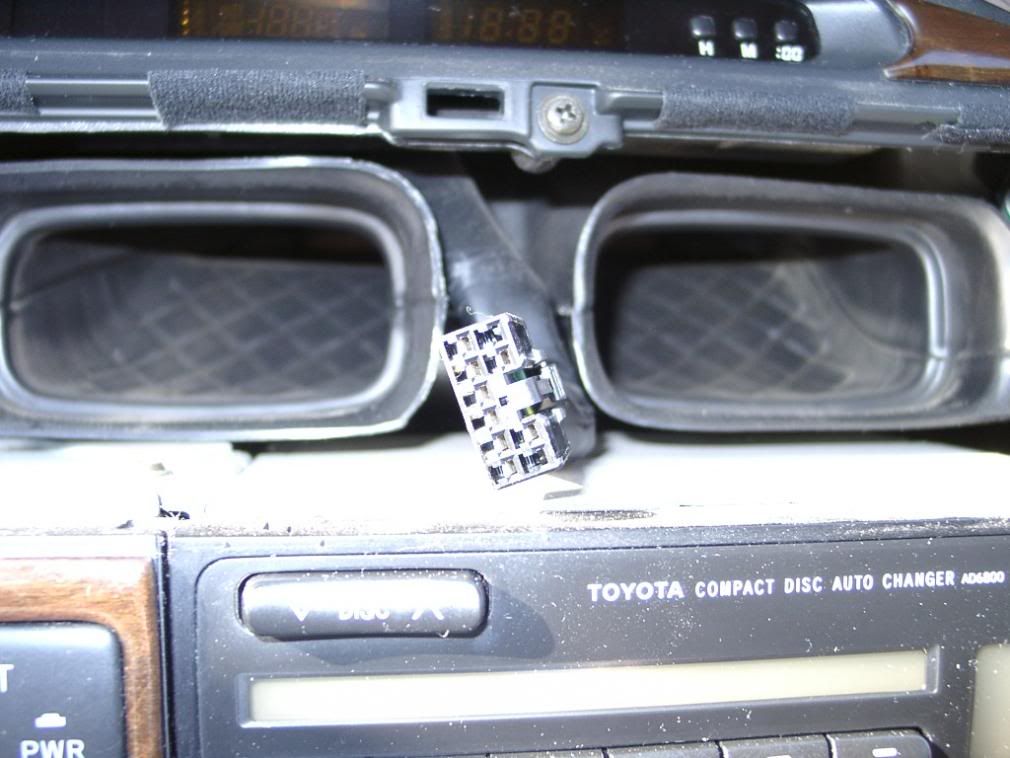
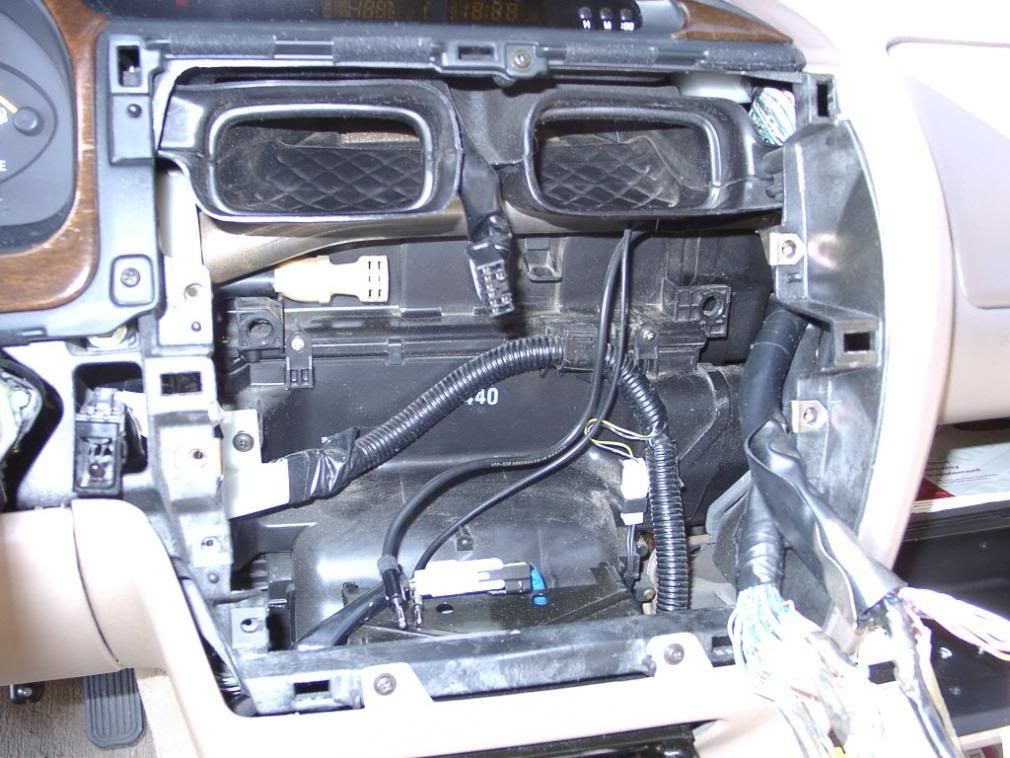
    • Here we see the wires with the radio removed. There is a standard sized antenna connector, a small sized (AM band) antenna connector, and two radio harness connectors. The smaller white harness connector is for the trunk mounted CD changer, you will not need to use this one for your install.
      Image
    • Since I was installing a separate TV tuner, I needed to also remove the auto climate control unit in order to have room for the tuner box. Unless you are doing something similar, you will not need to remove this. It is also held in with four screws.
      Image
    • This is the Clarion external TV Tuner. Where to put it?
      Image
    • There is plenty of room for it here, down near the glove box and footwell. If you didn’t mind running wires, there is also plenty of space in the center shift column to the right and forward of the shifter.
Image

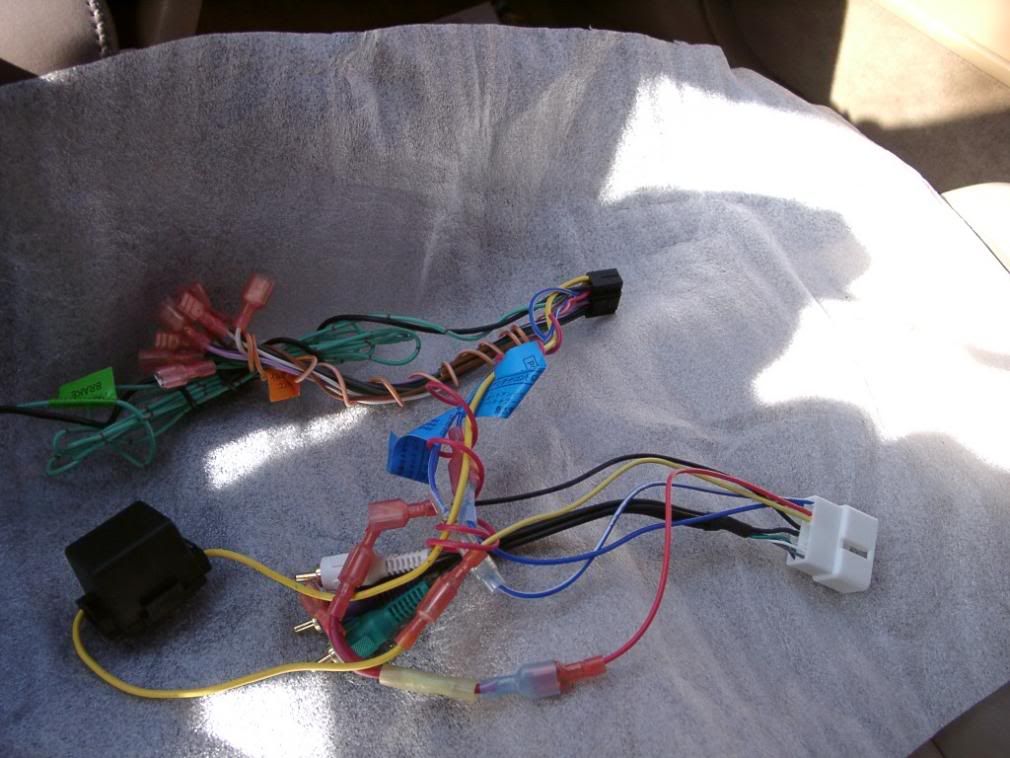
    • This is the radio adaptor harness, all wired up to the aftermarket radio harness and ready to plug in. It has all the connections for power antenna, constant power, etc. This special harness is made for Toyota systems that have the powered amp built in. You will use the RCA connectors on the back of your radio to mate to this adaptor, the + and - direct speaker wires on your aftermarket radio harness are not used. It makes installation a snap. This was purchased through Crutchfield for about $12, it also pops up on E-bay. Note that this particluar harness is NOT the usual one that you see that is a two piece adapter - Those are made for Toyota systems that DO NOT have a factory built in amp. If you have a factory unit with no built in amp (most/all XL's?) then you would use the two piece adapter. This one is specifically made for units that have the factory amp built in.
Image

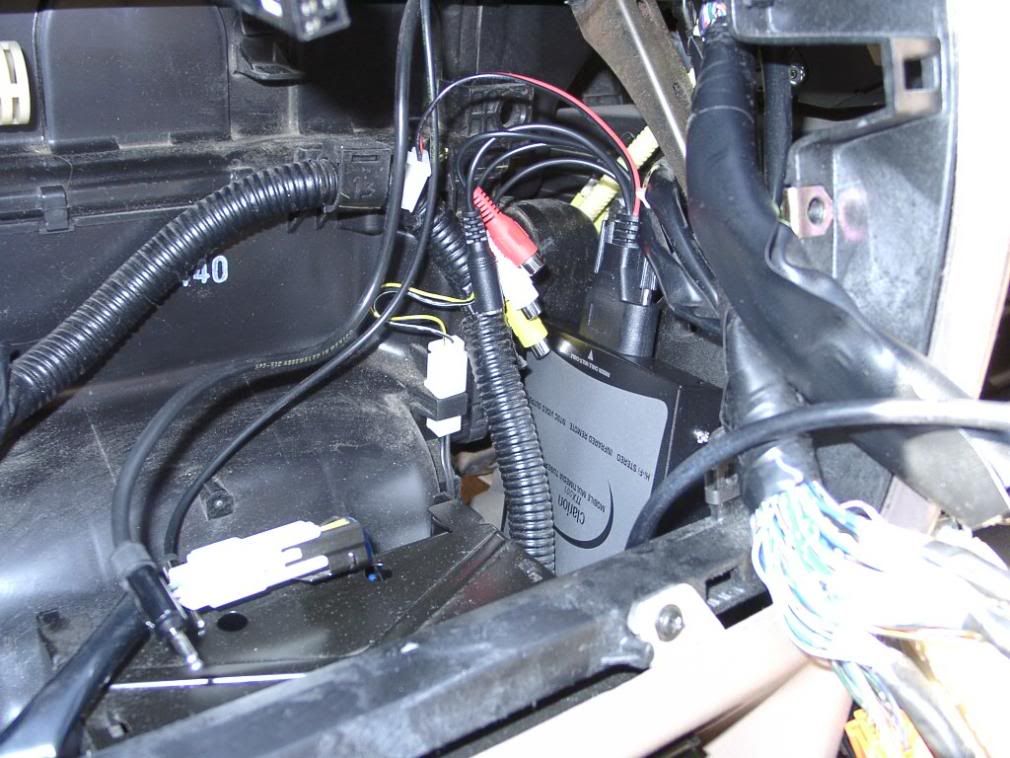
    • Here is the adapter harness and the replacement radio harness plugged into the car’s body harness. On the right are the video and audio connections for the TV tuner to the back of the radio. The colored RCA connectors are from the adapter harness and will go to the back of the radio. The rest of the wires are all connected to the harness and will plug into the back of the radio using its harness plug.
      Image
    • The TV tuner requires its own separate antenna, and is set up for a regular sized auto radio antenna plug connection. You could get a specialty auto TV diversity antenna, but that would be cumbersome and who wants an extra ugly antenna mounted somewhere? What to do? If only you could use the soon to be unused AM band antenna, which is a fine wire element built into the rear window by the defroster wire. But wait, you can! I bought a car antenna plug end adapter at radio shack for $1.50. The small AM band antenna plug end is small enough to just fit inside the full sized adapter plug housing. With a little bit of modification, the AM antenna plug can now be used for the TV tuner, which takes a regular full sized antenna plug. This can also go back to stock simply by removing the radio shack plug. Nothing cut, no permanent modifications.
      Image
    • This is what the radio looks like removed and unplugged. Remember, write your security code on a piece of masking tape and put it on the radio so if you ever want to put it back in (or sell it off) you can.
      Image
    • You must remove, and reuse, the brackets from your existing radio. There are four screws on the right side. You will reuse only two from each side, as the replacement pocket to go from double DIN to single DIN will come with its own screws.
      Image
    • The left side bracket is trickier, because in order to remove it from the radio you must first remove the bracket holding the ECT/ vent switch module to get access to it. First remove the screw at the top:
      Image
    • Then remove the screws at the side:
      Image
    • Then you can swing the switch module out of the way to get access to the four screws that actually hold the bracket to the radio.
      Image
    • You now can attach the brackets to your new radio. Test fit to make sure the radio is at the mounting depth that you want from the front panel.
      Image
    • This shows the mounting for the new under radio pocket, which fits in the lower holes of the bracket. Depending on your brand of radio, you could mount this above the radio if you wanted. I thought about using a stock XLS pocket with the little flip down door, but this was not possible given my radio, where the whole faceplate moves and rotates to load DVD’s and CD’s and there is not much clearance. This aftermarket pocket came from Crutchfield also. It's a generic unit for Toyota installs.
      Image
    • With the brackets all installed, the radio is test fit back into the slot and the harnesses all plugged in and routed around for clearance. Looks like we have power!
      Image
    • Test of the TV tuner. Brings in channel 31 loud and clear (classic star trek re-run). Scotty, I need more power! Reception from the AM band antenna while stationary is nearly perfect with all channels.
      Image
    • The radio bracket screwed back in with the four mounting screws, and the trim piece reinstalled after plugging in the hazard switch and auto temp sensor plug by the ignition lock. Make sure you plug the hazard switch back it - the turn signals route through that circuit.
    • You will note that it is a big old faceplate, bigger than a single DIN opening. Because of the car's stock trim ring, the radio does not sit quite flush but stands a little more proud than I would like. The only way to fix this would be to pull the radio, take off the mounting brackets and elongate the bracket holes slightly to allow the radio unit to mount forward another 1/8 inch or so.
      Image
    • Also, the car’s trim piece sits so close to the radio as mounted that there is absolutely no room for the trim surround bracket that came with the radio to be used, leaving a small gap on the driver’s side. Just going to have to live with it.
      Image
Finished! Total time to install including crimping the wiring for the adapter harness was about 2 hours. That’s the time if you were just installing the radio only, it actually took me longer than that as I had to do the TV tuner install and rig up the antenna plug to the AM band plug. Now that I've done it once I could probably do another one in an hour if I had all the tools laid out and ready to go.
 
#2 · (Edited)
only a few comments

1. did you remove the 12 cd changer from the trunk?
2. why did you replace? was the stock one broken or damaged, or did you just want something better?
3. is there any way you can center it in the double din opening? i think it would look much better than extending above the trim piece.

* do you know if the single din radios require a security code or is it just for the double din units? i have unplugged mine several times and not needed a code, is that because it was put back into the same car?
 
#3 · (Edited)
1. No, its still in there. Its off to the side and out of the way so there was no need to remove it.
2. The stock radio worked fine, but now I have DVD and TV capability. By burning my mp3's to a DVD, I can get at least 25 albums on one disc, which rocks all over a 12 disc changer any day of the week.
3, I suppose you could center it, but that would present its own problems, as the brackets are set up in the car for upper or lower. You would have to make some sort of adaptor bracket, and then figure out what to do for trim above and beneath the radio. The faceplate on this unit is bigger than single DIN unit which exacerbates the trim overlap.

If your radio does not have a little key symbol somewhere on it (lower right corner of the first pic showing my radio) than it does not have the built in anti-theft code feature.
 
#5 ·
Are you planning on fitting them in the doors? I'm told that the OEM speakers have some sort or proprietary mounting system and aren't quite standard size, but that you can buy an adapter that will let you mount other speakers with industry standard mounting points, etc.

I'm just using the stock speakers in my current install.
 
#7 ·
Are you planning on fitting them in the doors? I'm told that the OEM speakers have some sort or proprietary mounting system and aren't quite standard size, but that you can buy an adapter that will let you mount other speakers with industry standard mounting points, etc.

I'm just using the stock speakers in my current install.
:D!
Thought I would share.
The opening is 4 inches.

 
#12 ·
I'm the idiot!

Okay, so I'm the idiot who followed all of your steps, but never looked for/retrieved my radio security code....I noticed it was likely a problem after I ran my wiring harness plugged everything back up and my stereo wouldnt cut on at all......I rechecked my wires and all of my work and it was all fine, so I'm assuming that is where I messed up....any advice??? This tutorial has been absolutely amazing by the way. By far the most helpful tutorial I've gound on this subject.
 
#13 · (Edited)
Thanks for the compliment, I tried to make it as logical as possible.

Do you mean that you tried to plug back in the factory radio with the security feature and it won't power on? If so, and you don't have the code to re-enter, I think the only option is to take it to a Toyota dealer who can reset the code for you, I've never seen anything anywhere that tells how you can re-set a dead unit without going to the Dealer.

If you installed an aftermarket unit and its DOA, check all the fuses and then make sure you've got power and constant power correctly connected. My JVC won't power on unless the switched power (main power) and the constant power wires are both connected and live.
 
#14 ·
That's a relief.

Okay good deal, I'll recheck my wires. That's actually good news. For a second there I thought I just messed up the only unit I had and I wouldn't be able to activate the new unit without the old security code. There is also a possibility that the wiring harness I bought (from walmart) isn't the right one. I was trying to finish up the job last night in the dark, so I'll have a better visual today. Thanks again for all of your help.
 
#15 ·
Do you have an XL, or an XLS with the built in sub-woofer? If you have an XL (or any factory radio without the built in subwoofer) you will likely use the standard Toyota two piece harness adapter that is available almost everywhere.

If you have the XLS with premium sound and the built in subwoofer (You'll know because its mounted up in an enclosure with the 3rd brake light) Then you need the much less common one piece harness adapter with the subwoofer bypass and RCA outputs on it. You see it sometimes on E-bay or you can get it direct from Crutchfield, both places its about the same price.
Good Luck!
 
#16 ·
Right again

You got it. It's an xls, I was fortunate and best buy had the wiring harness which I just picked up for 20 bucks. My only problem is after running my wires I'm left with the solid blue wire on the harness, and my pioneer unit wires don't have another blue wire...do you know if there is another common color used for power antenna? And after I figure that one out....where do I need to run these RCA jacks? Do they go into the SW and F inputs, or do I use one of those two and the rear output jacks? I'm really sorry for all of the questions, this job has turned into a bear for me.
 
#18 ·
My pioneer unit apparently uses the blue wire with a white stripe as the power antenna, so I connected it to the solid blue wire on the wiring harness and it worked. I have everything run now and installed including my ipod interface. It's really interesting, everything works the way it's supposed to, my stereo stops at radio frequencies that actually have clear stations, my antenna works, my head unit still allows me to flip through playlists and so forth on my ipod, but I have no sound at all....Am I correct in my assumption that the RCA jacks essentially become your speaker wire??? or am i wrong? Also I did not disconnect the original factory amp. Could that potentially cause my unit to not work???? I feel like I'm so close, but I'm just not there yet.
 
#21 ·
Don't know. I've heard the Toyota setup is a unique (read: weird) subwoofer setup and if you actually want a "true" subwoofer you would have to add one in, hence the adapter plug being designed to bypass it when using an aftermarket head unit.
 
#22 ·
If you had the subwoofer capability with the previous radio, and adding that harness removed the subwoofer, then clearly the input was terminated at the harness. I'm sure if you were to poke arround the harness(eses) you could find a wire that goes into an oblivion and that may be your subwoofer input.

Once the signal wire+ground is found, splicing an RCA end onto it and plugging it into the subwoofer output of the headunit should give you bass, I hope.

I also heard that in the stock setup the subwoofer was just tied to the rear left output or something, Which is silly. The right way for toyota to do it would be to sum the channels and cross it over at the amp.

I never had the blessing of this harness that is spoken of. It just became splice crazy in my case. (and bypassed the factory amp)
 
#23 ·
Since we're on the subject of the subwoofer, does anyone have a part number for the grille and sub bracket that is next to the 3rd brake light? I've been looking online for a while and haven't found anything. I am planning on adding an aftermarket 8" in there and this bracket would really help the installation.
 
#24 ·
So Close...

Hi guys, I've been lurking on the forums for a bit now, first came here and figured out how to replace the regulator on my window and saved $600 bucks:) So I ran across some of these threads on how to replace the stereo system, and I decided to make the leap. Everything seemed to work out great with the install, my only hitch was that some of the screws stripped because they were in so tight so I just drilled them out. So here's the scoop.

My car is a 1995 Avalon with either the 4 or 6 speaker system, not entirely sure. But there is no CD changer. I installed a double din Pioneer unit that also has rear RCA outputs. I followed the link posted by swift justice in another thread to a the crutchfield harness and ordered it.

http://www.crutchfield.com/App/Product/Item/Main.aspx?g=103000&i=120708112&c=3&tp=736

After getting everything installed, I turned on my car for the moment of truth, and ... weirdness. Like one of the above poster's, everything APPEARS to be working correctly. The head unit powers on, CD's are accepted and appear to play, radio stations tune correctly and appear to be playing. But there is no sound! :headbang:

My questions are:
1. Did I get the right harness? It seems to be right because the unit powers on and it fits the factory adapter, but the only thing I can think of is that maybe the speaker connections are wired in the wrong spot? I also bought the cheap double connection harness and it doesn't fit, so I'm pretty sure I got the right one.

2. Is there some sort of setting in the pioneer unit to get it to use the RCA outs? Being as the guy above had the same problem I wonder if that's it. I've scoured my manuals, websites, and forums, and nothing I've found seems to talk about this.

3. At this point should I forget the harness and just start splicing? I figure I need to just splice the 8 speaker wires to the right ones at the back of the adapter...but if I do this, do I need to bypass the factory amp? I don't get this, if the harness can bypass the amp why can't it be done by directly splicing some wires at the head unit instead of mucking around with removing the glove box. I initially wanted to preserve the factory adapter, but at this point I don't care, I just want the system to work.

4. Does anybody know the wiring diagram? I've looked all over the web and this forum, and none of the diagrams I've seen match. I just need to know what 8 wires in the factory adapter match the right speaker wires right? Is there any way for me to test this?

5. At this point should I consider just running my own wires? Being as I can't find a wiring diagram that makes sense to me, I wonder if this would just work better. No worries about amp bypassing, no second guessing the wiring. Is this the more difficult option? Should I just keep looking for wiring options?

6. Should I just find a professional to finish the install? Would this be expensive being as I've done the majority of the work (I think). This really is last resort for me since I'm a huge DIYer, and I love tinkering, but I'm wondering if this is just a bit beyond me since I can't figure out the wiring.

7. This is a refurbished unit, so maybe the RCA out's are bad? I'm not sure how I would test that really except for splicing the wires directly to my speakers. When I get back home (out of town), I'll at least try connecting the head unit speaker wires out directly to my new speakers and see if it works.

Anyways, I'd appreciate any help with this. I feel like the guy above, so close!! Everything is powered and looks like its working, but there is NO SOUND! It makes me wonder if I should have gotten a cheaper unit from Crutchfield so I could get their support. I wonder if they'd help since I bought the harness from them... Ok, thanks!
 
#25 · (Edited)
To test the RCA outputs, just feed the radio RCA outputs into whatever amplifier you have lying around that has an RCA input. Small boom box, whatever,Actually, get a set of headphones, and use it on the RCA outputs, using a nice combination of adapters (female 3.5mm to male RCA) You should get some volume out of it.
Heres another way, do the opposite to see really check if the head unit is funky, take a portable music player, and feed it into the RCA adapter harness that goes to the factory amplifier. If you hear music from the speakers, that means your harness and other connected items check out. And the problem would be before that point, the head unit- I haven't dealt with any radios where you have to enable any RCA outputs, but it sure worth a try!

Running your own wires, depends! Have any experience in wire routing though cars? Taking door/trim panels apart? Running new 18 or 16 gauge speaker wire be a vast improvement over the factory anyway.

I may be able to slip a picture in at my splice location, depends how clear of a shot I can get.
 
#26 ·
Amazing!

Thanks for the quick reply!

Haha, well as it turns out, I found my answer. After reading through forums for two weeks, the half hour after I post I find my answer, of course.:D Link is posted below:

http://www.tundrasolutions.com/forums/avalon/64306-1996-avalon-radio-diagram-help/

First, the harness I linked to earlier really is the correct one. It works without any kind of modification, just crimp the connections. So for any future people attempting this, here's the what I found to be the problem. Apparently my speakers do route through the factory amp, so all I needed to do was connect the blue/white wire from the head unit to the blue/white lead on the harness.

:clap::clap::clap::clap:

Works! And I absolutely cannot believe how much better my factory speakers sound. I was always one of those skeptics about the receivers improving sound quality, but I'm a total believer now. Now I just wish I hadn't jumped the gun on buying new polk speakers, the factory ones are as good as I need! Thanks so much for all the help that's been posted here!!
 
#28 ·
Cool, thanks for the step by step. That really was a piece of cake to pull, so much easier than taking the entire dash apart. I needed to pull my 3 CD changer out, which I did easily after reading this. After partially disassembling it, I found not 1 but 2 CDs stuck inside of it. This was, of course before I knew about the manual release for the CD mag, though I did eventually find it. I was careful not to break down the L4200 CD player more than I needed to, and upon reinstalling it works great. Tomorrow Ill put some new door speakers into the '95.