

this is my experience/approach to the laborious task. i've been told there's a way to access rear plugs by loosening emgine mounts and rocking entire block forward around it's transverse axis. i don't think so.
notes: this Highlander is a 3.3 V6 '09 Hybrid, i think the engine changed the next model year to the 3.5 V6 while still remaining a "2nd Gen". obviously, the the peripherals around the engine block are laid out differently than the Gas-only.
i had recently done the plugs on my older 3.0 V6 '03 Highlander 1MZ-FE earlier and that provided me with experience to not screw up the newer nicer vehicle. i'm planning on posting that too.
the overall difference was that the '03 had more hoses to disconnect and keep track of but the '09 had the wiper/cowl box removal step - so they were about the same as far as how many steps were needed to complete. but most significantly, the clearance between the firewall and the dreaded blindly-accessed rear support bracket bolts to remove the air intake manifold was much better on the 2nd Gen '09 than the 1st Gen '03
First i used my iPad to do a screen shot of all the steps in SweeneyP's excellent "DIY 2GR-FE V6 Spark Plug Replacement" found on TN. he provided the inspiration for me to post my own write-ups of both my vehicles.
these are almost all the tools i used: i worked slowly and obsessively-complusively scotch-taped each fastener to my sketches and used flourescent duct tape to mark hoses etc so i wouldn't forget any steps or what goes where. this would be overkill for most people. i also manged not to drop a single tool, nut, etc. i cut 2 fingers off the nitrile glove and used a rubberband to hold those fingertips tightly over the ends of the single coolant line i had to disconnnect as i had nothing else suitable to plug/cap them. i have found that the 9" curved-tip long-neck pliers are the best way to work any hoses off their connections - you can direct lots of leveraged force via the tips in direct parallel direction of the hose you're wrestling, so you can push the hose off - instead of pulling the hose off.

my pics start with the assumption you have SweenyP's 2GR-FE tutorial at hand (in my case - the screen shots on my iPad) so i'm not going to replicate a lot of steps such as getting the wipers out, etc that are the same on either model. i just wanted to highlight the differences if you have a Hybrid as compared to his gas-only.
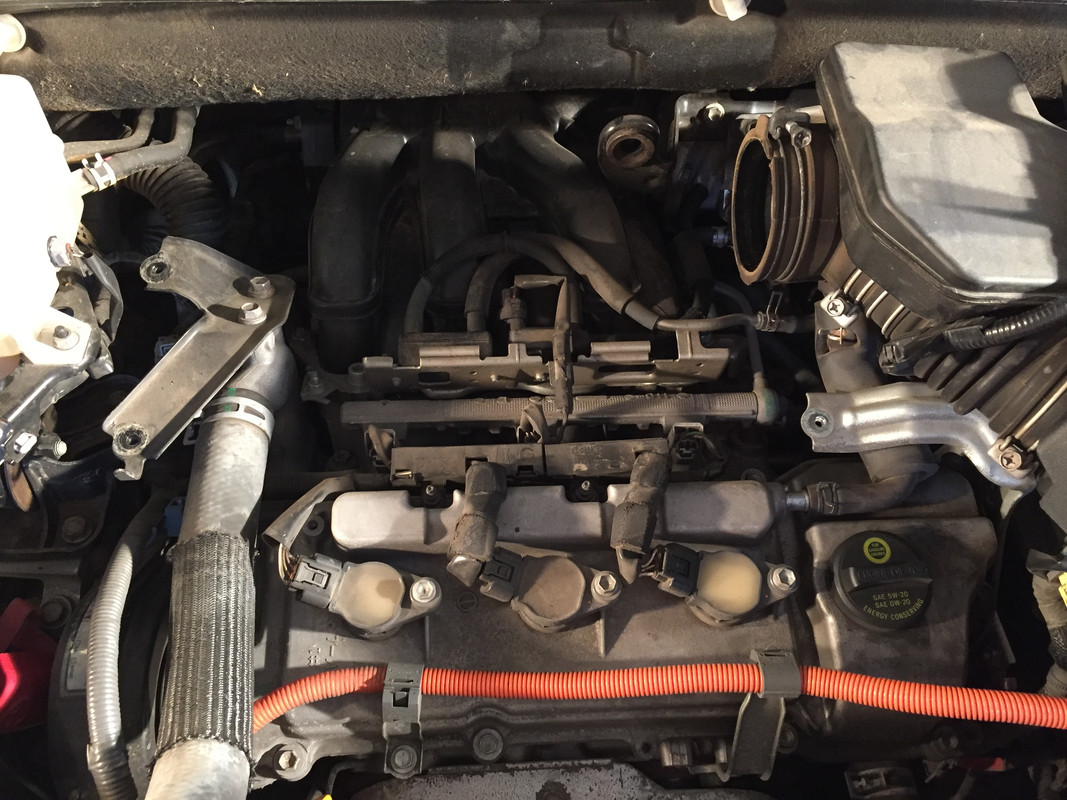
Air Filter boxes look different: had to remove plastic trim over the radiator to remove main air intake "snorkel" piece and then the main air filter box. all the fasteners were 10mm.

front plugs - way easy: for me the harness clips are best carefully levered up w a tiny screwdrive to release the catch. there is no clasp on the back side to worry about, just the single catch on the side you see.
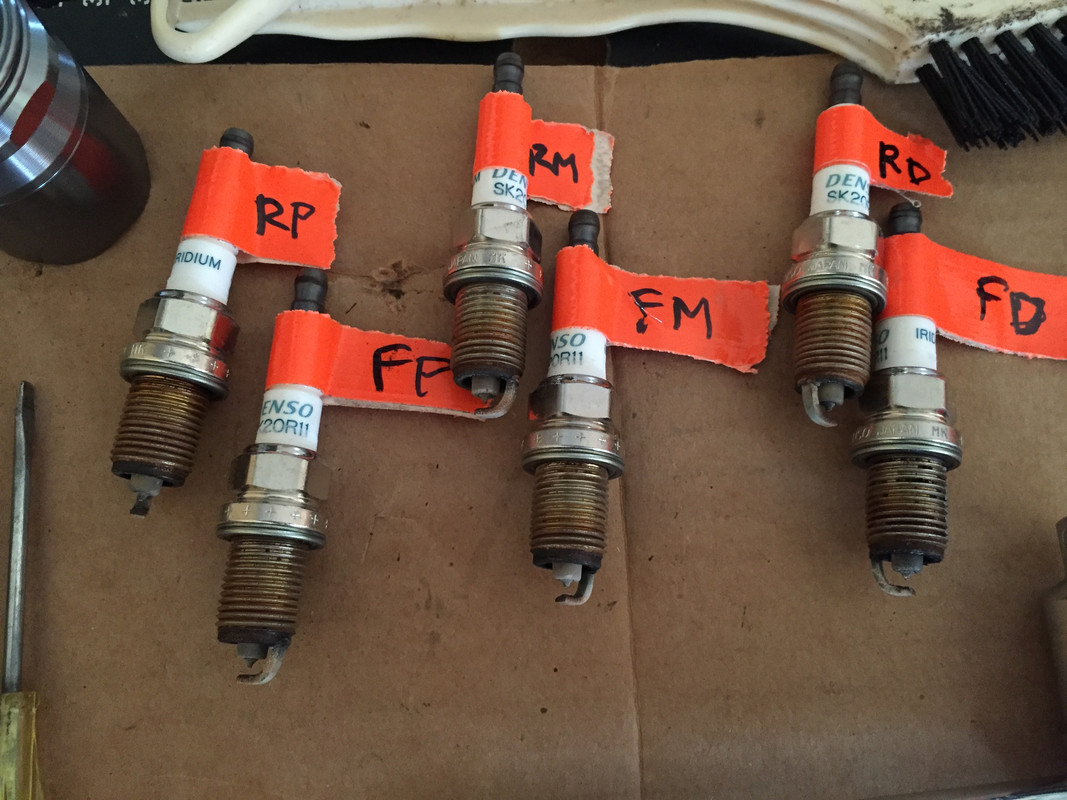
torque came out to be about 1/3rd turn past hand-tightened for ~13ft-lbs, so that's how i gauged it on the rear bank where there was not really enough room to properly swing a torque wrench. but i don't suspect i'll ever be doing these plugs again (if my "reserved" Tesla Mod 3 ever actually materializes.....)
this shows how rear bank is jammed up under cowl box: my hand is held in the vertical plane:

to get the wiper wiring harness unclipped from the cowl-box, it helps to remove the driver's side white square-head dampening-mat nut to lossen damper-mat forward to see the backs of the wiper wiring harness clips. yellow circle shows the bolt it's attached to:

there were 4 clips total holding the ginormous hybrid wiring harness against firewall. for whatever reason, the outer 2 had clips with nubs horizontal:

while the center 2 clips had nubs in the vertical plane:

maybe you can figure out how to open the hose-clamp-like plastic bands and leave the anchor nubs alone. i couldn't. i hate stuff like that - so easy to break if a service technician hasn't done it for you already
i tied back the harness out of the with a scrap twisty. you might be able to work without moving it but it makes a big difference in visibility and manuevering room.
before harness moved: hose in place, pass-side top of coil pack circled:

lots more room w that harness tied up and out of the way:

go ahead and remove the air intake "splitter", i tried not to but it's got to go to free up the throttle body (you might see it in other pics but i should've taken it out from the start - this pic recreates this step to put it in proper order):

i only had to disconnect one hose (orange duct tape - at it's end on the throttle) to free up the top hose/harness bracket: there is no significance to the hose i'm holding except to say "remove this bracket". 10mm nuts on each end.

big pic so far:

this is the one coolant hose (yellow circle) i had to disconnect. used the nitrile glove to cap ends as mentioned (you can see that i've already taken out the manifold fasteners. my plan was to get it all loose enough to swing up and to the right but that one coolant line did not have enough slack)

to get the manifold off: front fasters, throttle body, a hose, and those hidden rear bracket bolts

it would' ve been easier to to remove the ground wire on the left (pass) side but for me - the fewer loose ends - the better. the bracket will maneuver to the left out of the way w it still attached.
two 14mm nuts, four 8mm hex heads

this hose (red circle) on the Pass side has to come off to free the underside of the manifold (you see my flashlight towards the left of the frame):

i started to take the throttle body apart from the manifold but i couldn't really get to the 2 bolts on the lower-most side, so i decided (like w the 1st Gen Highlander that i did) to free up the manifold and throttle body en bloc. yellow-10mm bracket will swivel away when loose, red-12mm on a support bracket (this is a view from the Driver's side)

i used a board to lay on as i knew from the '03 that i might be spending lots of time reaching blindly to get the back bracket bolts out by feel alone. this helped me take it slow and not drop anything.

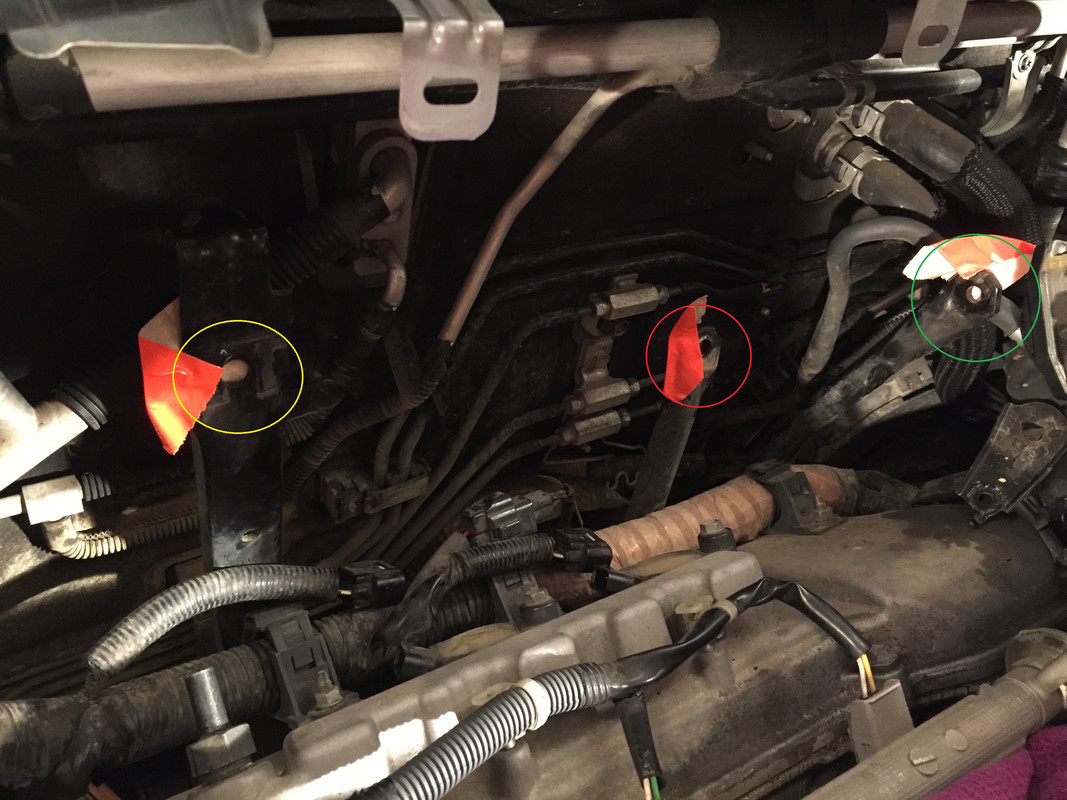
14mm bolt bracket top edge (yellow), left hand fingers keeping wrench onto bolt, a stubby ratchet allowed a free swing of only a couple of clicks but worked (unlike the '03 which had a bracket-stiffening curve to edge and thus the bolt-head was essentially "sunken" and could only be gripped with a socket). initially the bolt was very tight - broke it loose w a few careful whacks of a small hammer against the visible end of the wrench (red circle) then the bolt came out easily. the open jaws of the wrench look like they're grabbing that coolant line going into the firewall, but that's just an illusion created by the angle of the photo, the wrench is way forward of it hugging the backside of the manifold.

with manifold swung up and to the right (driver's side): yellow - 14mm bracket (the same one as the yellow circle in the previous pic), red - 12mm also a 'blind' removal on rear of throttle body, green-12mm visible from the driver's side on the throttle body (3 pics above it is the red circle in that pic)
my gasket looked ok: note the metal inserts to strengthen the plastic at fastener 'tunnels' - they all stayed in the plastic manifold except one on the far side - that'd be an easy bit to lose.

to get the manifold free took a bit of jiggling up/backwards, etc before it would clear the front two engine block bolts still sticking up throught the side-front edges.
rear harness had a jammed up pass side coil-pack connector so i had to do some wiggling of the big harness it sprouted from.
reassembly is just the reverse. i could not get the the two "blind" back bracket bolts to line up and thread the bolts back in until i had mostly tightened up the front manifold clamp-down bracket with the two 14mm nuts and the four 8mm hex-heads.
cheers! 162,409 miles:
notes: this Highlander is a 3.3 V6 '09 Hybrid, i think the engine changed the next model year to the 3.5 V6 while still remaining a "2nd Gen". obviously, the the peripherals around the engine block are laid out differently than the Gas-only.
i had recently done the plugs on my older 3.0 V6 '03 Highlander 1MZ-FE earlier and that provided me with experience to not screw up the newer nicer vehicle. i'm planning on posting that too.
the overall difference was that the '03 had more hoses to disconnect and keep track of but the '09 had the wiper/cowl box removal step - so they were about the same as far as how many steps were needed to complete. but most significantly, the clearance between the firewall and the dreaded blindly-accessed rear support bracket bolts to remove the air intake manifold was much better on the 2nd Gen '09 than the 1st Gen '03
First i used my iPad to do a screen shot of all the steps in SweeneyP's excellent "DIY 2GR-FE V6 Spark Plug Replacement" found on TN. he provided the inspiration for me to post my own write-ups of both my vehicles.
these are almost all the tools i used: i worked slowly and obsessively-complusively scotch-taped each fastener to my sketches and used flourescent duct tape to mark hoses etc so i wouldn't forget any steps or what goes where. this would be overkill for most people. i also manged not to drop a single tool, nut, etc. i cut 2 fingers off the nitrile glove and used a rubberband to hold those fingertips tightly over the ends of the single coolant line i had to disconnnect as i had nothing else suitable to plug/cap them. i have found that the 9" curved-tip long-neck pliers are the best way to work any hoses off their connections - you can direct lots of leveraged force via the tips in direct parallel direction of the hose you're wrestling, so you can push the hose off - instead of pulling the hose off.
my pics start with the assumption you have SweenyP's 2GR-FE tutorial at hand (in my case - the screen shots on my iPad) so i'm not going to replicate a lot of steps such as getting the wipers out, etc that are the same on either model. i just wanted to highlight the differences if you have a Hybrid as compared to his gas-only.
Air Filter boxes look different: had to remove plastic trim over the radiator to remove main air intake "snorkel" piece and then the main air filter box. all the fasteners were 10mm.
front plugs - way easy: for me the harness clips are best carefully levered up w a tiny screwdrive to release the catch. there is no clasp on the back side to worry about, just the single catch on the side you see.
torque came out to be about 1/3rd turn past hand-tightened for ~13ft-lbs, so that's how i gauged it on the rear bank where there was not really enough room to properly swing a torque wrench. but i don't suspect i'll ever be doing these plugs again (if my "reserved" Tesla Mod 3 ever actually materializes.....)
this shows how rear bank is jammed up under cowl box: my hand is held in the vertical plane:
to get the wiper wiring harness unclipped from the cowl-box, it helps to remove the driver's side white square-head dampening-mat nut to lossen damper-mat forward to see the backs of the wiper wiring harness clips. yellow circle shows the bolt it's attached to:
there were 4 clips total holding the ginormous hybrid wiring harness against firewall. for whatever reason, the outer 2 had clips with nubs horizontal:
while the center 2 clips had nubs in the vertical plane:
maybe you can figure out how to open the hose-clamp-like plastic bands and leave the anchor nubs alone. i couldn't. i hate stuff like that - so easy to break if a service technician hasn't done it for you already
i tied back the harness out of the with a scrap twisty. you might be able to work without moving it but it makes a big difference in visibility and manuevering room.
before harness moved: hose in place, pass-side top of coil pack circled:
lots more room w that harness tied up and out of the way:
go ahead and remove the air intake "splitter", i tried not to but it's got to go to free up the throttle body (you might see it in other pics but i should've taken it out from the start - this pic recreates this step to put it in proper order):
i only had to disconnect one hose (orange duct tape - at it's end on the throttle) to free up the top hose/harness bracket: there is no significance to the hose i'm holding except to say "remove this bracket". 10mm nuts on each end.
big pic so far:
this is the one coolant hose (yellow circle) i had to disconnect. used the nitrile glove to cap ends as mentioned (you can see that i've already taken out the manifold fasteners. my plan was to get it all loose enough to swing up and to the right but that one coolant line did not have enough slack)
to get the manifold off: front fasters, throttle body, a hose, and those hidden rear bracket bolts
it would' ve been easier to to remove the ground wire on the left (pass) side but for me - the fewer loose ends - the better. the bracket will maneuver to the left out of the way w it still attached.
two 14mm nuts, four 8mm hex heads
this hose (red circle) on the Pass side has to come off to free the underside of the manifold (you see my flashlight towards the left of the frame):
i started to take the throttle body apart from the manifold but i couldn't really get to the 2 bolts on the lower-most side, so i decided (like w the 1st Gen Highlander that i did) to free up the manifold and throttle body en bloc. yellow-10mm bracket will swivel away when loose, red-12mm on a support bracket (this is a view from the Driver's side)
i used a board to lay on as i knew from the '03 that i might be spending lots of time reaching blindly to get the back bracket bolts out by feel alone. this helped me take it slow and not drop anything.
14mm bolt bracket top edge (yellow), left hand fingers keeping wrench onto bolt, a stubby ratchet allowed a free swing of only a couple of clicks but worked (unlike the '03 which had a bracket-stiffening curve to edge and thus the bolt-head was essentially "sunken" and could only be gripped with a socket). initially the bolt was very tight - broke it loose w a few careful whacks of a small hammer against the visible end of the wrench (red circle) then the bolt came out easily. the open jaws of the wrench look like they're grabbing that coolant line going into the firewall, but that's just an illusion created by the angle of the photo, the wrench is way forward of it hugging the backside of the manifold.
with manifold swung up and to the right (driver's side): yellow - 14mm bracket (the same one as the yellow circle in the previous pic), red - 12mm also a 'blind' removal on rear of throttle body, green-12mm visible from the driver's side on the throttle body (3 pics above it is the red circle in that pic)
my gasket looked ok: note the metal inserts to strengthen the plastic at fastener 'tunnels' - they all stayed in the plastic manifold except one on the far side - that'd be an easy bit to lose.
to get the manifold free took a bit of jiggling up/backwards, etc before it would clear the front two engine block bolts still sticking up throught the side-front edges.
rear harness had a jammed up pass side coil-pack connector so i had to do some wiggling of the big harness it sprouted from.
reassembly is just the reverse. i could not get the the two "blind" back bracket bolts to line up and thread the bolts back in until i had mostly tightened up the front manifold clamp-down bracket with the two 14mm nuts and the four 8mm hex-heads.
cheers! 162,409 miles:
") one can dream (they are down to $32k now perhaps when they his $25k ......... )
one can dream (they are down to $32k now perhaps when they his $25k ......... ) 


