Toyota Forum banner

DIY - Gen4 1998 Camry V6 1MZ-FE Complete Motor Mount Replacement

1 reading
34K views 29 replies 13 participants last post by  tedmich  
#1 ·
Hello all!

Use this guide at your own risk. I nor TN assume no responsibility for any damage to your vehicle or personal injury as a result of following this guide.
I finally... (been using this phase a lot) got time to do my motor mounts one afternoon. I was bored and I knew I wanted to get rid of this box that was sitting in my trunk for over 2.5 Years.

More History on this car is here. I'll be updating the list in there as well.
http://www.toyotanation.com/forum/1...solara-1999-2003/1450442-kingdom934-s-1998-camry-le-v6-anniversary-edition.html

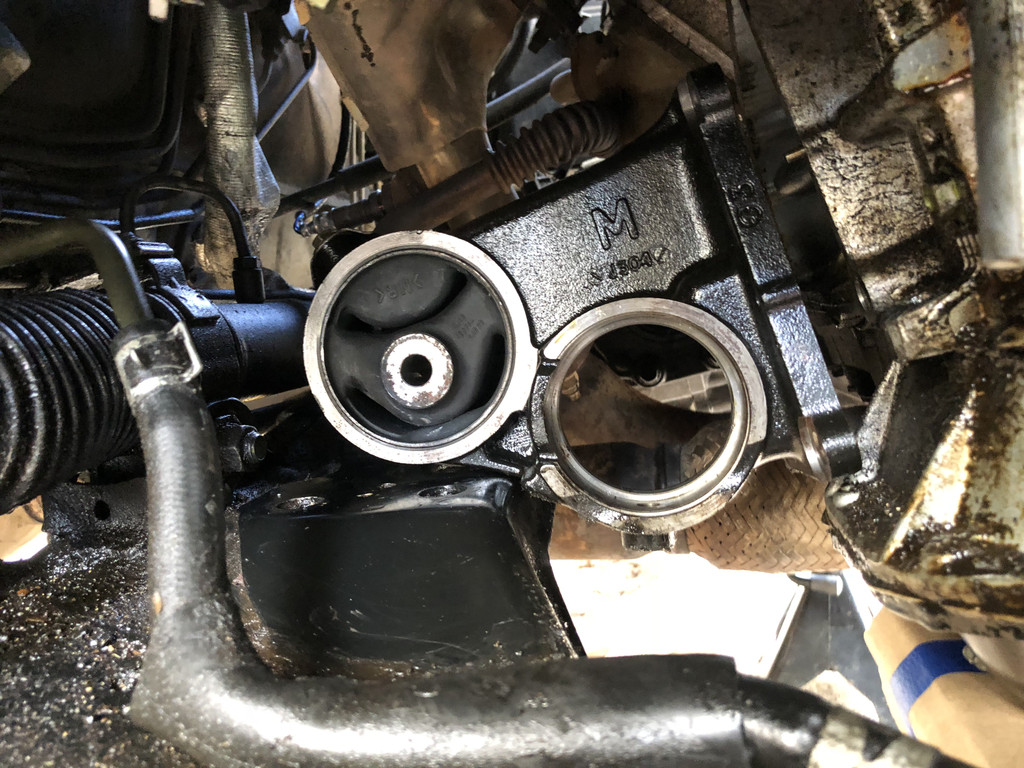
When I got the car, motor mounts were shot. Shifts were very harsh...still is even after...another thread on that.

The car did vibrate quite a lot in park and when in gear especially. It was causing some panels to vibrate and rattle. After the mounts were replaced, everything seems to had smooth out as it should...except for the shifting issue noted below.

http://www.toyotanation.com/forum/1...n-solara-1999-2003/1618650-transmission-kick-down-cable-shifting-too-harsh.html

Anyhow, the mounts had to get replaced. I bought all the parts from our awesome Roman from Toyota of Cool Springs.

NOTE: This guide should be fairly applicable to many of the 1MZ family, including the Sienna, ES300, Avalon, and Solara. Of course, use common sense when attempting any kind of repair work.


http://www.toyotanation.com/forum/506-toyota-cool-springs/

It all started on this day...
Hi Roman!

Glad someone told me that we have a vendor that sells parts on here. I tried looking on the website, but couldn't find much pictures on the motor mount for my car and wondering if you could help me. It is regarding the rear motor mount for a 1998 J-vin V6 LE Camry.

I am planning to just get the entire housing (bracket + mount) since I don't want to press in the mount into the housing. My 98 has a completely dead motor mounts since the engine moves a lot in gear (It wants to HOP out). Previous owner had the rear mount replaced back a few years ago and it is bad again. Most times used a cheap aftermarket one. The front one is also bad but I bought a Anchor replacement (didn't install it yet), but now consider i should get an OEM front as well.

I spend a few hours researching this. I found out that the 12380-20030 is the suitable replacement (bracket + mount) for it, but also noticed that some places cross references the 12380-20040. The 12380-20040 is used in the ES300 if I recall correctly.


When I called my local toyota dealership, they said that the 20030 is the replacement but when I said if the 20040 would work, they said it was also listed as it would be a compatible as well....sooo does that mean the 20040 will work? the only thing I can see is that the rubber insert is much bigger. Wonder if that would be better for less vibrations or cause fitting issues? I know the Avalon/Camry/ES300 share a lot of similarities.

Also, do you folks ship to Hawaii? Zip code (96786)?

Much thanks and hope to do business sometime in the future!
The 20030 is the correct part number for the rear mount, BUT there is a supercession on the part number. The correct part number now is 12380-0A031. If it was me, that is the part I would go with. It's an updated number, so the issues they were having with the wear on these should be alleviated, and we KNOW it's going to fit. I've never heard of anyone using a 20040 in the rear, and at any rate, the part is not available unless you contact a Lexus dealership. It is specific to the Lexus models.

The front mount is part number 12361-20040. Here are a couple of links to the parts in our online store:

http://parts.toyotaofcoolsprings.com/oe-toyota/123800a031
http://parts.toyotaofcoolsprings.com/oe-toyota/1236120040

Let me know if this helps or if you have any other questions.


The part list ran like this for a Toyota Camry 1998 LE V6 Motor Mounts.

Rear Mount w/ Housing (do NOT get JUST the bushing - Yes it is cheaper, but you need to press that ***** in!)
12380-0a031
https://parts.toyotaofcoolsprings.com/oem-parts/toyota-rear-mount-123800a031

Transmission Mount :
12372-0A020
https://parts.toyotaofcoolsprings.com/oem-parts/toyota-side-mount-123720a020

Front Mount :
12361-20040
https://parts.toyotaofcoolsprings.com/oem-parts/toyota-front-mount-1236120040

Dog Bone (Torque Strut) :
12363-20020
https://parts.toyotaofcoolsprings.com/oem-parts/toyota-torque-rod-1236320020

Transmission Shift Shock Strut :
12307-20021
https://parts.toyotaofcoolsprings.com/oem-parts/toyota-vibration-damper-1230720021


Anyhow, time to get started.

Here's that 2.5 year old box...been in my trunk.
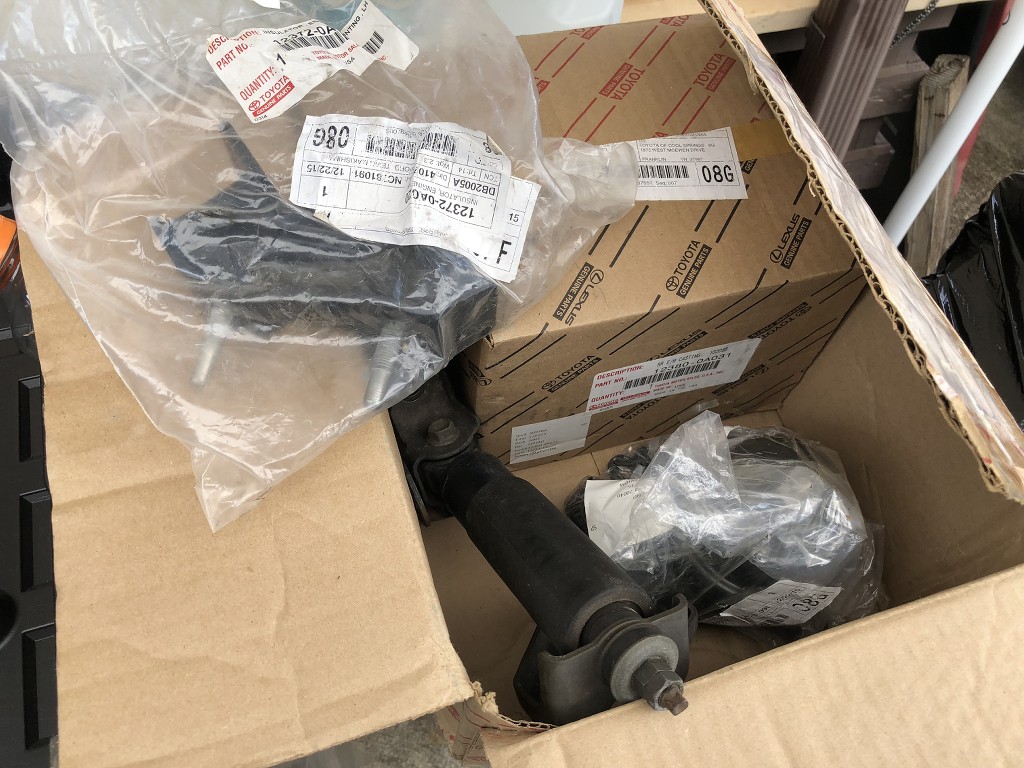


Use this guide at your own risk. I nor TN assume no responsibility for any damage to your vehicle or personal injury as a result of following this guide.
 
#2 · (Edited)
-------------------------------------------------------------------------------------
Transmission Mount
-------------------------------------------------------------------------------------
Use this guide at your own risk. I nor TN assume no responsibility for any damage to your vehicle or personal injury as a result of following this guide.
I decided to tackle the transmission mount first.

Motor mount in the bag


Mount out of bag


Remove the driver side wheel, jack the car up. The usual


Remove the inner panel. two 10mm bolts.


Panel off. Set aside.


There is a total of 4x 14mm bolts. Two on each side. Don't forget the two nuts holding the mount into the lower subframe.


Two hidden/hiding ones.


They shouldn't be on too tight. I was able to loosen with a standard ratchet and the 14mm socket. I did not remove the bolts yet.


Rears are not too bad.


Look at that tear! It was getting pretty bad.


Use a 14mm deep socket for the nuts underneath


I didn't have a block of wood so...concrete with cardboard had to do. for jacking upthe transmission


Start positioning the jack.


Pick the most flattest spot on the pan. SLOWLY raise it JUST a tad bit


With *some* of the weight remove, I completely removed the two nuts holding the mount.


As you raise the transmission up a tad bit, you might see the dead mount.


Remove the remaining of the screws after you jacked the transmission just enough.


May have to jack the transmission a tiny bit more to get it to clear the subframe.


Just pull it out and inspect. Yikes!


No mounts


Inspection of the old mount


It was done for...awhile ago.


Reverse order to install.


Tighten the bolts up!


Don't forget the bottom nuts as well.


Some pictures of the dead mount.


-------------------------------------------------------------------------------------
Transmission Mount TORQUE Spec
-------------------------------------------------------------------------------------


Use this guide at your own risk. I nor TN assume no responsibility for any damage to your vehicle or personal injury as a result of following this guide.
 
#3 · (Edited)
-------------------------------------------------------------------------------------
REAR Mount (Part 1 of 2)
-------------------------------------------------------------------------------------
Use this guide at your own risk. I nor TN assume no responsibility for any damage to your vehicle or personal injury as a result of following this guide.
I went hard core - the rear mount. It's like this is the boss level. Many have attempted, many have struggled....so it was my turn. Would I struggle or would I flourish?

Here's a AWESOME video on how to do this mount as well.

Here we go, get those mana potions and hp items ready.


I skipped a step. I removed the inner fender thingy. two 10mm bolts again. Set aside.


I gotta figure out where the heck all this oil is coming from.


You have two options. You can remove the strut bolts to remove the CV axle (at least the driver side you can do just this)


Or remove the lower ball joint and disconnect it. I ended up going the lower ball joint route.


Remove the cotton pin, that weird crown, and the axle nut. You'll need a mega thick breaker bar. It's held down at least 217 ft-lbf. If you are going to breaker bar it...do this (loosen) the bolt when the car on the ground with tire on. If your debating on getting an impact gun...DO IT. I have one now and I have no ideal how I survive so long without one.


Pin removed


Removed this other piece


30mm socket...zip it off


Came right off


Some people have issues...some don't. See if the axle spindle will slide out.


Mines did without any resistant... :)


Lower ball joint bolt/nuts


Use a breaker bar. Remove them.


Use a pry bar to lower the LCA so you can clear the lower ball joint studs.


I don't think you need to remove the sway bar link. I thought I did...but didn't have to.


Move the CV axle out of the way.


Loosen the nut holding the axle in place. I forgot the size...14mm? I removed it. Take note if a plastic black thing comes out of it.


Remove the axle lock in ring thingy.


Snap Ring loosen


Now...I was ready. I had this...and I thought i could FINALLY use this as this doesn't work on the passenger side of these Camry.


NOPE...


The axle JUST came out EASY. I just gave it a slight tug with my hand and it came sliding out.


Like...butter. Nothing. Even the differential didn't leak. Transmission fluid is between L and F when I checked after this too. Is it suppose to leak if you remove the axle?


This is what gives people so much headache. Mines was...nothing?


With the axle removed, the rear mount is in full view.


He's dead, Jim


Remove the two bottom grommet covers...mines was missing one. You can also see the other two bolts on the frame as well.


There is a total of 4x 14mm bolts holding the rear mount bracket . You'll have struggles on the top ones on the left side when looking from the back of the engine.


See...that sun of a gun. Oh yea, the EGR pipe thingy.


Use this guide at your own risk. I nor TN assume no responsibility for any damage to your vehicle or personal injury as a result of following this guide.
-------------------------------------------------------------------------------------
CONTINUE BELOW
-------------------------------------------------------------------------------------
 
#4 · (Edited)
-------------------------------------------------------------------------------------
REAR Mount (Part 2 of 2)
-------------------------------------------------------------------------------------
Use this guide at your own risk. I nor TN assume no responsibility for any damage to your vehicle or personal injury as a result of following this guide.

And of course


I did this one bolt first. 14mm x 4. It's tight, but you can loosen it. May need to get a swivel socket or a open box wrench. Hard to get leverage.


The top right 14mm isn't too bad, but again, leverage is a bit difficult.


After loosening (not removing) the bolts on the bracket, I started to put my jack underneath the oil pan. I just crank it just enough to feel *some*weight was on it. I didn't want to remove the rear bracket while there is weight on the bolts holding it down.


Pop off the two plastic covers to reveal the 14mm. Deep socket is a must.


Take note of this metal plate behind the mount. It's held on by two 10mm bolts. It can be left on for now.


Using a 1/2" w/ 14mm removing the bolts holding the bracket on. Remove all the remaining 3 or 4 (if you didn't take the other one out yet)


From below, remove all the 14mm nuts holding the bracket to the rear subframe. They were greasy.


With your jack, slowly raise the engine maybe an inch. Try jiggle it out.


My new mount was waiting.


Thankfully, all the bolts (14mm) are all the same for all the 4 spots on the bracket. I place it in the place I took them off anyhow though.


Raising the engine.


Jiggle Jiggle.


It...won't...come...out


Just remove this bolt. It'll have to come out in two piece. 17mm I believe. It's on pretty tight. I had to zip it off with a few 12"x2 1/2" extensions.


It's pretty long too.


Removed the bracket first then mount!


Covered in grease!


The fudge happen to this thing. Per records, they had a shop replaced this mount in like 2010 or something....I think they may had pressed in an aftermarket bushing as this doesn't look original OEM. although the bracket has a toyota part number. Never seen an OEM one fail like this. LOOK at it!


It's some scary horror show.


Please take note. There is a black plastic thingy that the 14mm bolt that goes into the mount that holds the CV axle in place.


It fits right on the bolt.


The plastic has a nipple that fits nicely on the bolt.


Swap this metal bracket over to the new mount. 10mm x2


The rear mount goes in one way: nut side is in side. The hole side faces to you (out from passenger side)


Reverse order. Install mount and then bracket.


Take note of these pins. They align the rear mount to the block.


Once you get the bracket and mount in, hand tighten all the nuts/bolts. Give enough slack to be able to move them around.


Once that is in, install the long 17mm bolt.


Tighten the 17mm bolt in. I torque this to what I found..I couldn't find it in the FSM. I think I used about 66 ft-lbf. Could someone tell me what it is suppose to be?

Also this is the time to tighten and torque to spec the 4 bolts holding the bracket to the engine and the 4 nuts holding the bracket to the subframe.


Reinstall axle.


I put some anti sieze...I hope this should be fine.

Coat inside as well.


Slide the axle in place. Making sure it doesn't damage the inner axle seal.


Once the axle is in place, install the 14mm bolt w/ the plastic thingy.


Axle installed


Lock the snap ring in


Put lower ball joint back on lower control arm and put the axle spindle back into the hub


-------------------------------------------------------------------------------------
REAR Mount - TORQUE
-------------------------------------------------------------------------------------

I couldn't find the torque spec for the 17mm bolt that holds the rear mount to the bracket. I think I do around 60 ft lbf.


Use this guide at your own risk. I nor TN assume no responsibility for any damage to your vehicle or personal injury as a result of following this guide.
 
#5 · (Edited)
-------------------------------------------------------------------------------------
Front Mount & Transmission Shift Shock Mount (what's the name for it?? lol)
-------------------------------------------------------------------------------------
Use this guide at your own risk. I nor TN assume no responsibility for any damage to your vehicle or personal injury as a result of following this guide.

Time to do the front mounts


Front mount has a 17mm (?) bolt holding it in place and 3 14mm bolts, one facing downwards.


Remove the skid plate


Put it on the oil pan, raise it just a tad bit.


You may need a swivel socket. Otherwise those extension that had a slight wobble would be fine.


They shouldn't be on too tight, but I breaker bar it. Two on top, one underneath.


See it??


Remove the top bolt holding the mount.


After all the bolts are removed, raise the engine a tad more. Remove the mount. It'll be easier from removing it below. You should be able to do it with everything in place (rad fan, exhaust, etc)


Thru this spot


Old mount...ded.


Nothing really in there supporting it.


New Mount


The old front mount looks...dead


Install the new mount as how you did with the old one, same way out...in...


That 'dot' goes facing towards the engine.


If you look at the mount where the mount goes, there a small dimple on the underneath to align the top mount cover.


Start hand tightening all three bolts on bottom and the top bolt. The mount moves quite a bit until it is getting snugged.


Slowly tighten and torque to spec. Lower engine down before doing final torque.


-------------------------------------------------------------------------------------
Transmission Shift Shock Mount
-------------------------------------------------------------------------------------

This one is easy. These can be removed and installed without jacking up the engine. They are more or less like a strut. The one on mines seem to still be good, but I replaced it with an Avalon one with a rubber brick on it. You'll need a 14mm socket.


Two 14mm on the lower subframe.


and two 14mm covered in dirt where it mounts to the transmission.


Get your extension, loosen the bolts on the bottom


Then a breaker bar for the ones on the transmission


Remove from top end


Compare.


Left one is from the 1998 Camry. Right one came from a 2004 Avalon.


Also installed this insulation brick. Apparently the Avalon and ES300 had these.


Line everything up, hand tighten screws. Then go in order to final torque.


Installed!

-------------------------------------------------------------------------------------
Front Mount & Transmission Shift Shock Mount TORQUE Spec
-------------------------------------------------------------------------------------
Torque specs are a bit confusing. I couldn't find out the torque bolt for the mount to the bracket (17mm) bolt one. I think I torque to about 60 ft-lbf...


Use this guide at your own risk. I nor TN assume no responsibility for any damage to your vehicle or personal injury as a result of following this guide.
 
#6 · (Edited)
-------------------------------------------------------------------------------------
Torque Strut Mount (aka Dog Bone)
-------------------------------------------------------------------------------------
Use this guide at your own risk. I nor TN assume no responsibility for any damage to your vehicle or personal injury as a result of following this guide.
Best for Last. My old one seem to still be okay, but why not swap everything?

There are two bolts holding this dog bone in. 14mm I believe.


New Part


Use your 14mm, loosen the bolt by the strut mount


Repeat on the other side


Remove the bolt.


They are different lengths.


Slide out old mount. You may need leverage.


Old mount that I replaced about 2 years ago to 'hold off' the work seem to held up okay, but worn.

In the new mount


Repeat from above.


-------------------------------------------------------------------------------------
TORQUE Spec
-------------------------------------------------------------------------------------


Use this guide at your own risk. I nor TN assume no responsibility for any damage to your vehicle or personal injury as a result of following this guide.
 
#7 · (Edited)
Great job and super pics! When I attempted to replace my tranny mount, I removed the nuts on the mount captive bolts going through the sub-frame. When I jacked up the tranny, the tranny and sub-frame moved together. I assumed this meant that I had to first disconnect the front and maybe rear mount to allow the engine/tranny to be separated from the sub-frame. When you jacked up the tranny, did you have the other mounts disconnected? Thanks.


PS. I can not believe how lucky you were on the rear mount! I had to split the mount casting at the axle bearing to release it. I was hoping to just replace the bushing but had to buy a complete new rear mount. Used a liberal amount of anti-seize just in case I have to do it again someday.
 
#8 ·
I hope I don't have too much crazy errors. Let me know if you folks have any questions!


Thanks!

It could very well be you may had to 'loosen' the front mount one first. The shift shock one probably can be left alone as it seem to be able to extend a lot. It's like a hydraulic strut. Again, my mounts were dead, so I guess that didn't pull the sub-frame with it when I did raise it, right? I was able to do the transmission mount first without any issue. The CV axle part ...I was super lucky. I guess all that leaking oil help...somewhat, right?

The passenger CV axle was done some time in 2012, so who ever did it did it right.

As a note, in the pictures I have a front strut brace. I had to remove this brace after the new mounts as the EGR valve top part was hitting it and causing all kind of noises with the new mounts.
 
#10 ·
#13 ·
Nice DIY!

Oil on the support bearing is likely the reason why the passenger axle came out without a fight. However, the inner half looked like an aftermarket with the shiny cup (Cardone's signature)?

The mounts are probably one of the reasons for the torn CV boot. Noticed a torn lower ball joint boot as well (not related to mounts). Both of those are considered safety hazards and in some states can fail inspections.
 
#15 ·
Didn't catch that in regards to the lower ball joint. Thank you! I did look at the lower ball joint on the passenger side. It looks like it is just gunk/dirt. I'll double check when I get under...could be torn from the backside.

Yea, the car has a inner failed driver CV boot. Maybe I can rebuild/reboot the driver side inner boot since that should be easy. Gotta check for P/N though.

The passenger side was replaced by the previous owner. Wouldn't be surprised that the passenger side is Cardone.
 
#21 ·
You gotta remove it and test. Since it is a hydraulic shock absorber, it will allow you to compress and expand as long as you put some force into either action. Like a hydraulic tensioner. It shouldn’t be loose afaik but the shift shock thingy I had in my 1998 which had all bad motor mounts felt the exact same from a shift shock I removed from a 2004 Avalon with 70K on it. I don’t suspect it fails often.
 
  • Like
Reactions: Good Wishes
#23 ·
Stickied
 
#28 ·
Kingdom, this is an excellent step by step, thank you! One question, I noticed on the old rear motor mount versus the new rear motor mount the bushing inside the casing is rotated 180°. When I have tried to install this, the bolt holes don’t line up. Did you just raise the engine to get the holes to lineup?
 
#29 ·
^^ I had to "coax" the engine a bit - using a block of wood w/ a floor jack underneath the oil pan: to get the rear motor mount ('00 4 cyl. Camry here) holes to line up, FYI. Tip: keep the lower rear mount bolts "loose", just threaded / with plenty of play, so you can shift the mount as needed: to line up w/ the motor & get all bolts threaded.