Toyota Forum banner

If your Previa smells like burning oil after you drive it, please read this !!

50K views 56 replies 25 participants last post by  coilz  
#1 · (Edited)
After reading pnyboy27 's post Fml I want to bring a spotlight on a very common, very dangerous problem that is easily fixed.....

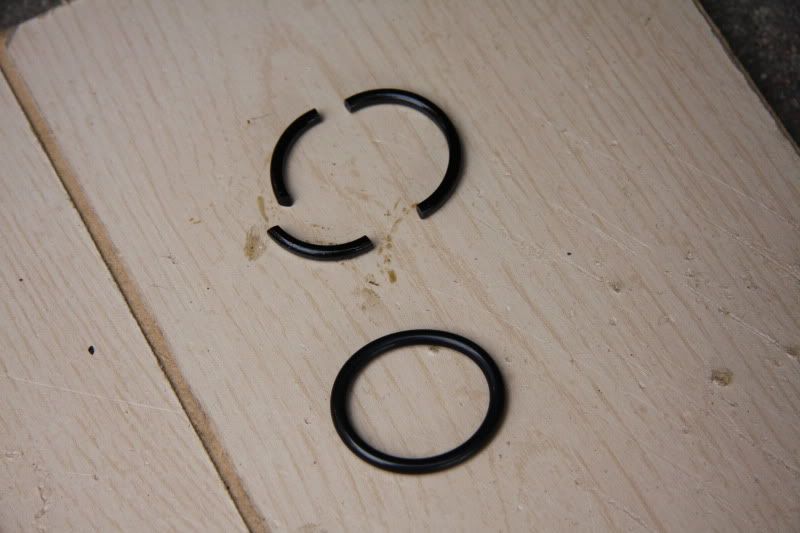
Every previa that I have had leaks a little oil from the distributor. and, guess what?..... the distributor is about 2 inches directly above the exaust header. as the previa gets older, the distributor seal gets hard and leaks more and more till the chance of fire is likely. The seal for the replacement is a $6 part from Toyota, or $1 part from a auto part store. takes about 20 minutes to change if you know what you are doing.....

I just got a new seal last week and have been putting off replacing it, but seeing pnyboy27's post, I am going to take the time and replace mine...

In a side fact , the donor previa that I got my rear end replacement from was all burnt from the distributor leaking oil onto the exaust header. it wasn't as bad as what happened to pnyboy27, but burnt enough to land it in the salvage yard......

I took a couple pics, it is a pretty easy prosess and can save your previa and make it much safer.
Image

Image


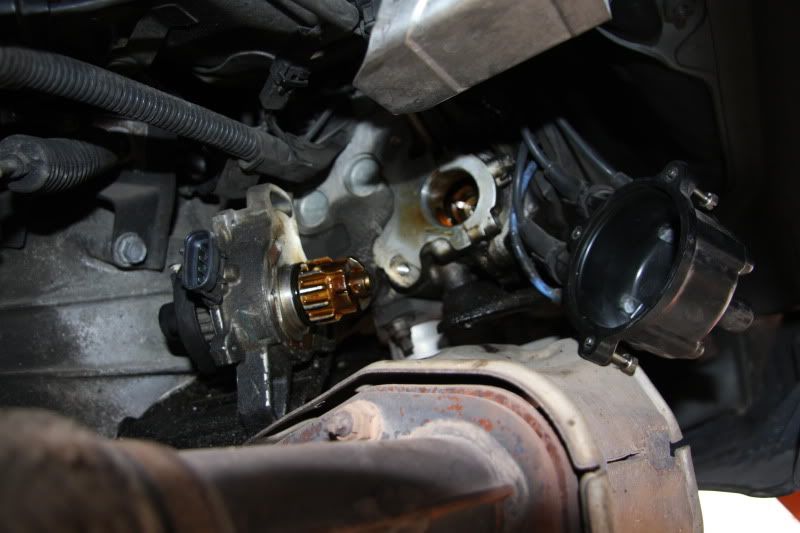
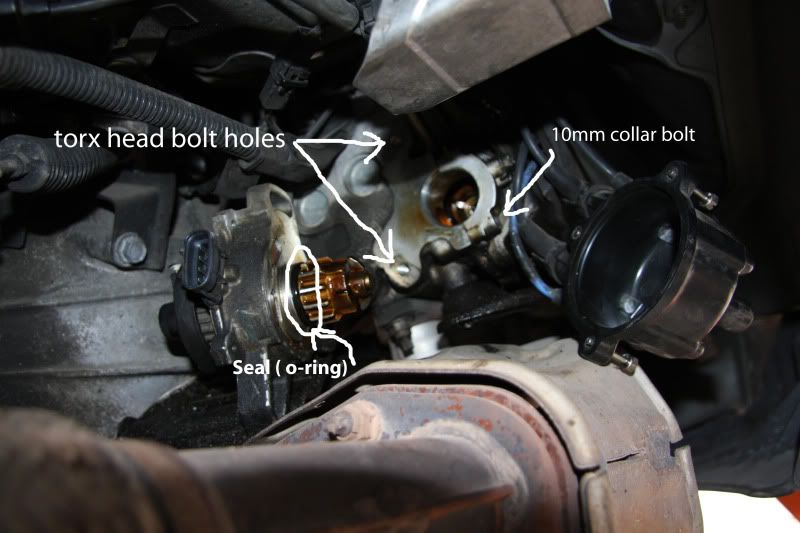
The key to making this an easy prosess is making note of the exact location of the rotor position and the distributor position in relation for the timing. this can be done easily by marking where the torx bolts are tightened with a marker and mentally noting the position of the rotor ( ie... top left, top right. straight down, etc......). (Dont forget to loosen or remove the 10mm collar bolt) and replacing everything back the way you found it. oh yea, coat the new seal ( o-ring) with oil, with your finger, so that it goes back in easily
it took me 20 minutes, and hay, it doesnt hurt to replace your rotor and cap while you are down there either......
 
#3 ·
My local parts place didn't even have one listed, thats why I went with the Toyota one from the dealer for $6 and they had it one in stock....... didn't even think about NAPA..... oh well, next time..
 
#6 · (Edited)
This is all accesable from under the van, Passenger side. I jacked up the front right wheel just to give me a little more room to move around. I did it before the van was run for the day so that the exaust was nice and cool. If you are changing out the cap and rotor, you should already have them by now. First, disconnect the electrical connector on the top of the distributor. ( I used a small pair of Pliars to squeeze the tab as the other hand pulled it apart). Take the cap off of the distributor using a Phillips screwdriver ( a socket is probably an easier choice, but I used a screwdriver and do not know of the socket size at this moment. I think it is an 8mm). After removing the cap ( wires still attached ) tuck it out of the way. next step is super important !!!!! Note the direction of the rotor. In comparison of a clock, note what time it would say.... if need be, take a picture of it with a digital camera. Next loosen the 10mm collar bolt that is facing the drivers side on the bottom right ( as you look at the distributor). Next, Mark where the torx head bolts are tightend ( this will save you from having to adjust the timing when you are done. )Best bet is to wipe them and then use a Sharpie and mark each side of eace one. loosen and remove the 2 torx bolts . There are 2 breather hoses connected to the disributor. You can disconnect them or not, it makes the distributor a little easier to move around with them off, but it may take more time trying to get them off than just leaving them alone. My suggestion is to just leave them be. After the torx head bolts are removed, wiggle the distributor out of its " mounting" . you should now have what looks like my picture . Use a small screwdriver or pick to remove the old seal ( o-ring) taking care not to damage the surface it sits in. Most likely it wil break into pieces and you can just use your fingers. After the old one is off, put the new one in its place. Get some oil on your finger and coat the new seal with oil so that it will slide back into place easy. Ok, now Make sure that the rotor is facing the same direction as when you removed it. Carefully, but firmly slide the distributor back into is place. You may need to rotate the rotor a couple degreese in either direction to get it to set, but no more than 45 degreese, or it might set in the wrong groove. Replace the 2 torx head bolts and rotate the distributor to align with the marks that you earlier made and tighten. Now, tighten the 10mm collar bolt. If you are replacing the rotor, now is when you would do this. Now, reinstall the cap. If you are replacing, this would be the time to do this as well. Reconnect the elecrical connector. Next, Check everything over to make sure you got everything back together and snug.Now, you are finished. (If I missed anything, someone please let me know so I can add it)
Image
 
  • Like
Reactions: ZZZRSC
#19 ·
Great write up, thanks. I just bought a new cap, rotor & wires but I haven't done it yet. I haven't noticed any burning oil smell but if I'm going to replace everything else I might as well replace the o-ring too. :thumbsup:
 
#8 ·
thanx for the timely heads up.

i'm going back at my distributor this coming week, to replace the cap and rotor, and i will do this o-ring replacement while i'm under there.

after having it open last sunday, it will go a lot quicker this time.
i'm grateful that you wisely recommended that preventative maintenance. :chug:

i do have a tiny amount of oil weeping onto the exhaust, but i believe it's root cause is a failing valve cover gasket.
not sure how soon i'll brace mice elf to tackle that, ... maybe it won't be as much of a drag as i'm imagining.

btw, ... what dim bulb decided that phillips head bolts would be a good choice for the little distributor heat shield, there, instead of normal bolts?
those little buggers were nearly unpossible to get out.
there's almost no way to get a tool on them without dropping the exhaust.

i managed it, with a lot of cursing, and by using a short phillips screw tip bit, clamped in my vice grips at a right angle, with a piece of walnut levered against the exhaust, to provide upward pressure and keep the bit in the screw head.
i'm replacing mine with the "right" type of fastener when i do the work.

thanx again, for the smart tip.
 
#15 ·
thanx for the timely heads up.
btw, ... what dim bulb decided that phillips head bolts would be a good choice for the little distributor heat shield, there, instead of normal bolts?
those little buggers were nearly unpossible to get out.
there's almost no way to get a tool on them without dropping the exhaust.

i managed it, with a lot of cursing, and by using a short phillips screw tip bit, clamped in my vice grips at a right angle, with a piece of walnut levered against the exhaust, to provide upward pressure and keep the bit in the screw head.
i'm replacing mine with the "right" type of fastener when i do the work.

thanx again, for the smart tip.


At least you just had a dim bulb with a phillips head screw. I had a burned-out bulb with a flathead screw. To quote Homer J. Simpson, D'oh! :headbang: Definitely going to replace those with some sort of hex-head screw once I get it out of there.
 
#9 ·
Yeah,

Toyota makes great cars but some of the things, like the distributor heat shield attached with phillips screws, just drive me nuts. Also, the way the brake lines are routed through a hole in the strut is terrible as well. If they just had it attached with a bolt to the strut, it would have been a much better design.

I will give you a tip, make sure to change those philip screws to a hex bolt and you won't have problems with it next time. Just slide a wrench in and get it off. Also, for anyone who needs to do this in the future, if those screws won't budge, the easiest thing is to take the whole distributor assembly off along with the heat shield attached.
 
#12 ·
Just keep in mind that if oil is getting out at low pressure, imagine how much water/ degreaser is getting IN while spraying it with high pressure......
 
#14 ·
I haven't driven my van in almost a month now, after reading this post, and noticing that burning oil smell when I got home one day. I looked under the passenger side, to find oil dripping onto the exhaust and burning (flames included) one drop at a time. Just in time! Thanks for saving my van! I'll be replacing the gaskets tomorrow. As such, any advice for the valve cover gasket? :thumbsup:
 
#16 ·
I am so glad that I can be of help..... the abount of help i have gotton from this site due to others has been wonderful. I am glad that I can do my part.
As much as I like seeing a previa in the salvage yard with good parts on it, I also get sad that and a little upset at the same time.....

I wish i could help out with the valve cover gasket, but i have never done one before.... although i can't imagine it to be that hard.... good luck and I am so glad that you caught your little fire before it took your van..:clap:
 
#17 ·
Great piece. The valve cover gasket is as easy as pulling the cover off and replacing the gasket, I'd also suggest changing the PCV valve and while your at the dealer getting parts pick up a new PCV seal as I can guarantee the old one in your valve cover is ROCK HARD and the old PCV will not pull out nor will a new one slide in.

I did my cylinder head and gasket in the fall and had assumed that the O-ring would have come with the Toyota top end gasket set but it did not. I cleaned up and replaced everything else but the O-ring and it is leaking now, including the burnt oil smell. I picked one up at the dealer and it's sitting in the pocket behind the seat. I had been procrastinating about this job as I thought the valve cover needed to be removed to access the rear most camshaft bearing cap to remove the distributor. I guess it's way easier than I'd assumed.

Lastly a few years ago when I was looking at LOTS of Previas trying to find a good one to purchase I was at first unfamiliar with these cars but soon realized EVERYONE I looked at had a leaky valve cover gasket and distributor O-ring. Jason...
 
#21 ·
Question, I just ordered the parts from RockAuto to do this repair (except the O-ring which I got from NAPA). When I bought the parts on RockAuto's website, I didnt notice until after checkout that they were for a '95 Previa LE Vin Code A 2TZFE, which is the non-supercharged engine, right? I am supercharged, will this make a difference? I am also going to change out the supercharger oil before our trip. Ouch! $30/qt. from Toyota.
 
#22 ·
A suggestion on the Supercharger oil..... When I had Supercharged Previa models, I would always use the GM supercharger oil. it is only about $8 to $10 for a BIG bottle at the GM dealership. Out of the thousands and thousands of miles I used it. I never had any problems....
 
#25 ·
I am going to be doing all the same things you are, really shortly here.

Cap, rotor, wires, and shaft seal.

You know what's really crazy? The fact that I paid $7.95 shipping on a $0.99 part from NAPA. :lol:

I live 30 miles from the nearest NAPA, so it's less money than it would cost me in gas to get there and back to pick up the O-ring.

I still need to get the supercharger oil at some point in time.
 
#26 ·
Finally got this done today. The actual cap, rotor, wires, and shaft seal was easy. The hard part was disassembling the interior of the van. LOL

Image


Thanks all, I quite possibly prevented my Previa from burning up at some point in time. I need to change the valve cover gasket too, but that will have to be another day.
 
#28 · (Edited)
Finally got this done today. The actual cap, rotor, wires, and shaft seal was easy. The hard part was disassembling the interior of the van. LOL
Thanks all, I quite possibly prevented my Previa from burning up at some point in time. I need to change the valve cover gasket too, but that will have to be another day.
Note: I did my valve cover gasket, but it still leaks (though not nearly as bad as it did). Apparently there was some sort of sealant in the curved areas. So I'm going to have to do it again with sealant this time. :headbang: Lesson of the day: don't forget the RTV!
 
#30 ·
Just got around to having the valve cover gasket, distributor shaft seal, spark plug seals and thermostat replaced on my Previa yesterday. Like the others, I had been procastinating with the repair work for well over a month. Finally kicked myself in the @ss and had it all done in one go. Happy with the results. If you haven't done it yet, go out and do it NOW!


#32 ·
Don't Dismantle Distributor!

I just wanted to save people some agony by clarifying, don't dismantle the distributor. Just pull the bolts, then pull the unit off.

I did this fix and I wasn't sure what I was doing, dismantled the distributor and then it got ripped to bits.
But I bought a second hand replacement and after carefully following these instructions, and turning the crankshaft to match it, she's running better than ever. It's really a simple procedure, and as stated can keep your car from burning up.
good luck!