Toyota Forum banner

Ball joint life span?

31K views 40 replies 10 participants last post by  JohnGD  
#1 · (Edited)
I've been looking over my suspension since I'm install quick-struts next month and will have the suspension apart. As far as I know all the suspension parts are original and I have 210,000 miles. So worrying about catastrophic ball joint failures when the wheels flip outward I thought I'd check mine.

After looking online I found some methods to inspect the ball joints. There are no rubber boot tears and there is some grease around the joint. With the wheel off the ground there is no movement I can feel by push/pulling at 9 and 3 o'clock on the tire, and 12 and 6 o'clock.
I saw YouTube videos of other methods...
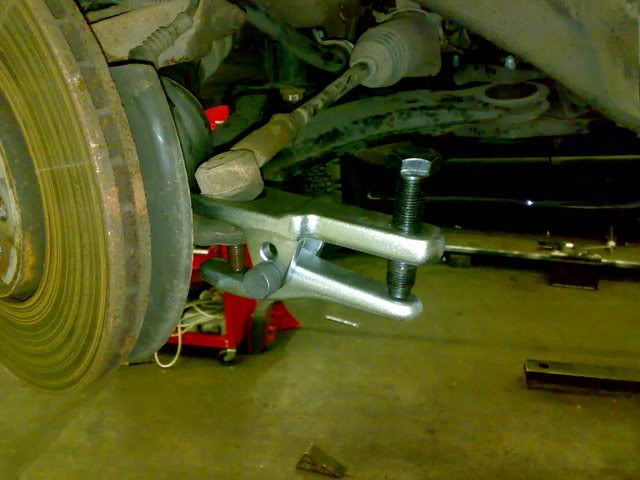
Raise front end and use large crow bar under tire (6 o'clock) to lift up tire and watch ball joint for up/down play,
.
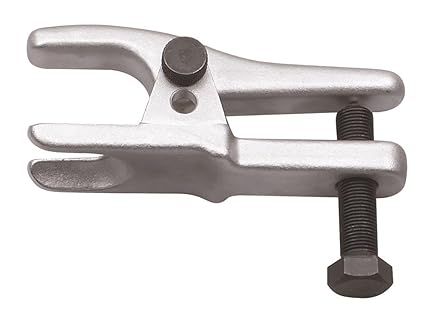
Also another method that while car is lifted and support undered the control arm prying between lower control arm and ball joint top,
.

The driver side ball joint appears to have no movement.

The passenger side has appears to have 1/16 of an inch in vertical play? I recorded it cause I don't feel I have the good idea yet on what is acceptable and what's not. Passenger ball joint check Note I have the front end on jack stands and put pressure on the lower control arm with a floor jack.

Is this worth the time and money to replace, or leave this go for now?
Do catastrophic failures of the ball joint where you see a wheel flip outward happen that often?
 
#2 ·
It's not uncommon to see the OE Toyota suspension joints last a ridiculously long time, especially if it's all highway miles. Had a 435,000 mile 04 Solara in a few weeks ago with original parts on it and a 200,000 mile timing belt.
 
#4 ·
Just try tot do your basic checks whenever you have your front end off the ground... shake the wheel up and down... left and right... any problems will be evident... also never ingore wheel-bearing noise either...

at the age of your car, if one ball joint goes bad replace all 4... ie 2 lowers and 2 tie-rods ends all at once and be done with it...

:D
 
#6 ·
Don't get cheap shit when you replace them, I did and in under a year I was replacing my ball joint again! Mook K series (not the Chinese RK series) are the better stuff to use if you don't get dealer parts. Moog has a new boot design on their joints that looks MUCH better than it used to be, they're actually sealed now with a grease vent, so you can't over grease them and water won't get in.
 
#8 ·
To check ball joints you first have to know if the methods on the net are for LOAD-BEARING or NON-LOAD-BEARING joints. For Toyotas with MacPherson suspension they are NON-load-bearing joints, so you leave the wheel on the ground, start jacking the chassis up to take approximately 1/2 the load off (best guess), and carefully put a pry bar against the joint to test for movement while protecting metals with pieces of wood.

IIRC, I don't expect to see movement on these types of joints. So I'd consider replacing them with OEM joints from TN sponsors or other online sources.

The good old Moog US-made joints were pretty good, but greasing them can be a PITA. They're heavier duty, not that Camrys need it, so it's your call.

The driver side ball joint appears to have no movement.

The passenger side has appears to have 1/16 of an inch in vertical play? I recorded it cause I don't feel I have the good idea yet on what is acceptable and what's not. Passenger ball joint check Note I have the front end on jack stands and put pressure on the lower control arm with a floor jack.

Is this worth the time and money to replace, or leave this go for now?
Do catastrophic failures of the ball joint where you see a wheel flip outward happen that often?
 
#9 ·
To check ball joints you first have to know if the methods on the net are for LOAD-BEARING or NON-LOAD-BEARING joints.
+1 I was about to respond the same thing. The McPherson strut front suspension has a non-load bearing lower front ball joint. Less stress on it means it takes much longer to wear out compared to the double wishbone front suspension design that the Lexus GS/IS and Honda's are known for.

The good old Moog US-made joints were pretty good, but greasing them can be a PITA. They're heavier duty, not that Camrys need it, so it's your call.
I installed a Moog greasable ball joint on my Solara. The only thing I don't like about them is there isn't enough anti corrosion coating on many Moog parts and it gets rusty very quickly.

Here's how I installed it:
 
#11 ·
Just to add my 2 cents. I just did a suspension revamp on my 97 Toyota Camry CE with 250,000 + miles.

I used oem parts for the lower ball joints. I did monroe quick struts on all 4 corners, Napa premium auto parts with lifetime warranty for inner and outer tie rods, lower control arms, link stabilizers, inner tie rod boot, and sway bar bushings.

The result is a stiffer steering wheel and much tighter suspension. At 250,000 mi my car was out of alignment because the bushings to the LCA, outer tie rod, lower ball joint, and link stabilizers were shot. Some were not torn but they were heavily worn. It would have not made sense to get an alignment because all those parts were heavily worn and at the slightest bump things my get out of alignment.

What I am getting at is even though it might look good on the outside dont rule out the possiblity that you have 200K + miles and these things wear out. All the new ball joints I tested were much stiffer. Good luck, I just did the job myself last week.
 
#13 ·
Thank you all for the additional comments. I appreciate the help!

When do you decide to let a part go, as you expect to keep the car 2-3 more years and when do you lean on replacing? I suppose all of you may struggle with this question so how do you decide?

I'm replacing the struts because I've been meaning to do it for years and one started to finally make a racket and the ride feels terrible. My ball joints "look" ok but have a lot of miles and could use a replacement but balancing out savings vs return on invest keeps popping up in my mind.

These are my front end, end links. They look like they could use replacement also but how important are they? Is that play "acceptable" for a old car for the time being.
Video: Front end end links


Other suspension items I eyeballed but pushed down my priority list:
Control arms, Rear lateral links, Rear end links.

How do you all decide what to replace when it all could use replacement?
 
#14 · (Edited)
The sway bar links aren't all that important. They'll make noise, and you may notice a little more body roll, but that's it. They won't affect tire wear or the safety of the vehicle.

Rear lateral arms will also cause tire wear. With the cost of tires these days, if you notice that they are loose, replace them. Same with the lower control arms.

Ball joints will cause uneven tire wear and are unsafe to drive on if worn. Best to replace them preemptively, especially if the boots are torn. That being said, if the boots aren't torn, they aren't making noise, and they are still tight, leave them be. The front end parts Toyota used on these cars can live a really long time.
 
#16 · (Edited)
Image
This is me right now! :grin:


So I'm trying to replace my lower control arm and ball joint and the D#M ball joint castle nut won't come out! I'm having the EXACT same issue as speedkar9 in his video. The cotter pin wouldn't come out, tried using vise grips and all sorts of tricks. Cut the cotter pin at the loose end and tried using a punch and nail to drive it thru, no go. Tried drilling it out but battery drill died. Break time....came inside to the computer.

I'm not even sure if I get the pin drilled out what will be next. There's no way to get a socket on the nut, only a wrench and leverage really blows a big one with that. I'm VERY tempted to forget replacing the lower control arm and ball joint at this point. They seem decent but I was just going to swap them out with a complete Beck Arnley LCA and ball joint combo. I'd just have to do return shipping to rock auto.

Removing the axle nut, taking the axle aside, and then cutting/grinding off the castle nut and then pressing out the ball joint (I figure that will be stuck too) doesn't sound to pleasing and i've never grinded of a nut before. I could buy a cheapie from harbor freight, i do own a Dremel though. Anyone have some moral guidance ?
 
#30 ·
So I'm trying to replace my lower control arm and ball joint and the D#M ball joint castle nut won't come out! I'm having the EXACT same issue as speedkar9 in his video.
Well I went through a few struggles in that video, but I later learned that once the drive shaft is out, the ABS ring can be pried out of the knuckle. That will allow a socket to go on there and you can whip off the castle nut with an impact.
 
#17 ·
Link two wrenches together or put a section of pipe on the one wrench. Though odds are anything you have at home will be of dubious quality and may round the nut. The best course of action is going to be to pull the ball joint off the control arm, pull the axle from the hub, then go straight down with an air impact and an extension and just zap it right off past the cotter key. That's how I've done them at work, but usually I can just eat the cotter key with the castle nut using a good pair of linked wrenches.


Image
 
#18 · (Edited)
Wahoo! :thanks:The two wrenches together did the trick! I tried slipping a few different sections of pipe over the wrench but it wouldn't fit, the one end is rather large so figured I was out of luck.

Just got rent a ball joint separator tomorrow and see if I can now pop this ball joint free!

Still in shock that the castle nut broke free. haha! I loosed the lower control arm bolts and boy are those on tight! Had to use a 3 1/2 foot longer cheater bar (two pipes), thought for sure i'd be bleeding any moment after something broke apart in my cheater bar. I haven't used a cheater bar that long since my VW days of taking off the flywheel gland nut.
 
#19 ·
Image
Image


If you can rent one of those, rent one. It's shown on a tierod but it works the same for a ball joint. Hammer the forked end under the ball joint, the tongue presses on the stud, tighten the nut down as tight as you can, then smack the knuckle with a hammer, and it'll pop right free!
 
#20 ·
Update. Had to buy the tool since AutoZone and advanced auto didn't have. Got it at harbor freight. Had to make a small modification to the tool. I'll grab a photo of it but it did work. Putting the lower control arm in was a hassle to. Got the strut in also that went smooth.

I'm on the driver side suspension now. Looks like this castle nut is stuck even worse. I was at it a while . Called it a night and sprayed more pb blaster and tapped with hammer to let it soak overnight. I may try dremmeling the nut and peeling it off with a chisel if I'm still having no luck tomorrow.
 
#21 ·
I may try dremmeling the nut and peeling it off with a chisel if I'm still having no luck tomorrow.
That's what I resorted to. Split it on both sides lengthwise then popped it off with a chisel. Did it with the whole arm in a vise on my workbench.
 
#22 ·
I'm still not able to loosen this castle nut. I've tried using a punch and chisel to rotate the nut and it didn't move. I Tried my dremel tool but that thing is wimp for this job, the cut-off disk edge gets worn out way to fast and the cutting is to slow. The castle nut is starting to strip now also.

Seems like the next option is to grind or cut the nut off. Should I get a cut-off disk or a grinding disk to go with a cheap angle grinder?
 
#23 ·
Seems like the next option is to grind or cut the nut off. Should I get a cut-off disk or a grinding disk to go with a cheap angle grinder?
It might be hard to avoid hitting the knuckle using a grinder. I'd stick with the Dremel. Are you using the cut-off disks that have the fiber-reinforcement? They work better. Still slow, but better.

Like these on eBay:

Image
 
#26 ·
Got that nut off with the Dremel tool and the cut-off wheel you suggested!
:thumbsup::chug:
I'm gonna save this castle nut as a trophy!
I ended up not being able to loosen the axle nut with a large breaker bar. So I went back to cutting the nut with it on the car, and after a few cuts and chiseling I started to peel it off, sweet success! Thank again for the suggestion on the cut-off tool wheels for the Dremel. I couldn't have finish this job without those!

On thing is i damaged the cv-joint boot by a slip with the Dremel. I only nicked it and there is a pin hole leak where grease can come out if i squeeze the boot at that area. Gonna see if I can just plug that up with some sealant since its so small. Anyone have a suggestion on a good adhesion sealant for this?
 

Attachments

#27 ·
Glad to hear you got that stubborn castle nut off!

I'd use a silicone sealant, also called RTV. Clean the grease off the outside very carefully. Use a rag or paper towel with a little rubbing alcohol to get all the grease off.
 
#28 ·
I'd get a rubber specific glue like inner tube patch stuff or maybe an inner tube patch kit for a bicycle, silicone sealant won't bond to the rubber of the CV joint boot correctly. Any repair will likely leak grease at a later date though, and that grease makes a hell of a mess!
 
#29 ·
CV Boot repair.
Well I decided to try the rubber cement and it seems to have worked but I haven't done more than 2 miles on the car since the repair. A note for anyone else trying to use bicycle rubber cement patch sealant (Monkey grip brand).... its the constancy of water when first opened so I noticed on the second day that either with air getting into the sealant tube it became a little slower in movement. The first day the sealant would actually go down inside the hole...and it kept happening... so i spun the cv joint and boot upside down and that helped a little...I also blowed on the cement and that seemed to help it set up in a position even though i only did it for a few seconds. I also did some googling and Shoe Goo is said to work by some 4x4 off road folks. I'll update if this holds up or not.

On this topic I'd like to replace that boot but it appears to be an original axle. I always thought it was fine cleaning the old grease out and re-greasing the joint and putting on new boots but I saw some people say new axles are cheap and might as well. I suppose I'd prefer the new boot for now though.

Anyone know what cv joint boot to buy for a Japan built Camry? RockAuto list US built boots but I see GKN brand listed and that is on the boots on the axle.
 

Attachments

#32 ·
Well the CV joint boot repair experiment is over :facepalm::disappoin Only put about 50 miles on the repair. It was ok a low speeds and seemed to have blown while on the highway. Time to replace the boot. Was hoping it would last a week. dam. oh well. Bitter, you weren't kidding it would be a mess. This is a pin hole leak , can't imagine a larger leak. nasty mess.
 

Attachments

#33 ·
Oh yes, a nasty mess indeed! Wear gloves, otherwise you'll end up with little bits of grease all over the house. On door knobs, doors, handles, counters, and clothes, even on the dog! Buy a bag of rags and a pint of mineral spirits to wipe it all up with, wet the rags with mineral spirits and wipe wipe wipe then wipe some more.


As for the axle boot, if the axle is in otherwise good shape you should be able to get a boot kit and replace just the boot for about $30 but if you've got more than 100K on the axle a new axle is in order and I do mean new. You can get rebuilt or you can get new, if there's a core charge then it's a rebuilt unit. New ones seem to be better than the rebuilt.
 
#34 · (Edited)
Thanks Bitter. I'd like to reuse the axle if I can. I read a little in past post about some new axles not being so good and I'm in a bit of a rush to replace the outer boot also. I think i'll gamble and try just replacing the boot unless I get in over my head while replacing that boot.

I did a little reading but it sounds like the outer boot (driver side) can only be replaced by first removing the axle and then removing the inner cv roller assembly?
I'd think i could just take a c-clip out of the outer cv-joint end and slide the cage assembly off, etc, and then put a new boot on. No go?

The only DIY with photos was this one and it was for the passenger side. http://www.toyotanation.com/forum/1...97-2001/255181-how-replacing-passenger-s-side-cv-boots-warning-many-photos.html
 
#35 ·
You can do it on the car but you need to have room to swing a hammer to remove the joint from the shaft, it's held with a snap ring. Usually the work is done in a vice, you will need a brass drift to hit the joint off and on with though. They also make a speed boot or split boot that's slid on and glued shut but I'm dubious about the long term reliability. There's a thread by Haloruler over in the MR2 section about his car and he's got a boot problem too, he's elected to replace just the boot with a kit from Toyota, I posted some links about boot replacement.
 
#36 ·
Well I tried and lost...at least as far as being able to replace the one boot without removing the whole axle. I didn't realize the outer CV joint had a raised edge. Good news is I got the axle out relatively quickly. I was able to pickup a new boot for the outer side from NAPA but they and all the other local parts stores don't carry the inner. The inner isn't torn but I wanted to replace it. Friday is the earliest they said it could arrive from another warehouse so I'm gonna reuse the old functioning boot for now.

Question now. The inner boot and bearings.... their wasn't necessarily grease in there it was a liquid grease that came out when I removed the boot (luckily I had a catch pan under already). How much grease do I pack back in on the inner joint with the cup and 3 roller bearings? About the same amount that came with the cv boot kit for the outer?