Gen 1 Avalon stereo install help thread
I just completed my new stereo install in my 97 Avalon, with the help of Crutchfield (those guys rock!). I have little experience doing this before, but with planning and Crutchfield customer support, I felt like a pro. Here is what I did.
Mine has the 6 speaker system, so there is a factor amp. Those of you lucky enough not to have the 6 or 7 speaker system can get a wiring harness. I had to bypass the factory amp, which meant running totally new wires.
Bye the way, when doing this I found out why the 3 disc cd changer stopped working. It was the chucky cheese tokens the previous owner had in there. The head unit was made by delco, and the 3 disc changer was alpine—how about that.
Just for reference, here is the staring pic:
http://drri.home.comcast.net/avalon/before_install.jpg
Our Avalons have a double din space. You will need an adapter if you use a single din stereo--see final pic for what mine looks like.
To get the trim piece off, find something with a 90 degree bend, and start at the bottom. There are two slight indentions right where the bottom clips are that hold the trim piece. The 90 degree bend allows you to pull. I was getting no where with a screw driver or butter knife. Here is what I used:
http://drri.home.comcast.net/avalon/trim_removal.jpg
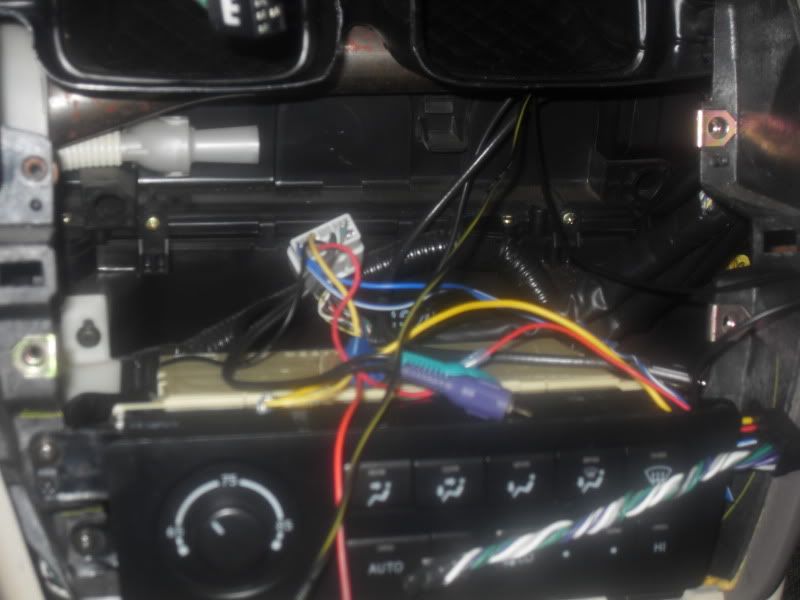
You will have to unplug the hazard button. The metal brackets holding the stereo also holds part of the climate control. No big surprises undoing these.
http://drri.home.comcast.net/avalon/stereo_removed.jpg
As you can see with it removed, there are two plugs. Crutchfield told me one plug is to control an optional cd changer in the trunk and to ignore it. The other plug is the one that connects the factor head unit to the factor amp. The only thing you will pull from this plug is the remote antenna power. Its going to be either a black with red stripe wire, which I did not have, or the red wire right on the upper right hand corner, next to the green wire. This is necessary for good reception even if you do not have a power antenna, because our in glass antennas are actually amplified. If you do not connect this your reception will stink.
Another note, there are two antenna plugs, one bigger and one smaller (in the pic I am holding the smaller one). Most new head units will only have a opening for the larger one. It was explained to me that our original system could move between two antenna systems for the best reception and to just ignore the smaller one, because most new head unit cannot do this.
Now you have to get to the factory amp, which is behind the glove box.
Start by removing the right kick panel. It has a plastic bolt, then you just pull it off.
Your next step will be to remove the L shaped trim panel, with also has a cover attached to it, behind it. This cover came off easily as I removed the L shaped trim panel. The L shaped trim panel has three bolts. Two are easy to see. The third you have to open the glove box and remove a cover to see:
http://drri.home.comcast.net/avalon/L_shaped_trim_bolt.jpg
After you removed the bolts, you will pull off the L shaped trim piece. I had to play with opening and closing the glove box door while getting it off. This next pic will help so you know where the tabs are that holds it in.
http://drri.home.comcast.net/avalon/L_shaped_trim_clips.jpg
The glove box door comes off easily with three bolts.
Four screws hold the actual glove box, and there are connectors that have to be removed, including one that I think runs to the air bag (oh year, before you batter is disconnected). You will have to work a little to get the glove box proper out.
When you finally get it all removed, this is what you will see:
http://drri.home.comcast.net/avalon/amp.jpg
That is your factory amp on the right, with two connectors in it. It is attached with two bolts on the rear side of it.
Here is a closer look at the plugs:
http://drri.home.comcast.net/avalon/amp_plugs.jpg
What I did to work with these was to cut back the insulation about an inch. It’s tight, but there was enough room to reach through the glove box, strip wires, and attach new wires. If you do not have a wire stripper already, buy the smallest one you can. Mine is quite large and was cumbersome to work with.
You will basically end up running 10 wires from here to new head unit (8 speaker wires, constant power, and accessory power).
You can consider the blue (white in some Avalons) one the output—out to the speakers, and the green (grey in some Avalons) the input-inputs from the head unit. From the input one you will only draw your Accessory Power. Not sure why, but Crutchfield recommended drawing power from the one I am designating output.
Here is the wiring schema for each plug courtesy of Crutchfield:
White or blue plug at amplifier (output)
FUNCTION / WIRE COLOR
Right Front SPKR + / LIGHT GREEN – this and the next 3 go to new HU
Left Front SPKR + / PINK
Right Rear SPKR + / RED
Left Rear SPKR + / BLACK
Woofer + (7th SPKR) / GREEN/BLACK – missing on mine
Constant 12 Volt Input / WHITE/BLUE – where I drew power
Right Front SPKR - / BLUE – this and next 3 go to new HU
Left Front SPKR - / VIOLET
Right Rear SPKR - / WHITE/BLUE
Left Rear SPKR - / YELLOW
Chassis Ground / BROWN – the ground I used
Chassis Ground / BROWN
Woofer - (7th SPKR) / GREEN/RED – missing on mine
Constant 12 Volt Input / WHITE/BLUE
Gray or light green plug at amplifier (input)
FUNCTION / WIRE COLOR
Remote Turn On / RED – you could do your antenna power here, or where I mentioned earlier
Accessory 12 Volt Input / GRAY – where you get your accessory power
Constant 12 Volt to Radio / WHITE
Beep Input from Radio / BLACK
Left Front SPKR + Input / GREEN
Right Front + Input / RED
Illumination Input / GREEN
Illumination Output to Radio / GREEN
Accessory 12 Volt to Radio / BLACK
Chassis Ground to Radio / BLACK
Signal Ground Input from Radio / BROWN
Mute Input from Radio / BLUE
Left Rear SPKR + Input / WHITE
Right Rear SPKR + Input / YELLOW
Additional notes:
I also installed my XM skifi2. I got a bracket on line from pro-fit (google pro-fit). I also got a new power source, a cig lighter socket to wire in accessory power from radio shack, so I did not have to have wires coming from the cig ligher below the radio. It was easy to get through the fire wall with my XM antenna with the glove box removed. My new head unit I bought also has an aux port in the back so I could wire directly into it, versus using the fm modulation option. Thus, I have three sources 1-tuner, 2-cd, 3-xm. I wanted to keep my skifi2 so I cam move my xm from home, to car, and to my office. That is why I did it this way.
Here is my finished product:
http://drri.home.comcast.net/avalon/finis.jpg
I just completed my new stereo install in my 97 Avalon, with the help of Crutchfield (those guys rock!). I have little experience doing this before, but with planning and Crutchfield customer support, I felt like a pro. Here is what I did.
Mine has the 6 speaker system, so there is a factor amp. Those of you lucky enough not to have the 6 or 7 speaker system can get a wiring harness. I had to bypass the factory amp, which meant running totally new wires.
Bye the way, when doing this I found out why the 3 disc cd changer stopped working. It was the chucky cheese tokens the previous owner had in there. The head unit was made by delco, and the 3 disc changer was alpine—how about that.
Just for reference, here is the staring pic:
http://drri.home.comcast.net/avalon/before_install.jpg
Our Avalons have a double din space. You will need an adapter if you use a single din stereo--see final pic for what mine looks like.
To get the trim piece off, find something with a 90 degree bend, and start at the bottom. There are two slight indentions right where the bottom clips are that hold the trim piece. The 90 degree bend allows you to pull. I was getting no where with a screw driver or butter knife. Here is what I used:
http://drri.home.comcast.net/avalon/trim_removal.jpg
You will have to unplug the hazard button. The metal brackets holding the stereo also holds part of the climate control. No big surprises undoing these.
http://drri.home.comcast.net/avalon/stereo_removed.jpg
As you can see with it removed, there are two plugs. Crutchfield told me one plug is to control an optional cd changer in the trunk and to ignore it. The other plug is the one that connects the factor head unit to the factor amp. The only thing you will pull from this plug is the remote antenna power. Its going to be either a black with red stripe wire, which I did not have, or the red wire right on the upper right hand corner, next to the green wire. This is necessary for good reception even if you do not have a power antenna, because our in glass antennas are actually amplified. If you do not connect this your reception will stink.
Another note, there are two antenna plugs, one bigger and one smaller (in the pic I am holding the smaller one). Most new head units will only have a opening for the larger one. It was explained to me that our original system could move between two antenna systems for the best reception and to just ignore the smaller one, because most new head unit cannot do this.
Now you have to get to the factory amp, which is behind the glove box.
Start by removing the right kick panel. It has a plastic bolt, then you just pull it off.
Your next step will be to remove the L shaped trim panel, with also has a cover attached to it, behind it. This cover came off easily as I removed the L shaped trim panel. The L shaped trim panel has three bolts. Two are easy to see. The third you have to open the glove box and remove a cover to see:
http://drri.home.comcast.net/avalon/L_shaped_trim_bolt.jpg
After you removed the bolts, you will pull off the L shaped trim piece. I had to play with opening and closing the glove box door while getting it off. This next pic will help so you know where the tabs are that holds it in.
http://drri.home.comcast.net/avalon/L_shaped_trim_clips.jpg
The glove box door comes off easily with three bolts.
Four screws hold the actual glove box, and there are connectors that have to be removed, including one that I think runs to the air bag (oh year, before you batter is disconnected). You will have to work a little to get the glove box proper out.
When you finally get it all removed, this is what you will see:
http://drri.home.comcast.net/avalon/amp.jpg
That is your factory amp on the right, with two connectors in it. It is attached with two bolts on the rear side of it.
Here is a closer look at the plugs:
http://drri.home.comcast.net/avalon/amp_plugs.jpg
What I did to work with these was to cut back the insulation about an inch. It’s tight, but there was enough room to reach through the glove box, strip wires, and attach new wires. If you do not have a wire stripper already, buy the smallest one you can. Mine is quite large and was cumbersome to work with.
You will basically end up running 10 wires from here to new head unit (8 speaker wires, constant power, and accessory power).
You can consider the blue (white in some Avalons) one the output—out to the speakers, and the green (grey in some Avalons) the input-inputs from the head unit. From the input one you will only draw your Accessory Power. Not sure why, but Crutchfield recommended drawing power from the one I am designating output.
Here is the wiring schema for each plug courtesy of Crutchfield:
White or blue plug at amplifier (output)
FUNCTION / WIRE COLOR
Right Front SPKR + / LIGHT GREEN – this and the next 3 go to new HU
Left Front SPKR + / PINK
Right Rear SPKR + / RED
Left Rear SPKR + / BLACK
Woofer + (7th SPKR) / GREEN/BLACK – missing on mine
Constant 12 Volt Input / WHITE/BLUE – where I drew power
Right Front SPKR - / BLUE – this and next 3 go to new HU
Left Front SPKR - / VIOLET
Right Rear SPKR - / WHITE/BLUE
Left Rear SPKR - / YELLOW
Chassis Ground / BROWN – the ground I used
Chassis Ground / BROWN
Woofer - (7th SPKR) / GREEN/RED – missing on mine
Constant 12 Volt Input / WHITE/BLUE
Gray or light green plug at amplifier (input)
FUNCTION / WIRE COLOR
Remote Turn On / RED – you could do your antenna power here, or where I mentioned earlier
Accessory 12 Volt Input / GRAY – where you get your accessory power
Constant 12 Volt to Radio / WHITE
Beep Input from Radio / BLACK
Left Front SPKR + Input / GREEN
Right Front + Input / RED
Illumination Input / GREEN
Illumination Output to Radio / GREEN
Accessory 12 Volt to Radio / BLACK
Chassis Ground to Radio / BLACK
Signal Ground Input from Radio / BROWN
Mute Input from Radio / BLUE
Left Rear SPKR + Input / WHITE
Right Rear SPKR + Input / YELLOW
Additional notes:
I also installed my XM skifi2. I got a bracket on line from pro-fit (google pro-fit). I also got a new power source, a cig lighter socket to wire in accessory power from radio shack, so I did not have to have wires coming from the cig ligher below the radio. It was easy to get through the fire wall with my XM antenna with the glove box removed. My new head unit I bought also has an aux port in the back so I could wire directly into it, versus using the fm modulation option. Thus, I have three sources 1-tuner, 2-cd, 3-xm. I wanted to keep my skifi2 so I cam move my xm from home, to car, and to my office. That is why I did it this way.
Here is my finished product:
http://drri.home.comcast.net/avalon/finis.jpg
")