Toyota Forum banner

Need to replace my rubber window channels

1 reading
137K views 36 replies 14 participants last post by  wesley220  
#1 ·
Hello, I need to replace my window channel runs on both the driver and passenger front windows of my 2004 toyota corolla s. Unfortunately, I can't pay dealer prices... so I'm looking online. I'm taking a shot in the dark here, but does anyone know the part number or even the dimensions of these channel runs??
Any help is appreciated! :)
Thank you
 
#2 ·
#4 ·
I am going to have to do this on my car by the looks of it. The driver's side rubber has always been loose, but now it's kind of bunching up and making the glass tilt slightly...not what I want. Is there a DIY thread on this somewhere? If not I would be happy to make one. I hate the Haynes manual and prefer to avoid using it as much as possible.
 
#5 ·
I do recommend replacing these. They are especially bad on 2003, 2004, and some 2005 models. The problem is eventually it bunches up near the front and the window wont close all the way.

Besides the bugs, rain, and noise you get eventually it can cause the window regulator to snap after all the times of rolling the window into it (power window cars).
 
  • Like
Reactions: SWengert
#6 ·
I guess I never really inspected my windows until today. I have a question: Is it normal for the windows to be, well, loose, when halfway down? The mount of play (side to side, forwards and back) is pretty ridiculous, but I'm not that familiar with these cars.

I know there's a TSB out for this...does anyone have a link for it? Basically, I'm wondering if I'm going to need to replace more than just the window seals while I'm in there...at least on my old car, the window rode on three tracks, the center of which held the gears for the winding mechanism...the window seals really didn't play any part in "orienting" the window like they seem to be on my Corolla.

Even more puzzling to me is that the rear windows are whistling slightly but they don't even remotely appear to be out of alignment or losing seal. Something is amiss here.
 
#7 ·
+1 for the windows seeming loose, my rear ones seem really loose, they rattle when I drive over a bump. The front ones are a little loose as well, but not as bad as the rear ones. I have a whistle from my drivers front window, sounds as if its from the very bottom front edge of the seal, but it's only when I'm doing ~120km/h so I can't be bothered.

MD1032 said:
I guess I never really inspected my windows until today. I have a question: Is it normal for the windows to be, well, loose, when halfway down? The mount of play (side to side, forwards and back) is pretty ridiculous, but I'm not that familiar with these cars.
 
#8 · (Edited)
NVH
NV006-05

REVISED April 19, 2005

Title: WIND NOISE FROM DOOR GLASS WINDOW RUN Models:

'03 - '05 Corolla (NAP) TSB REVISION NOTICE:

July 19, 2006: The previous step 4 and its note have been removed from the Front Doors Repair Procedure and the Rear Doors Repair Procedure.
Step 6 has been updated in the Front Doors Repair Procedure and the Rear Doors Repair Procedure.
The Required SSTs table has been updated to the current format.

December 26, 2005: The current part numbers in the Parts Information table have been updated.
Previous versions of this TSB should be discarded.

Introduction:

Some customers may experience wind noise from the front or rear door glass area. The window run has been improved to resolve this condition.

Image


Applicable Vehicles: ^ 2003 - 2005 model year Corolla (NAP) vehicles produced BEFORE or AFTER the VINs shown.
Part numbers vary based on Corolla vehicles produced before or after the VINs (refer to the Parts Information table in this TSB).

Image


Warranty Information

Applicable Warranty:

This repair is covered under the Toyota Comprehensive Warranty.
This warranty is in effect for 36 months or 36,000 miles, whichever occurs first, from the vehicle's in-service date.

* Warranty application is limited to correction of a problem based upon a customer's specific complaint.

Image


Parts Information

Image


Required Tools & Material

Image


Required SSTs

Front Doors Repair Procedure

Refer to steps 1 - 6 in the Technical Information System (TIS): 2003, 2004, or 2005 model year Corolla Repair Manual: Engine Hood/Door: Front Door: Overhaul.

NOTE: Use the same procedure for the LH side as the RH side.

1. Place the window in the down position.
2. Remove the window run. Completely remove the double-sided tape remaining on the frame.
3. Thoroughly clean the door frame using a white body shop towel and Kent(TM) Acrysol. NOTE: Do NOT use red shop towels. These towels contain silicone.
4. Install the door glass window run.

Image


A. Position the glass run at the No. 2 and No. 3 corners of the door frame and then attach the middle part of the run.
B. Insert the glass run into the window run channels.

NOTE: ^ Do NOT apply water or lubricant to the glass run when inserting it into the door. ^ Make sure the glass run fits securely into the holes of the door frame.

5. Using a plastic pry tool, press the glass run into the upper portion of the door frame to securely adhere the double-sided tape.
6. Fully close the window.

Rear Doors Repair Procedure

Refer to steps 1 - 4 in the Technical Information System (TIS): 2003, 2004, or 2005 model year Corolla Repair Manual: Engine Hood/Door: Rear Door: Overhaul.

NOTE: Use the same procedure for the LH side as the RH side.

1. Place the window in the down position.
2. Remove the door glass window run. Completely remove the double-sided tape remaining on the frame.
3. Thoroughly clean the door frame using a white body shop towel and Kent(TM) Acrysol.

NOTE: Do NOT use red shop towels. These towels contain silicone.

4. Install the door glass window run.

A. Insert the glass run into the front side of the window run channel. Then position the glass run in the No. 6 corner.
B. Fit the rear of the glass run into the division bar window channel. Then position the glass run in the No. 7 corner.
C. Press the center section of the window run into the door frame.

5. Using a plastic pry tool, press the glass run into the upper portion of the door frame to securely adhere the double-sided tape.
6. Fully close the window.
 
#20 · (Edited)
I'm afraid I won't be much help. I'm not an expert at decoding VIN's.

I simply ordered the following parts based on the fact that I have a Canadian-built 2005MY car and the example VIN refers to a 2003MY car.

68141-02211
68142-02160
68151-02191
68152-02160

I'm assuming you tried to just look at the first digit (Canada or USA made), and the last six (serial). What's unusual about yours?

By the way, I had to actually call Kent and order the Acrysol over the phone, since I do not work for a shop nor own one. Then they sent me the bill in the mail and then I paid it online. I asked and they said I couldn't just order it online. I guess they only usually sell in bulk to shops.

Once you finish your installation, it would be great if you could let me know what I could trim from my post. I'm thinking about eliminating the rear door section altogether since it's identical to the front in every way.

My comments about installation after driving the car today: The 9gen Corolla doors seem to use a superior design to most cars. Not only do the rear windows go down all the way (genius regulator design), I expected my car to rattle quite a lot after taking the doors apart and putting them back together, and it actually seems to be quieter and less rattley now, presumably because the rear windows were getting really loose before. On my previous cars (Hondas), it never seemed like it was possible to take apart any interior trim or panel and put it back together with the exact same tight fit it started with. Oh, and the wind noise is gone, too!

Now if I could only get the @$#%#%&&% radio to stop rattling!!
 
#9 ·
MasterTecInSTL said:
Warranty Information
Applicable Warranty:
This repair is covered under the Toyota Comprehensive Warranty. This warranty is in effect for 36 months or 36,000 miles, whichever occurs first, from the vehicle's in-service date.
* Warranty application is limited to correction of a problem based upon a customer's specific complaint.
Doesn't this mean that Toyota won't perform this fix anymore, seeing as everyone's out of warranty?
 
#16 ·
Is replacing window channel run (driver side) something easy to do for a clueless mechanical idiot like me?

The procedure sounds simple but am I missing something?

Do I just roll the window down all the way. Then pull on the rubber all along the window frame to remove the old window rubber. Clean the window frame where the window rubber used to be using the Kent Acrysol.

Now just install the window rubber using that tool to press it into the mirror corner and window corners.

So i don't need to tear apart the door panel and disconnect anything? I can just work with the window rolled down and just do everything along the window frame?

If I have to tear apart the door panel, I'd probably destroy the thing but if I only need to just work along the window frame to install the new window rubber channel, that's great.

Is it that simple?

Front Doors Repair Procedure


1. Place the window in the down position.
2. Remove the window run. Completely remove the double-sided tape remaining on the frame.
3. Thoroughly clean the door frame using a white body shop towel and Kent(TM) Acrysol. NOTE: Do NOT use red shop towels. These towels contain silicone.
4. Install the door glass window run.


Image
This image has been resized. Click this bar to view the full image.
Image


A. Position the glass run at the No. 2 and No. 3 corners of the door frame and then attach the middle part of the run.
B. Insert the glass run into the window run channels.

NOTE: ^ Do NOT apply water or lubricant to the glass run when inserting it into the door. ^ Make sure the glass run fits securely into the holes of the door frame.

5. Using a plastic pry tool, press the glass run into the upper portion of the door frame to securely adhere the double-sided tape.
6. Fully close the window.
 
#17 · (Edited)
I haven't ripped mine apart yet as I am still waiting to receive parts for it. I believe it is necessary to remove the door panel. Not to worry, Toyota came through with a GENIUS design here. Removing the inside panel is a piece of cake because the handle and lock stay inside the door when you remove it! See video:


TSB said:
Front Doors Repair Procedure

Refer to steps 1 - 6 in the Technical Information System (TIS): 2003, 2004, or 2005 model year Corolla Repair Manual: Engine Hood/Door: Front Door: Overhaul.
Those steps in the service manual (see page 75-7) are basically for taking apart the inside of the door...all you really need to do probably is take the inside panel, speaker cover, and the vapor barrier off.

When you think about it, it's really in your best interests to remove the panels anyway. First, you might want to just remove the window glass altogether to make it easier to slip in the window runs, or to clean the window's edges, or to clean the channels before putting in the new window runs. Second, you might want to adjust/tighten the regulator (not sure if that's applicable on this model).
 
#18 · (Edited)
Here's the DIY. I would still watch the video, but the pictures should be enough.

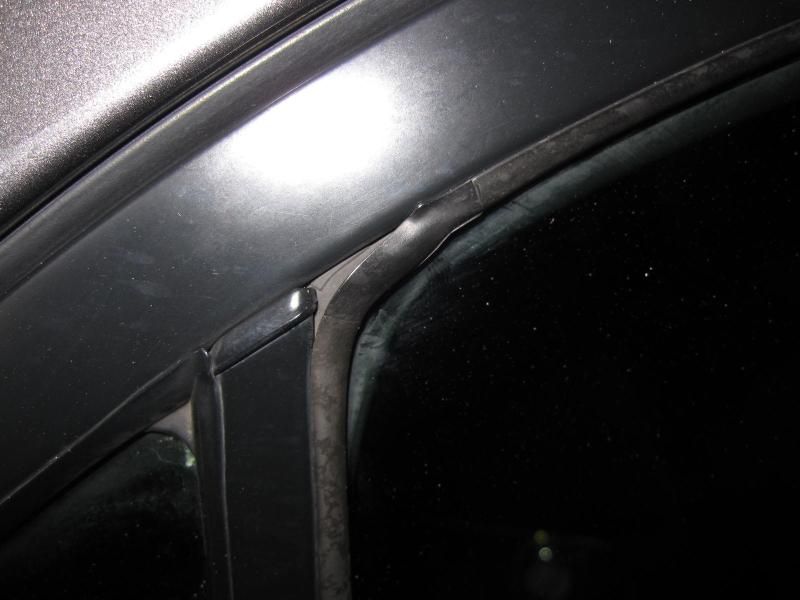
First off, what are we dealing with? You'll notice that your front doors have what looks like a bunch-up of the window runs near the side-view mirrors. When you get your new parts and lay them on the car, you'll notice that, well, that top part is definitely longer than the original...by about an inch!

Image


This freaked me the heck out initially. I thought I had gotten the wrong parts. Now I have diagnosed the root of the problem: the original parts are the wrong size. How this got past Toyota's QC, I do not know.

Here is a picture of the original driver's side in my car showing two "corners"...one molded into the window run itself and one caused by the window repeatedly crushing it into the corner and forming a new corner.

Image


And here's a picture of the same problem in the rear. It's subtle, but that part is too small, and the molded corner is not where it should be.

Image


What do you need to fix it? Read post #8 in this thread. It contains the TSB as transcibed by MasterTechinSTL. Order those parts from people like Gary (Toyotapartsman), or your local dealer.

Also, you'll need these:

Image


-1.5-2 hours of your time
-Flashlight
-Kent Acrysol (You can call the company directly and order it. It is now available in a convenient aerosol can.)
-Clean towel
-Small "electronics" flathead screwdriver
-Philips head screwdriver
-Duct-taped thin flathead screwdriver
-A chair, for sitting in while you work on the inside door panels. Much more comfortable than using the seats in the car.
-(optional) Service manual
-(optional) Magnetic parts tray (I love these!)

Let's start with the front.

Image


Insert your duct-taped screwdriver in between the armrest and the door panel, and pry directly upwards on each end, trying to remove it straight up. Be careful, do not try to twist anything.

Image


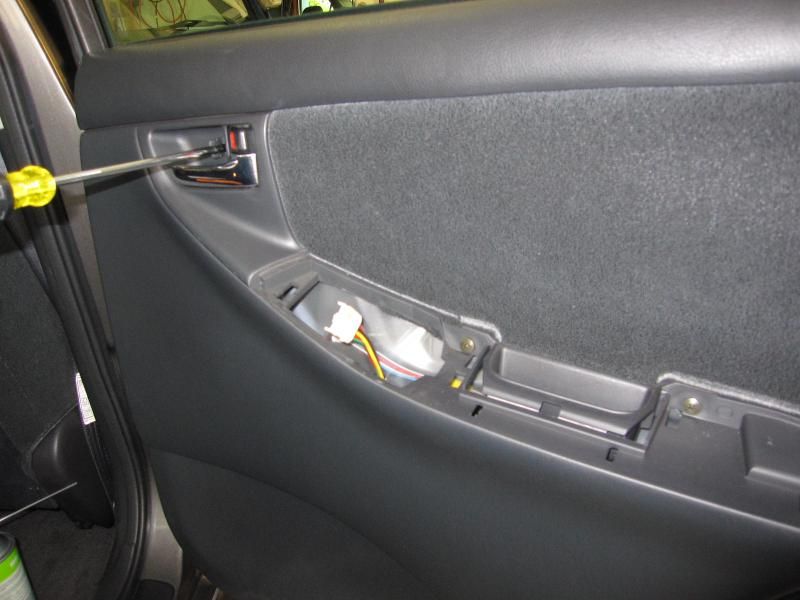
Remove the panel containing the power window switch by prying up on the front (picture really isn't the right place to pry from), and then lifting out forward, as there is a claw on the butt end. There are two connectors on the front passenger door, and one connector on all the others.

Image


Speaking of which, disconnect those guys for now.

Image


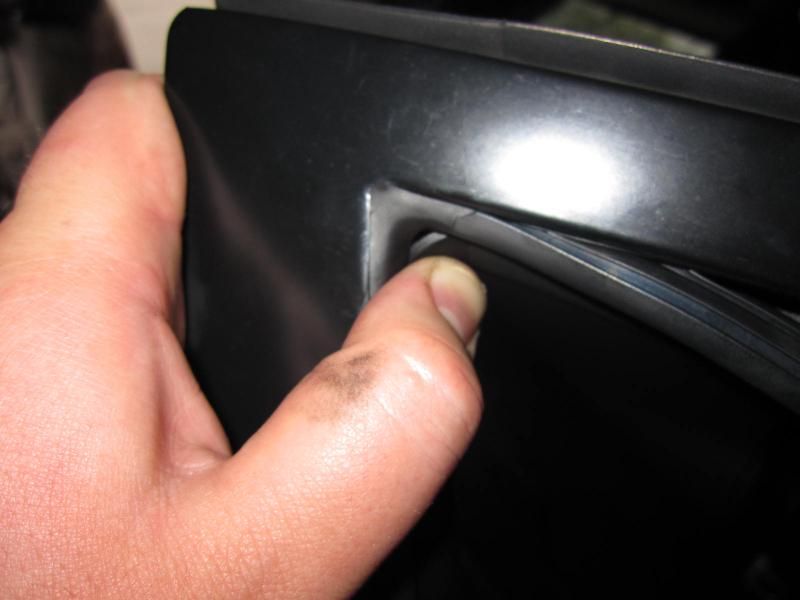
Use that computer screwdriver to open the little door inside the handle that exposes the screw.

Image


Remove the screws and throw them somewhere safe, like your magnetic parts tray.

Image


The speaker panel is a pain. Pry out as in this picture...

Image


...then sort of lift it out from the bottom. There's a claw in the front corner.

Image


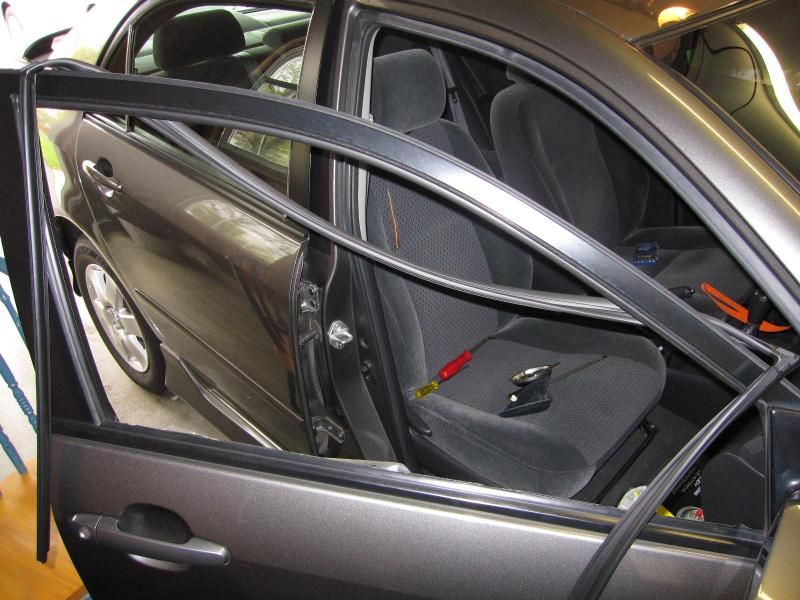
Time to remove the door panel. OK, trust me here: You're better off not using any of those stupid claw things, panel removal tools, whatever. In the front bottom corner of each door, there is a very large tapered gap between the panel and the door. Grab it here and give it a tug.

Image


You'll hear a cracking sound as the plastic clips release. Now continue around the door with your hand and make sure all those clips are disengaged. Then, holding the panel out at a slight angle, simply lift the door up and out of the way, like you are removing a picture from the wall.

Plug the window control back in and lower it all the way.

Image


Double-check that you have the right parts. Please.

Image


Pull the old window run out.

Image


Clean the channel with the Kent Acrysol. Smells like straight methanol, maybe with a little diethyl ether, to me.

Image


Now, follow MasterTechinSTL's (Toyota's) instructions. Press the window run channel into the corners.

Image


Image


For reasons unknown to mankind, it is far easier to put the outermost (closest to the outer handle) window run in first, then the innermost (closest to the hinge), on all four doors (even though logic dictates that it would be the opposite for the rear doors since the outermost window run has the least surface area in contact with the window). Grab that sucker like this:

Image


And shove it in there.

Image


Push it all the way down. You'll have to temporarily remove the run from the corner at the end to get some leverage on it. The technique for the first (outermost) side is to reach your fingers into the door and pull the window towards the innermost side to alleviate the drag on the window run.

Now for the innermost side, this is where you will want to kill yourself for not taking out the window. In fact, if I had to do this over, I would remove the window, and clean it and the rest of the channel with Acrysol, which makes the surfaces super clean and slick. But I decided to go by the books here.

This is where what we call the "shove" method comes into play. If that window run channel is getting hung up and not going down in for you because it's gripping the window too well, raise the window a few inches, get your hand into the "shoving" position, and shove at the same time you lower the window using the control with your other hand. Trust me, this sucks, and you'll be going about half a centimeter at a time, and the window channel will have a tendency to bunch up instead of going down...but it works.

NOTE: The service manual says to use a trim tool to "seat" double-sided tape at this point. My window run channels did not come with double-sided tape, and only the original fronts had a tiny strip of double-sided tape that wasn't doing anything. I would love it if someone could chime in here.

Once you're done shoving the window run in all the way around, do a thorough visual inspection (flashlight is handy) and put the window up and down several times. Then disconnect the window control panel again and set it aside.

Image


Hang the door panel on the door as if you are hanging a picture on the wall, but with a very slight angle. The top of the door has a lip that the panel seats onto, and you need to shove the panel down onto that. Once it's seated properly, push it into the door (light banging may be necessary) to seat the plastic clips, and reinstall the three screws.

Image


Connect the window control (and lock control, passenger side front). Careful! Put that claw in first before shoving down the window control.

Image


The way the armest goes on best is to tuck the clips in and just push it down straight with two hands:

Image


OK, that little speaker cover is a gigantic pain...one of my least favorite parts of this job. You need to use the exact opposite motion of how you took it out. Examine it and try to slide that claw in the inner-bottom-most corner into place first, then the rest of the bottom, then the top, in one smooth motion. It sucks. Just be patient...it will take a while to get it seated right.

Roll the window up and smile. You have avoided paying someone hundreds of dollars to do this simple job.

Image


Abbreviated instructions for the rear, since it's almost exactly the same!

Image


Remove armrest, remove window control panel, disconnect window control panel, open little door in handle using electronics screwdriver, remove screws.

Image


Grab inside corner of door panel, get it loose, rip it off, reconnect window control panel. Roll down window. Look familiar? I really do wonder just how many of the rear parts are literally identical to the front.

Image


Remove the old window run after verifying that your new part is the right size. I switched to using gloves at this point, as my hands were getting sweaty. I use Microflex Midknight nitrile gloves.

Image


Clean channel with acrysol. Install window run in corners. Shove outermost side in first, then innermost, using the shove method if necessary. Smooth out the top. Move window up and down a few times to ensure it's seated correctly. Visually inspect with flashlight.

For reinstallation of the panel, I'm going to go ahead and say follow the directions for the front. It's literally the same.

Now, do the other side of the car.

After that's done, roll all of the windows down and just go around and make sure everything is 100% seated.

Image

Image


Finally, clean all of the windows. They will be dirty from you grabbing them and trying to shove them in either direction to get the window run channels to go down in the door. I prefer Stoner Invisible Glass. I've used it for years, and it is simply the best.

Image


Enjoy not spending a lot of money to have the dealership do this job, and freedom from rattling, leaking windows. My windows are now nice and tight, and there is a very satisfying "chunk" or "thud" when they close that was never there before.
 
#19 ·
Here's the DIY. I would still watch the video, but the pictures should be enough.
Any chance you could post the part numbers of the window runs you installed? There's a bit of confusion with the TSB as none of the VIN numbers they list even remotely match the VIN on my 2003.

I ordered what I figured was the correct one for the driver's door on my 2003. The other three still look just fine although to be honest those windows don't get used very often.

I've actually never done this repair before on this vehicle so your write up will definitely help!

Here is a link to get the Acrysol: CLICK HERE
 
#21 ·
The VIN on my 2003MY starts with "JTDBR". According to Toyotapartszone mine is a 68151-12212 (which is an updated 68151-12211). According to the TSB the 68151-12211 is replaced by the 68151-02210 however because my VIN doesn't match the TSB I wasn't willing to take that chance.

So the question is is the 12212 also an updated 02210? Meh who knows.. as long as it works I'm happy TSB or not.

As far as the Acrysol goes I was able to order it online however I had to set up an account with my shop's name, etc in order to get to that point. That stuff will come in handy for other cars when I work on windows... It was $10 or so IIRC.
 
#23 ·
I would recommend doing all four in one shot if you can afford it. It's easy enough to do, and once you do the first one, the remaining three go very fast. Although I didn't initially realize it, my rears were really leaking more than my fronts, and the windows were so loose that they were rattling around in the tracks with the windows halfway down.
 
#24 · (Edited)
MD,
Thanks for the step by step DIY. Are those your pictures that you took yourself while you did it?

Generally, was that easy to do or did it end up more of a pain than the pictures suggest. I'm afraid I'll strip the rubber channel off and not be able to get it back on.

If I can take the throttle body and intake manifold off the car and replace the gaskets, is it likely I'm capable of replacing the window rubber channel without messing it up lol? In other words, is replacing window rubber channel more or less difficult than replacing intake manifold gasket on corolla?
 
#25 ·
:eek: You didn't need to quote my entire post!! Remove it if you get the chance.

Yes, I took the pictures myself. Honestly, if you think that looks like it's going to be a huge ordeal, well, maybe this job isn't for you. It took me about as much time as the intake manifold gasket. I can understand how you'd feel too chicken to do it yourself because you're afraid that you might not be able to get the new ones in. I guess I never felt that way about it because I got so sick of listening to wind whistling for 3 hours a day that I wanted to rip those #$@%& things out. Badly.

Don't worry about getting the channels in. Really, last resort, you just take the window out and be done with it. Give yourself plenty of time anyway. I managed to get them in on my car with 116k at the time.
 
#27 ·
Well I did it. It fits perfectly. I took off the inside door cover and left the window in. It took literally less than ten minutes once the door cover was removed. Not a big deal at all.

I would have took some pictures but there really isn't anything I could add to the awesome write-up!

I did use the Acrysol to remove some tar that had been stuck to the drivers rear door for several months. It worked incredibly well for that!
 
#28 ·
I did this to our 03 last fall. The run channels have a bad habit of shrinking in many makes and models of cars out there. What you *should* be looking at are the door seals on the rear doors especially. They shrink up and can be the source of leaks in air and water. You see them gap on the C pillar area.
Kent acrysol is just wax and grease remover. Nothing special in the formulation. FWIW, the glass claener shown in the post will clean up the door recesses. The W&G remover is meant to enhance the adhesion of double faced tape, and clean off the residue from the original strip of it in the corner. You may wish, however to place a small strip in its place of 3m automotive grade 1/2" tape to make sure it stays in place, but I have not seen in mine where it needed it.


Michael
Auto Glass Tech 28 Yrs
Paint and Body Shop Jobber BASF/ Sherwin Williams