Toyota Forum banner

DIY Cabin Air Filter Change

55K views 40 replies 24 participants last post by  invader  
#1 · (Edited by Moderator)
Hey TN, thought I'd throw up this DIY for changing the AC Air Filter (AKA Cabin Air Filter) for your 9th Gen Toyota Corolla. It's purpose is to filter out any particles from entering your cars interior when you turn on the fan.

Tools: Phillips Screw Driver (Stubby)
Parts: AC Filter (Cabin Air Filter) $15-$30
Time: 5 min

GO!

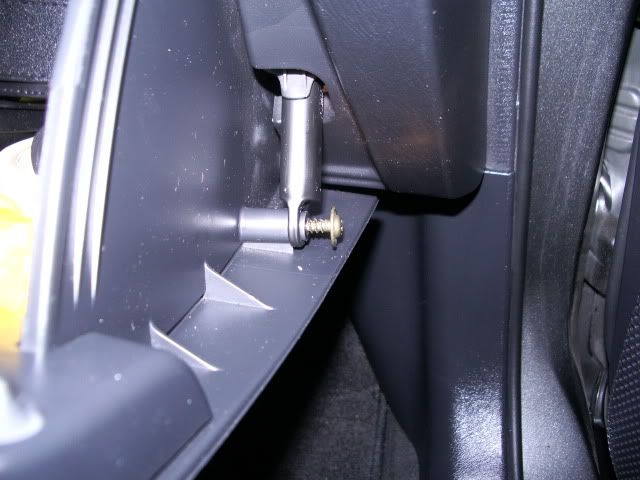
Get in the front passengers seat and open the glove box. There is a screw on the right side of the glove box near the bottom. Take the screw out with the phillips screw driver, you'll need the door open (don't loose the screw).

Screw almost out
Image


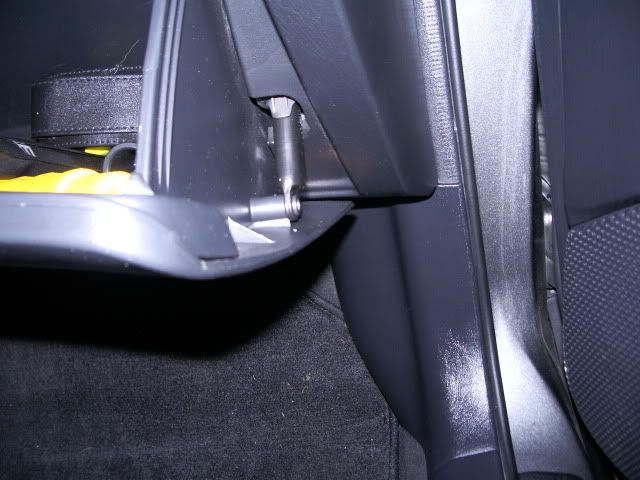
Screw out showing more of the glove box
Image


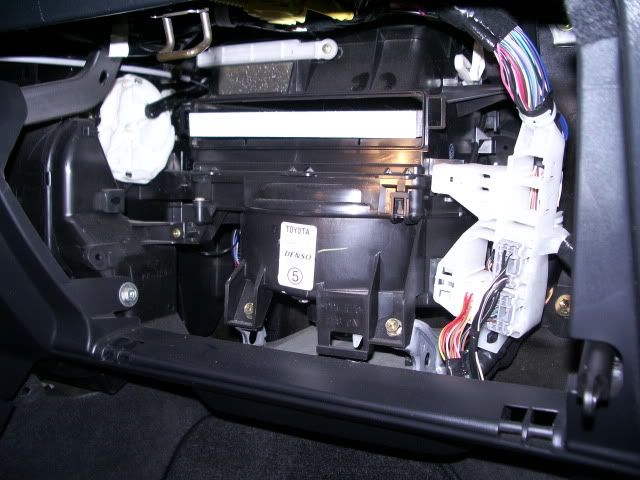
With the screw taken out slip the holder (<-lack of better term) off the peg. Open the glove box as wide as it will go. Lift up on the glove box (I jiggled mine while lifting) it should pop out its hinges on the bottom.

Now that you've taken the glove box out you will see this
Image


The AC Air Filter is housed where the black rectangular box with the clips on the left and right. Push the right and left clips in and remove the cover plate.

There is your AC Air (/Cabin Air) Filter!
Image


Remove it and replace it if it's dirty.

Here's mine at 90,000KMs (56,250 Miles).
Image


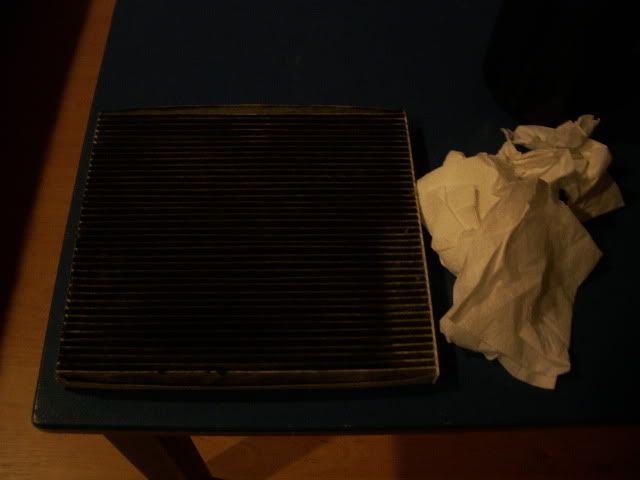
I don't think it's ever been replaced :sosad:. Because of the bad lighting I put some clean napkins to give a better idea. When I put the new filter in there was noticable difference in power and flow from the vents than from the old dirty one.

Reverse the instructions to put it back together. The new filter will have an arrow point up for reference (or atleast it should).

Hope this helps, see you around.
 
#4 ·
where you get the filter, and by any chance with the parts number? :clap:
 
#5 ·
Hey Slaander. I just went to my local auto parts store and got a Beck/Arnley Cabin Air Filter (AC Air Filter in Toyota terms) for about $17CAD ($19 after tax), just tell them your looking for a Cabin Air Filter for 200X Toyota Corolla that has AC, they might have a couple in stock! The Toyota dealership (parts division) will also carry them (most likely in stock).

The Beck/Arnley Cabin Air Filter part number is 042-2025, for the 9th Gen Toyota Corolla.
I don't know the OEM/Toyota part number and couldn't find it in my small search...
 
#8 · (Edited)
The cheapest place I could find for a Corolla cabin filter is from aircabinman on Ebay. Google search "aircabinman" and you will find it. It was $12.30 USD shipped to Canada. No taxes, duty or brokerage getting it across the border. I think it is a $1 cheaper if you are getting it shipped to the USA.

Note that the new filter is grey in colour, (carbon activated), so if your old filter is grey in colour, it is not necessarily an indication that your filter is dirty.

Suggestion: When you intall the filter, use a wax pencil and write the date on it.
 
#9 ·
#30 ·
I used the same FRAM Arm&Hammer filter and it did absolutely nothing for me.. I still get a little odor from time to time. (Weird it isn't all the time.) Going back to the Denso joint! I may have to take apart the whole blower assembly to truely clean out what ever is in there. But it's too much of work for too little of an award. :rolleyes:
 
#10 ·
I did mine today and it was really really dirty. Looks like someone threw it on the sand and into the garbage can and put it back into the ac cabin. Took me 2 mins to do. 1 min to remove and 1 min to put back. Just make sure the arrow is in the right direction. I can breathe much more easily now. People ignore this alot and should be changed in conjunction with the engine air filter.
 
#13 ·
Nice DIY. Thanks for posting.

I recently bought a 2003 Corolla with about 165K. The cabin air filter had never been changed. When I pulled it out, the accumulated debris, seeds and other life forms was incredible.

What was surprising was that the blower seemed to be working just fine even with the filter totally clogged.

Took about 10 minutes to do the replacement. I plan to check/change it every six months or so. Especially after the fall season with all the falling leaves.
 
#14 ·
Cabin Air Filter Replacement

It's not necessary to use a screwdriver to replace the cabin air filter. Just squeeze both sides of glovebox and pull out and down. The arm on the right side just stays connected and the left side will drop all the way down. No need to disconnect it.

2004 Corolla LE 130K miles. AMSOIL Signature Series 0/30, AMSOIL ATF.
 
#20 · (Edited)
It's not necessary to use a screwdriver to replace the cabin air filter. Just squeeze both sides of glovebox and pull out and down. The arm on the right side just stays connected and the left side will drop all the way down. No need to disconnect it.
The glovebox door has a plastic damper mechanism on it to prevent the glovebox door from slamming open. The damper has two holes in it, one of which "snaps" over a split plastic pin. If you squeeze the two sides and pull the door down, it will stop before there is enough room to get the cabin filter out. You then need to reach inside and disconnect the damper from the plastic split pin in order to drop the glovebox door further to create enough of a gap to change the cabin filter.

If you simply squeeze the sides of the glovebox and are able to pull the door down enough to change the filter as suggested above, I suspect that either the damper is broken, or has been previously disconnected, or the split plastic pin has been previously broken on your vehicle. If your glovebox door drops "like a rock", then you have the situation described above. Every time I go in for a quick oil change, they pull the cabin filter out and try to upsell me a new one. In the process, they disconnect my damper. It is very annoying. I have to re-install it when I get home.

In my opinion, it is probably easier for the average DIYer to remove the Philips screw that secures the damper to the glovebox door than it is to reach inside the disconnect the damper. Once you know how to do it, however, it is not very difficult.
 
#21 ·
I wasn't paying attention to how the old one was positioned in there. Now I'm having trouble trying to figure out which side of the new filter goes in. Do the sides with the paddings face out and in or to the sides? When I try to fit it in with the paddings to the sides, it won't fit and feels like it's bending when I try to push it in. And ya, also, which way is the airflow up or down?
 
#16 ·
cabin air filter direction

When I replaced my cabin air filter, the debris was on top of the filter, which means to me that the air flow is going down, from top to bottom. The arrow on the original filter was pointed upwards, which makes me think it simply meant to put the filter in with the arrow up, but that doesn't make sense, because usually with home A/C filters, the arrow is indicative of air flow, so I'm not sure.
 
#17 ·
The airflow direction of the filter for the 03-07 Corolla should be down. If your old filter airflow arrow was pointing up, then the filter was installed wrong.

Think about it. If the debris was on the top (up)side of the old filter when you removed it, the airflow was going down (from top to bottom).
 
#22 ·
#23 ·
#25 ·
The owners manual for my 2007 Rolla tells you to squeeze the sides of the glove box in and open the box fully. Never heard of taking a screw out. I would suggest the replacement be timed according to your conditions. Here in southern Arizona, with all it's dust, I replace mine once a year. The Fram "Freshbreeze" works good and the A/C feels like a new motor was installed when the restrictive filter is replaced.
 
#27 ·
sorry to revive such an old thread, but thanks for the photos on removing the glove box. i recently checked the health of my ac air filter and had issues figuring out how to put the glove box back in. in 2010 corolla's the little black thing on the side is held on with a retention clip, not a screw. this was throwing me off and this thread cleared it up... thanks!
 
#28 ·
I'm going to replace my Cabin Air Filter soon.

The microguard (3040) (made by Wix) filter comes up with the dimensions:
Length (In): 8.620 Inch
Width (In): 7.830 Inch
Height (In): 0.750 Inch

The Wix (24873) comes up as:
Length (In): 8.661 Inch
Width (In): 7.874 Inch
Height (In): 0.787 Inch

The Fram Fresh breeze (CF10133) comes up as:
Length (In): 7.840 Inch
Width (In): 7.840 Inch
Height (In): 0.750 Inch

I would prefer the Fram Fresh Breeze however the size difference bothers me. The wix and microguard are pretty similar in size. The fram is way off though. I'm thinking that maybe they have the dimensions wrong in the system.
 
#31 ·
Glad someone else pointed out some things I came to. The owners manual, and maybe the assembly itself, must have changed over the years because my 03 manual specifically mentions removing the screw and the damper before squeezing the box sides to pull it out. Maybe they either tweaked the design for the later years or realized that disconnecting the damper wasn't necessary, but just wanted to ensure people that there has been at one point instructions to disconnect the damper as a part of the process.

As for the direction of the arrow for flow, if you have a filter that is not the genuine Toyota filter, the directions will be different based on whatever that manufacturer decided to do. Toyota's OEM part specifically tells you to point the arrow up. It's not indicating flow direction, it's simply telling you which side to face up to ensure proper filtration, not leaving it up to you to figure out which way the air is flowing. To me it's an easier way to ensure people install correctly. Also, I used a TYC filter once, and it was not a good fit. It was ever so slightly longer than the OEM filter, so it stuck out more from the box, and when you closed the lid over it one corner of the filter would collapse inward. When I removed this filter to replace it with another OEM one, the corner that got bent stayed that way from being pressed for so long. I have a picture of the two somewhere. After that experience I just stick with the OEM part. It's not expensive, and you're only buying it maybe once a year.

Someone earlier mentioned that they regularly take I out and tap it to clear it. This isn't a bad idea, and may get some longer lifespan out of the filter. Didn't think of that before.

Finally, great write-up, Exage. My only recommendation might be to have a second person snap a pic of your hands on either side of the box showing the squeeze that needs to happen to pop it out. Thanks for providing this. I can send it to a friend of mine in another part of the country with a 9th gen Corolla so she can do her own filter some time.
 
#32 ·
You don't have to remove the damper screw. There is plenty of room on all Corollas (I have changed hundreds of filters). On a car like a Gen 5 Camry or Gen 4 Lexus ES you have to as there isn't room.

Removing the screw and taking off the damper will eventually wear out the plastic screw hole and the plastic damper mount on the dash. I always push in the sides, reach my arms through, pull cover, remove filter, install filter, install cover, close glove box. Doing it this way also helps to keep all the stuff in the glove box and avoid it being installed wrong in the dash slots if it pops out.

I have used the TYC with good results. I wonder why yours was longer.
 
#33 ·
I dunno. Maybe I just got a defective one, or maybe it was mislabeled for the Corolla and meant for a different car. Currently the OEM one doesn't cost much more than the TYC one I bought, so I'm ok with sticking with the OEM part here.

I never did try doing the job without removing the damper arm and the box fully, but knowing I can avoid doing so is good for future jobs. I just went by what the manual said to do.